📝 9 Mar 2025
Earlier we created a PR Test Bot that will Build and Test the Pull Requests for Apache NuttX RTOS. Our Test Bot kicks into action when we post a PR Comment…
## For Oz64 SG2000 RISC-V SBC
@nuttxpr test oz64:nsh

## For QEMU Emulator: Arm64 and RISC-V
@nuttxpr test qemu-armv8a:netnsh
@nuttxpr test rv-virt:knsh64
Today we extend our Test Bot to Build and Test the Pull Requests for PINE64 PinePhone. Yep on the Real Arm64 PinePhone Hardware!
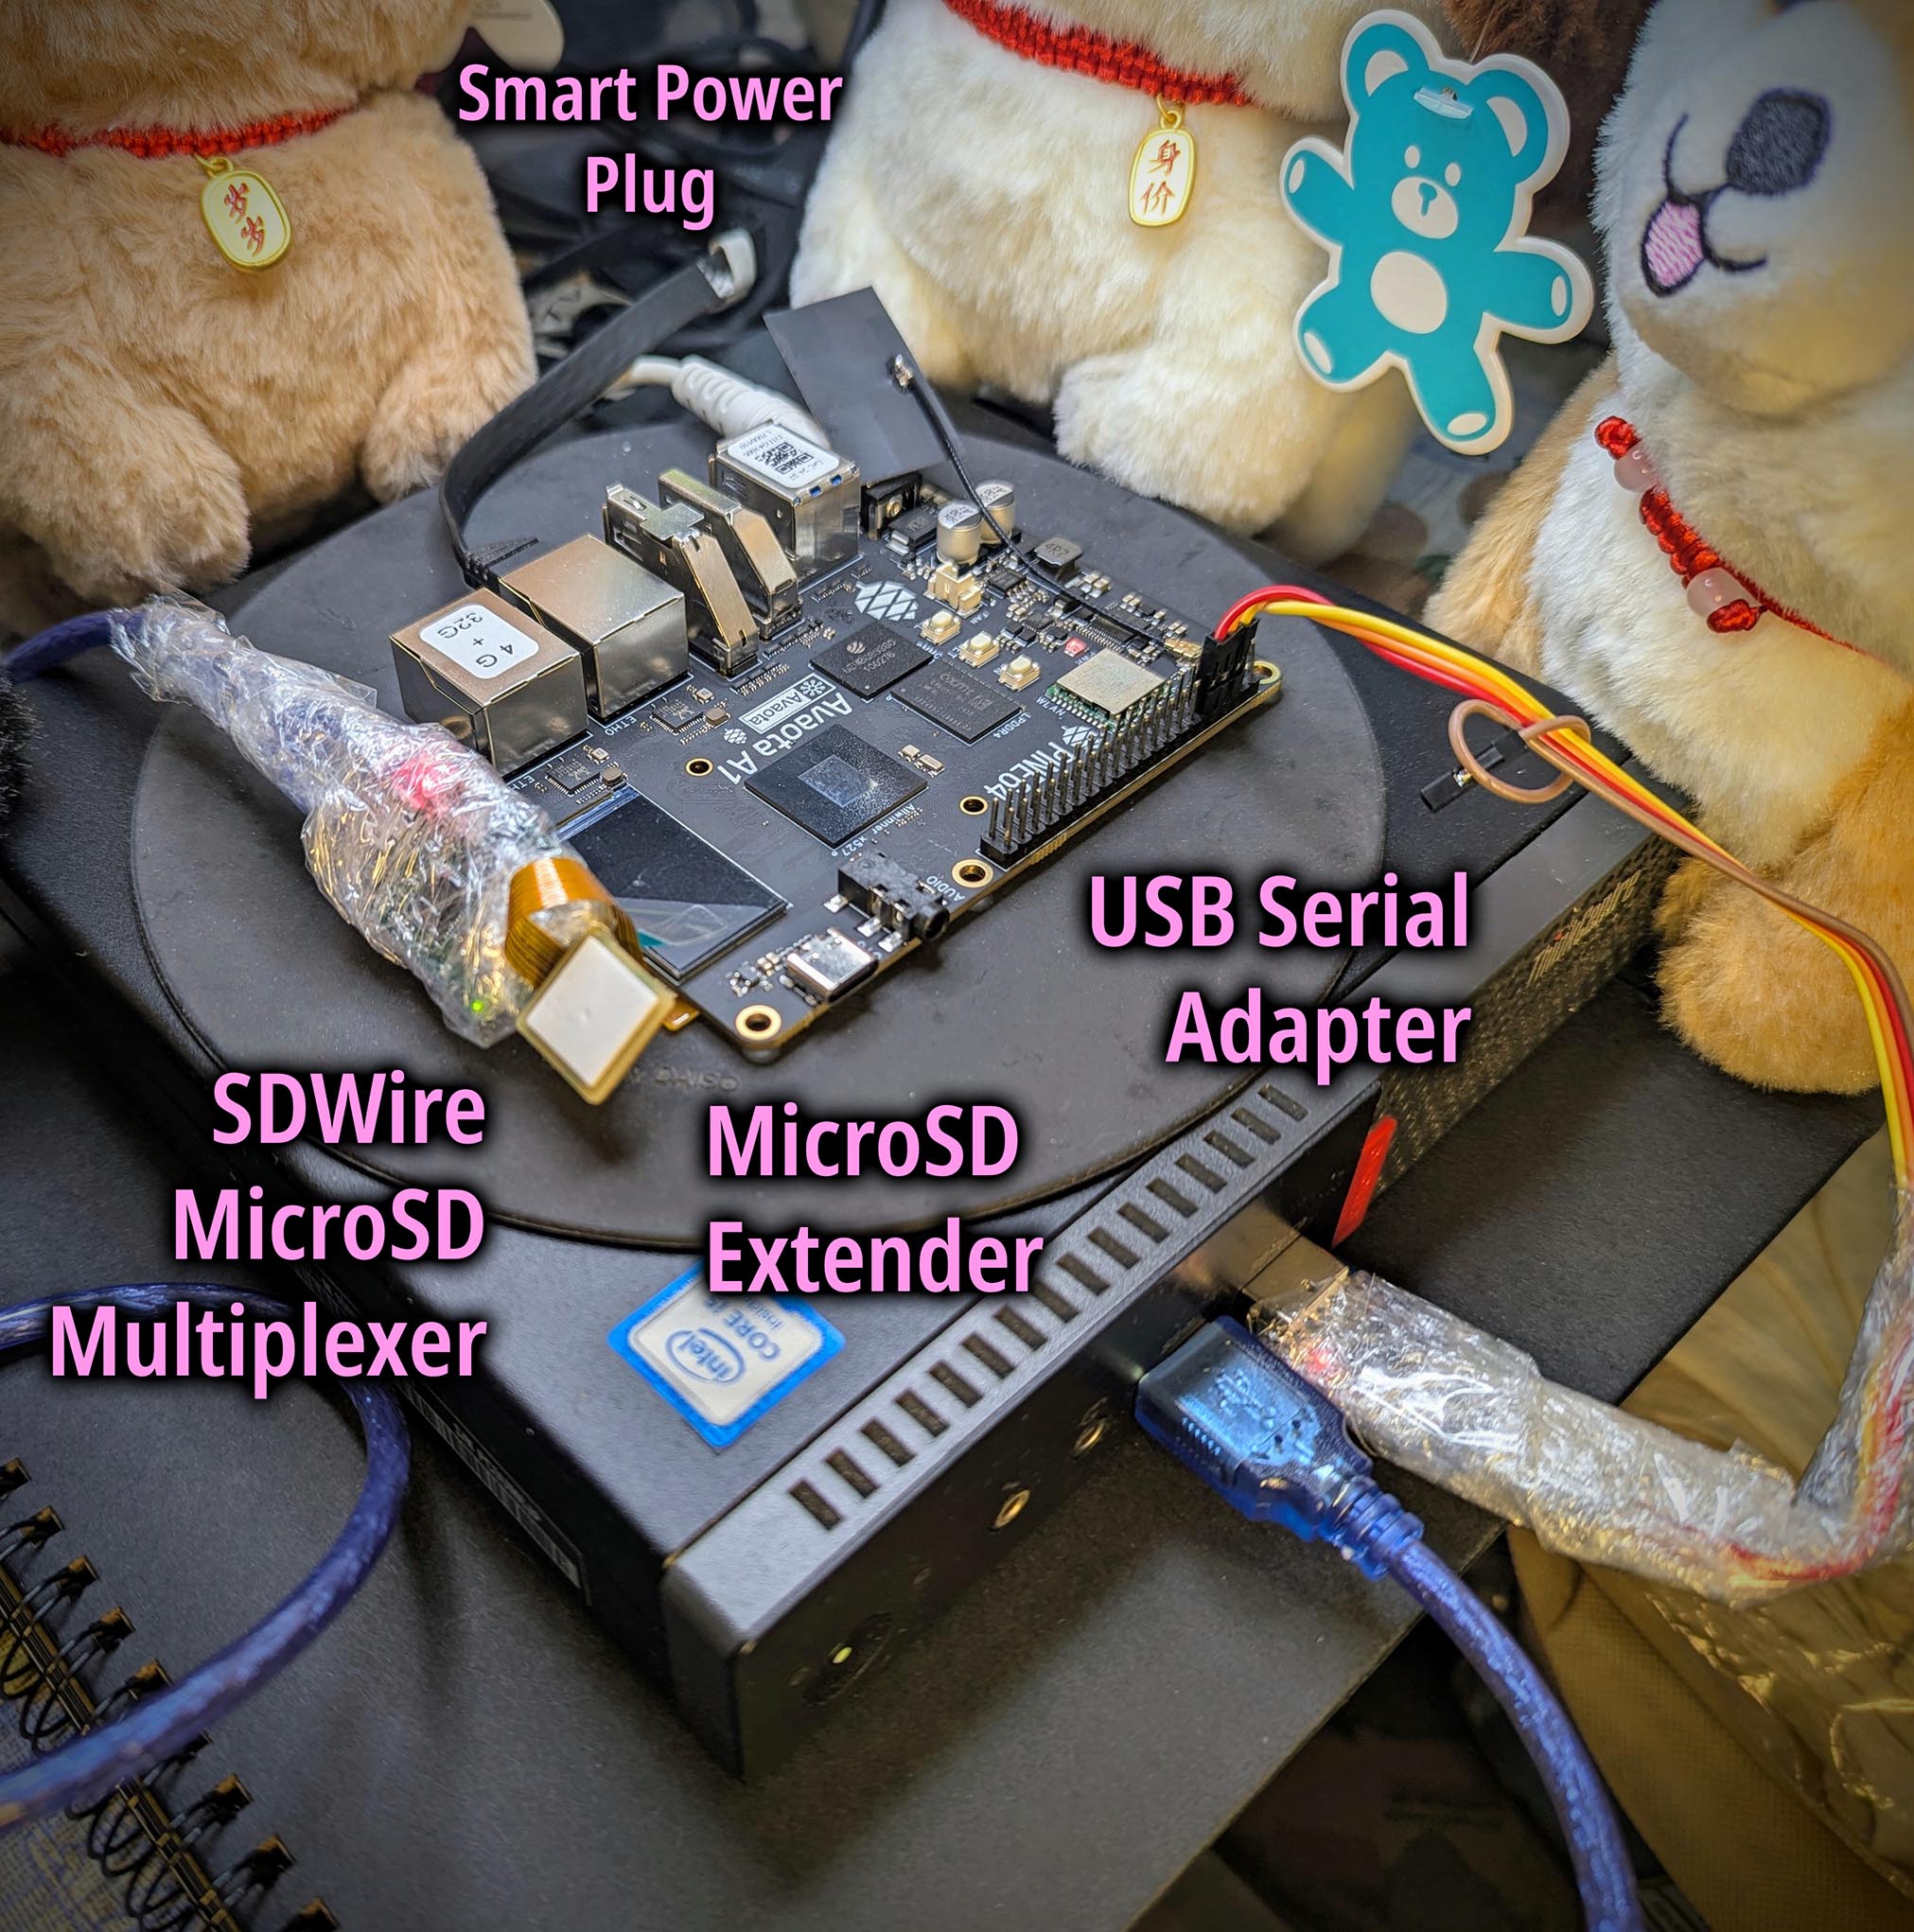
@nuttxpr test pinephone:nshWe used Special Hardware: SDWire MicroSD Multiplexer (pic above)
Controlled by a Single-Board Computer: Yuzuki Avaota-A1 (Open Hardware)
PinePhone Test Bot kinda works!
Though PinePhone Battery complicates Hardware Testing
We might pivot to another Arm64 Single-Board Computer
Maybe we’ll port NuttX to Allwinner A527 SoC?
MicroSD Multiplexer: What’s that? (Pic above)
SDWire MicroSD Multiplexer is an ingenious gadget that allows Two Devices to access One Single MicroSD Card. (One device at a time, not simultaneously)
Why would we need it?
To Test NuttX on Arm64 Devices (PinePhone), we need…
A Computer (“Test Server”) to copy the NuttX Image to a MicroSD Card
Then boot it on the Arm64 Device (“Test Device”)
Our Test Bot got no fingers and it can’t Physically Swap a MicroSD between Test Server and Test Device.
That’s why I bought a MicroSD Multiplexer to Electrically Swap the MicroSD between the two machines…

How does it work?
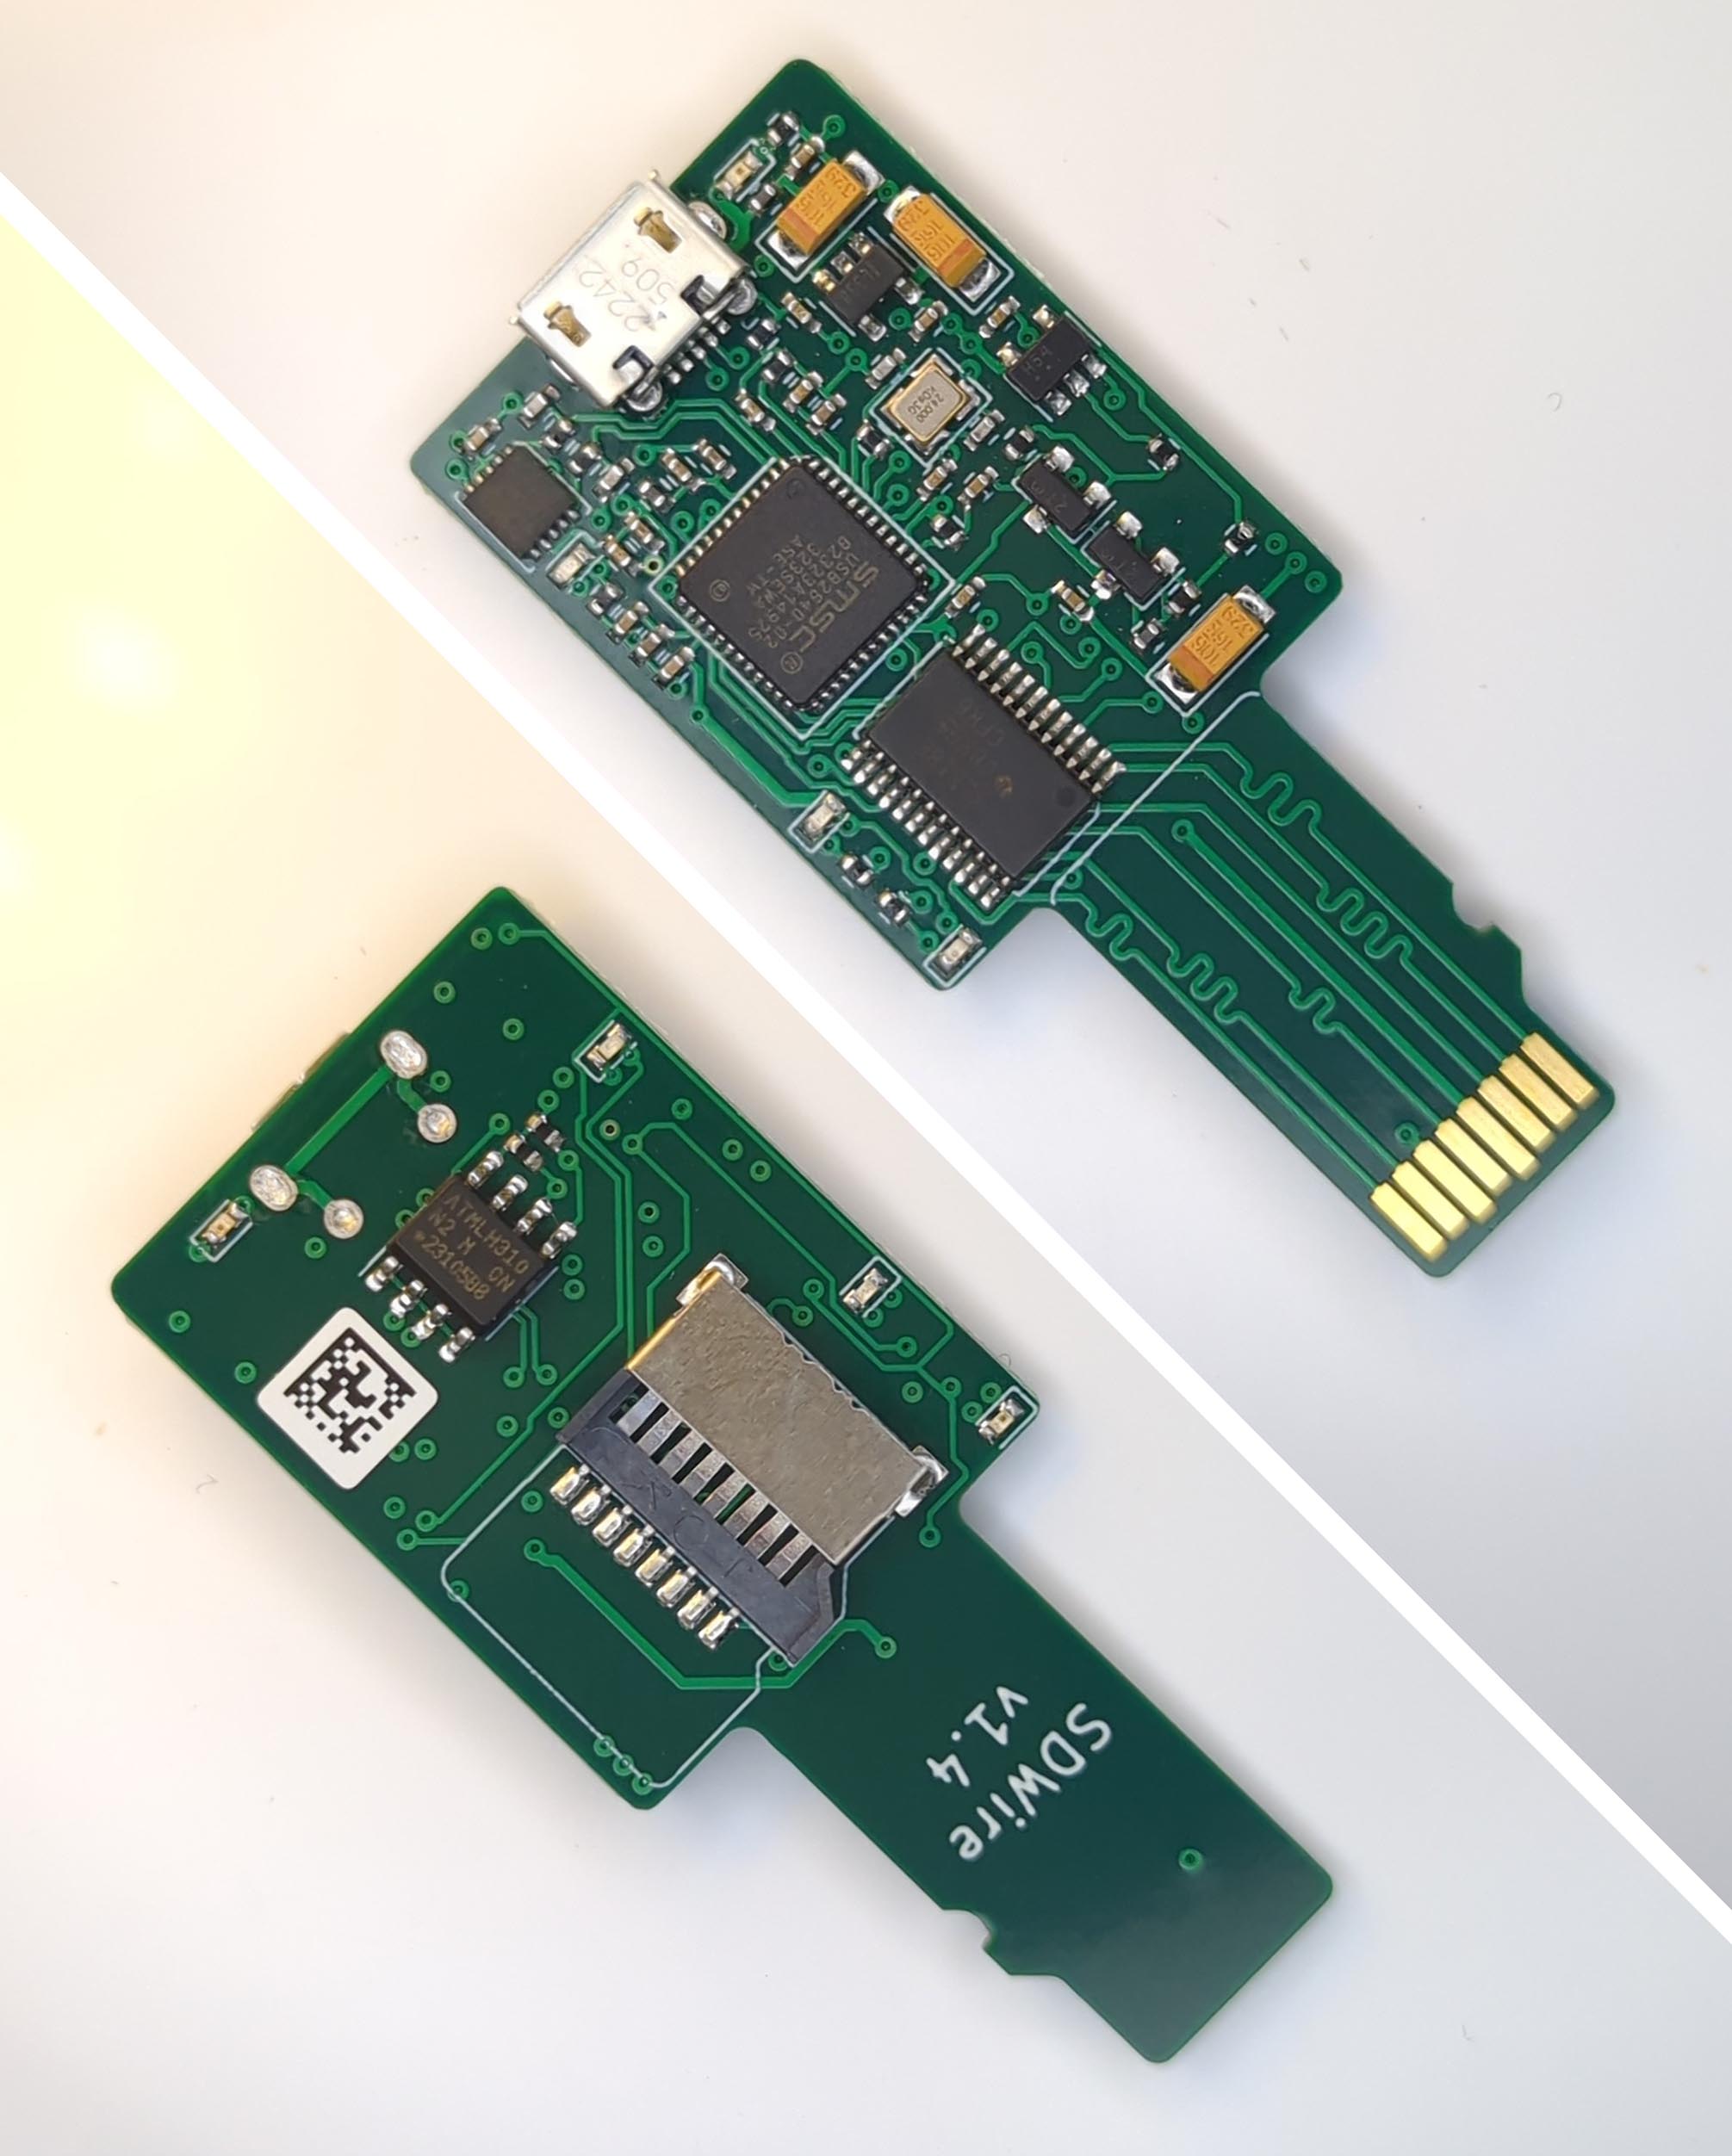
According to SDWire Schematic, the gadget has a TS3A27518EPWR Multiplexer inside. (Works like FTDI, but 6 Data Channels)
Our Test Bot will run a Command-Line Tool (provided by SDWire) to “Swap” the MicroSD between our Test Server and Test Device.
Micro-USB Port of SDWire exposes two functions…
USB Mass Storage: For reading and writing the MicroSD
SDWire Multiplexer: For swapping the MicroSD between devices
First we prepare our Test Server: Avaota-A1 SBC…
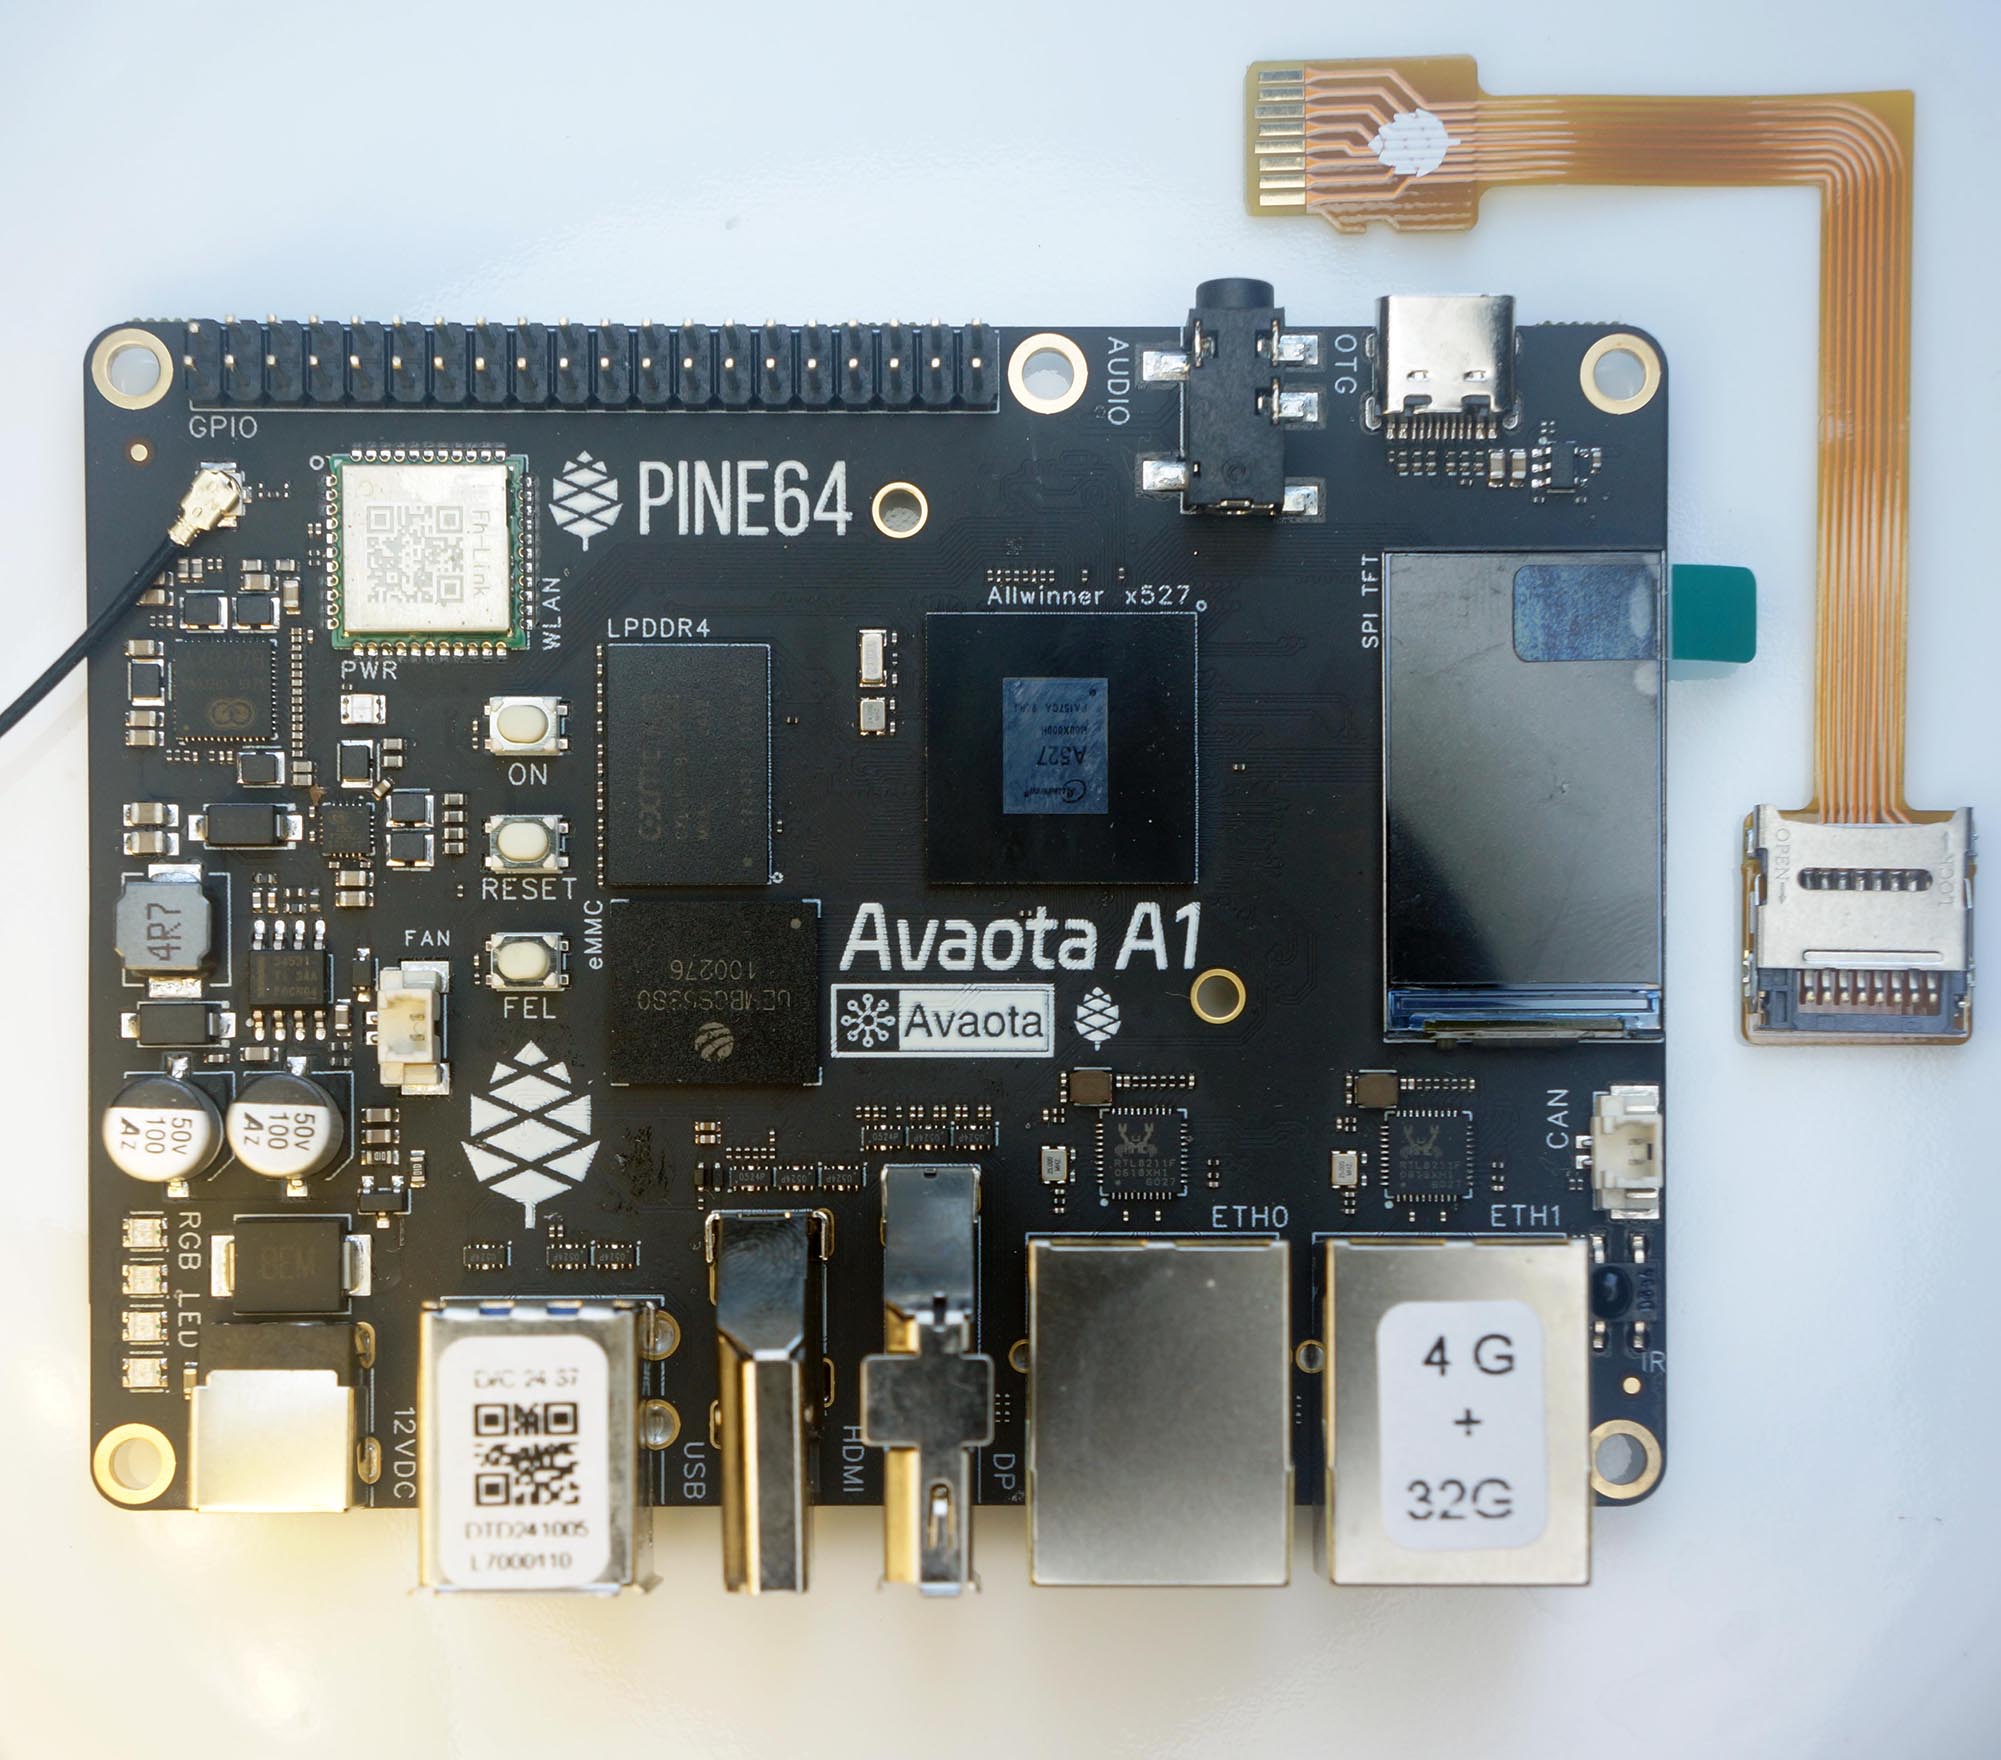
What’s this Single-Board Computer? (Pic above)
To assemble our Test Bot, I bought a Yuzuki Avaota-A1 Single-Board Computer. We download the Latest AvaotaOS Release (Ubuntu Noble GNOME) and uncompress it…
wget https://github.com/AvaotaSBC/AvaotaOS/releases/download/0.3.0.4/AvaotaOS-0.3.0.4-noble-gnome-arm64-avaota-a1.img.xz
xz -d AvaotaOS-0.3.0.4-noble-gnome-arm64-avaota-a1.img.xz
Write the .img file to a MicroSD with Balena Etcher. Boot our SBC with the MicroSD and Login via SSH…
## User `avaota`, Password `avaota`
## Root Password is also `avaota`
$ ssh avaota@avaota-a1
Password: avaotaWhile Booting: Our SBC shows a helpful message on the Onboard LCD, it should disappear in a while…
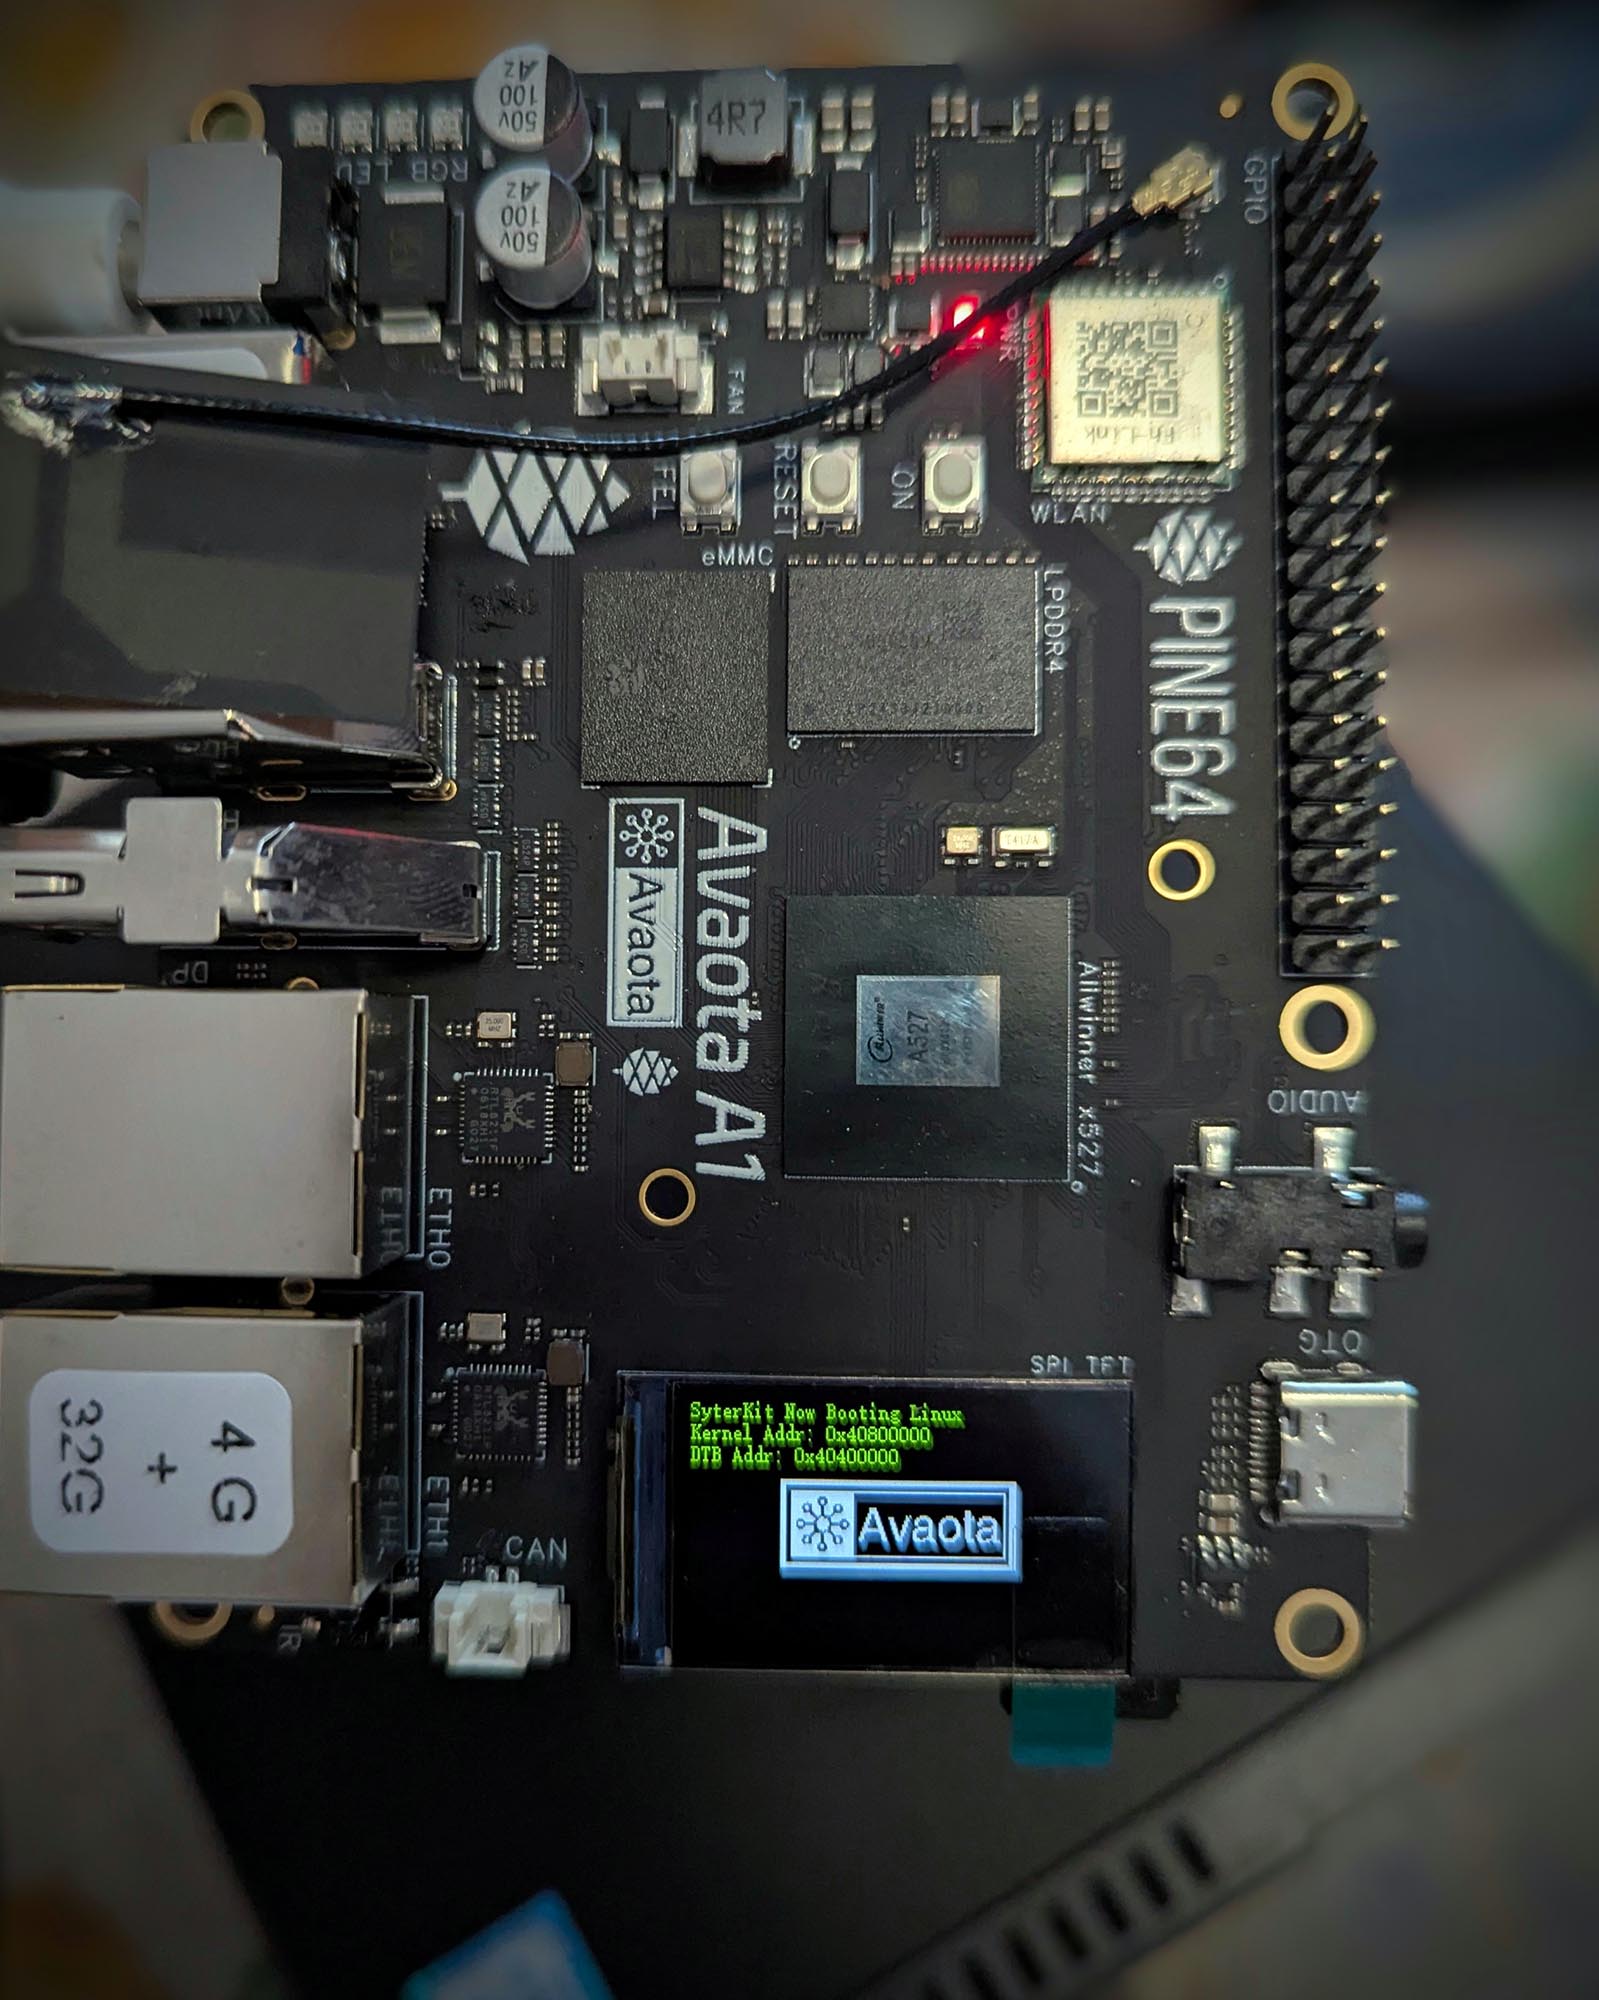
Hmmm our SBC is forever showing “Booting Linux”?
Make sure we’re booting AvaotaOS, not Armbian Ubuntu. Armbian will fail with a Page Table Panic…
Kernel panic - not syncing:
Failed to allocate page table page
Also: Always boot AvaotaOS from MicroSD. Fresh from the Factory, our SBC eMMC boots to Android by Default…
Linux version 5.15.119-gc08c29131003 (yuzuki@YuzukiKoddo)
Android (8490178, based on r450784d)
clang version 14.0.6 (https://android.googlesource.com/toolchain/llvm-project 4c603efb0cca074e9238af8b4106c30add4418f6)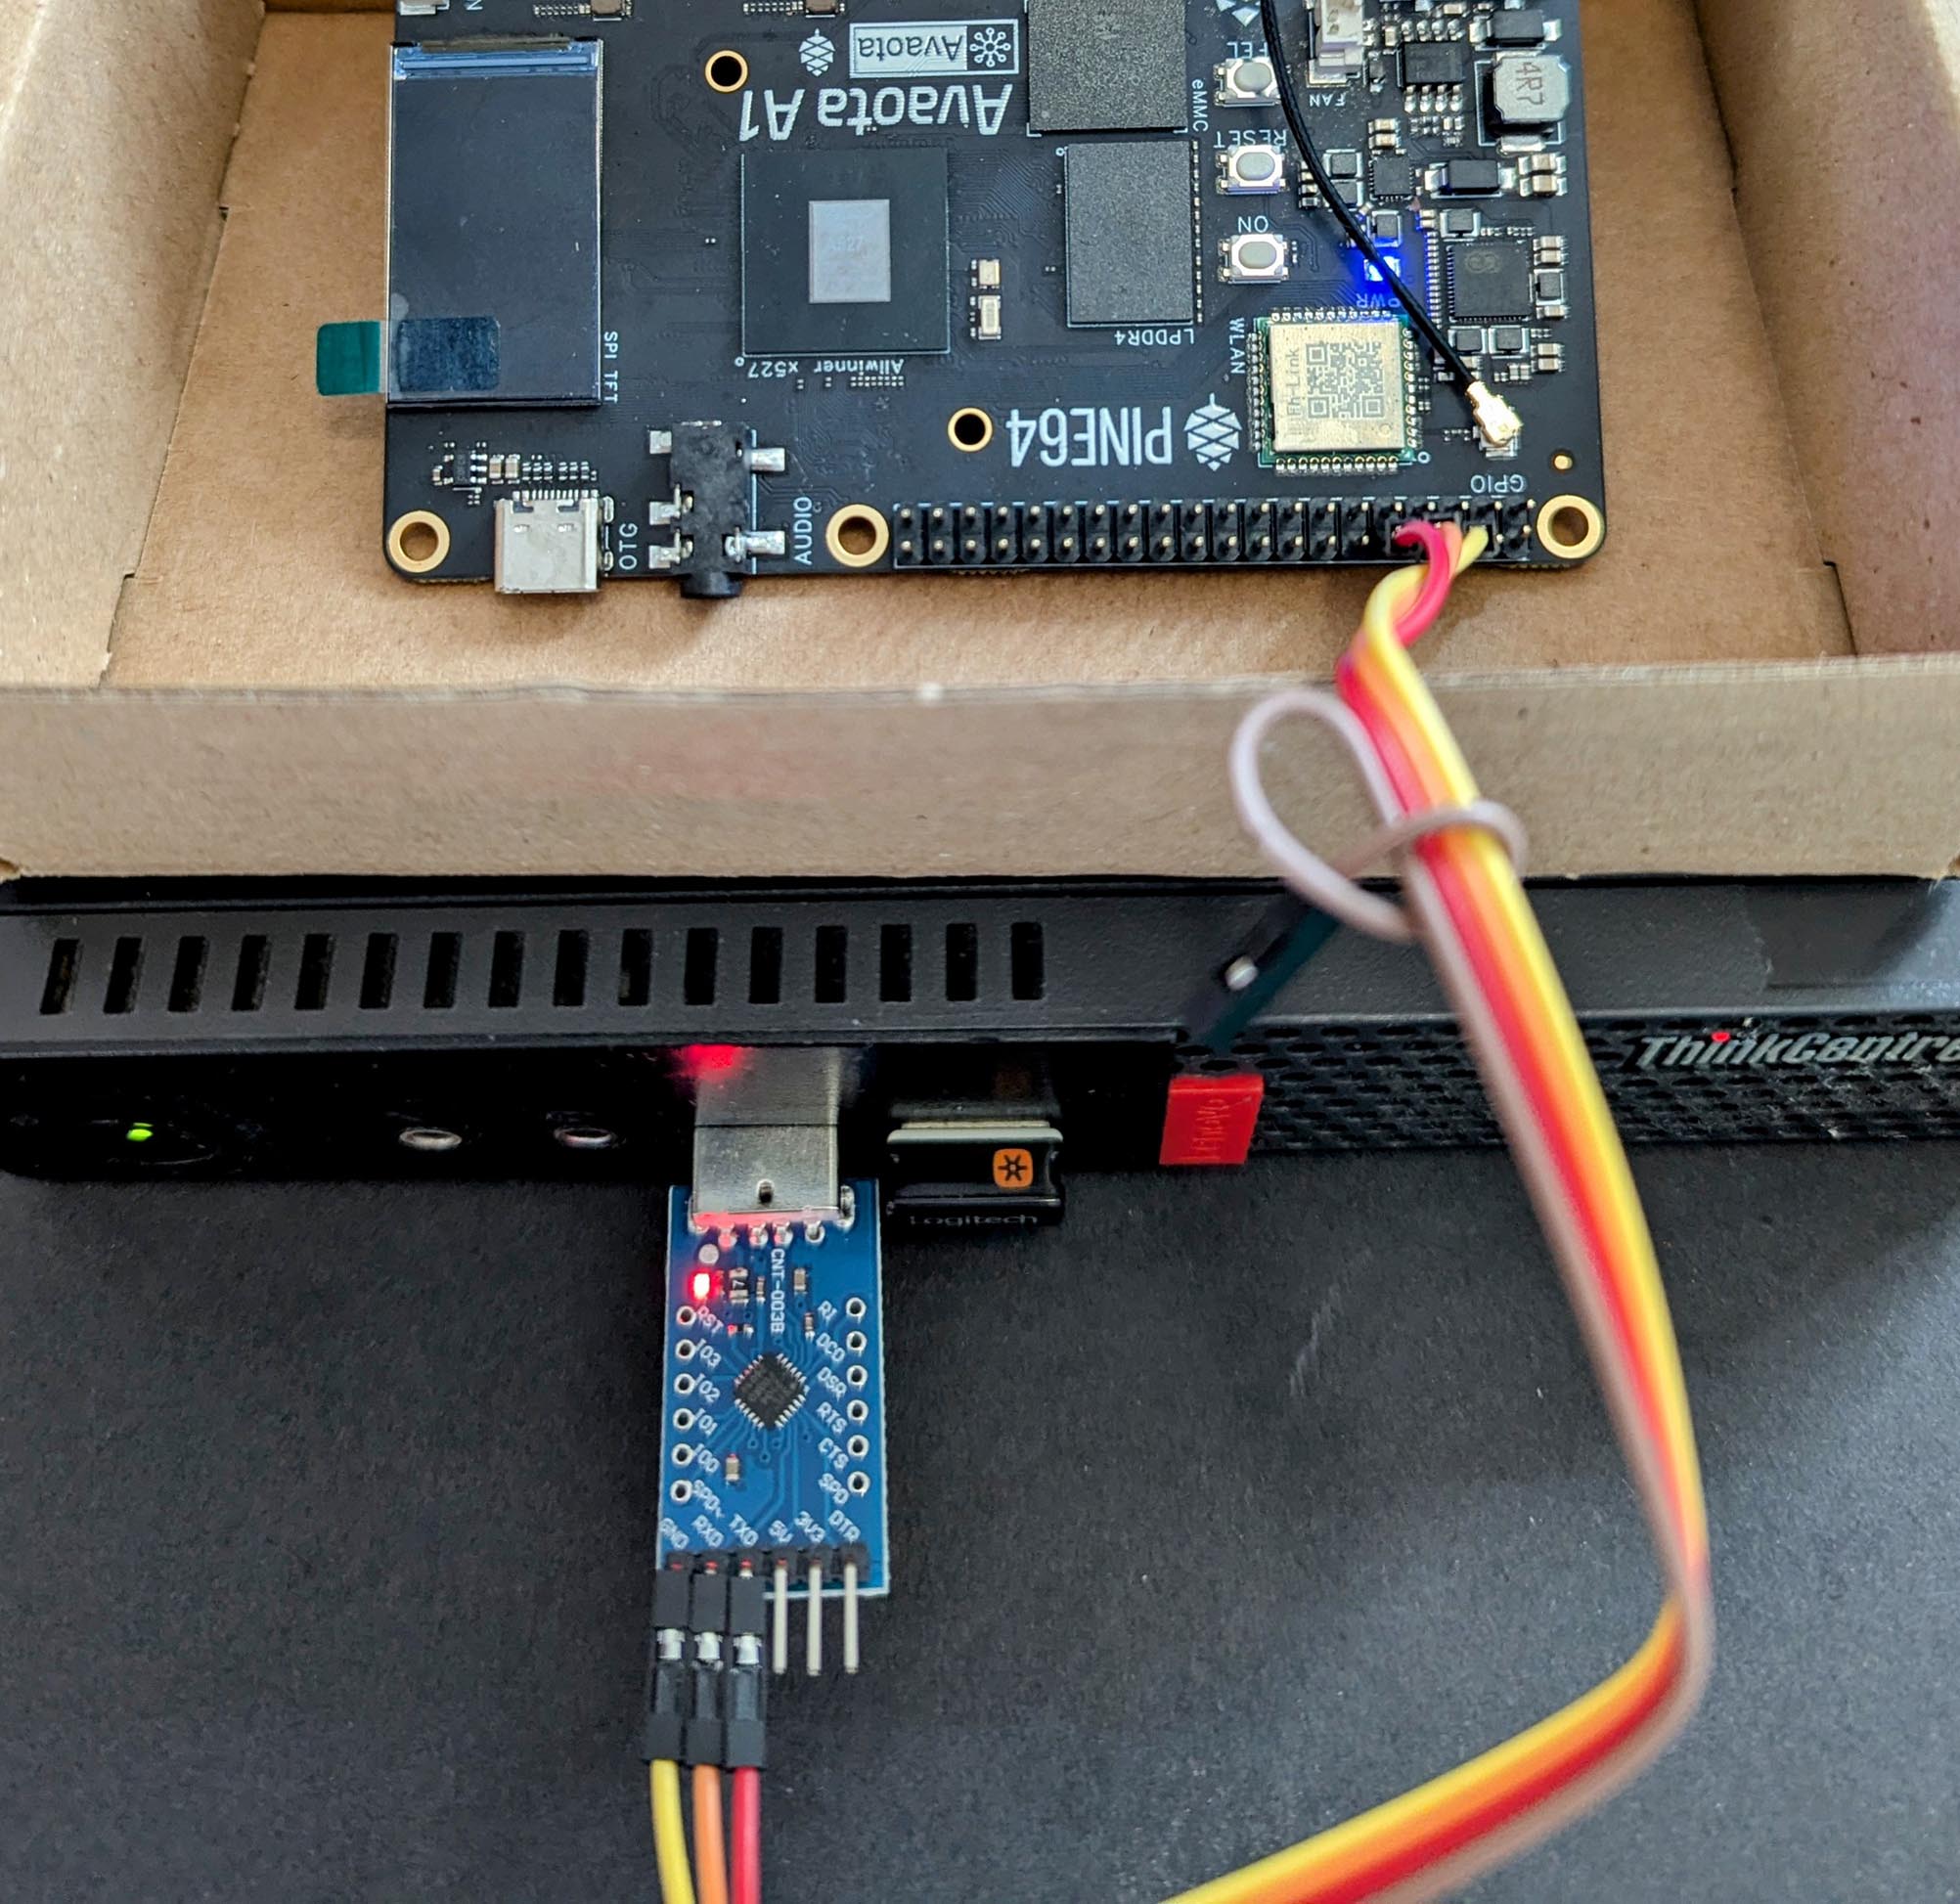
How to troubleshoot? And see the Boot Logs?
Connect a USB UART Dongle (CH340 or CP2102) to these pins (pic above)
| Avaota-A1 | USB UART | Colour |
|---|---|---|
| GND (Pin 6) | GND | Yellow |
| TX (Pin 8) | RX | Orange |
| RX (Pin 10) | TX | Red |
Boot Log will appear at /dev/ttyUSB0…
## Allow the user to access the USB UART port
## Logout and login to refresh the permissions
sudo usermod -a -G dialout $USER
logout

## Connect to USB UART Console
screen /dev/ttyUSB0 115200
Why choose Avaota-A1?
It’s Open Source Hardware, available from Multiple Makers. (Quite affordable too: $55)
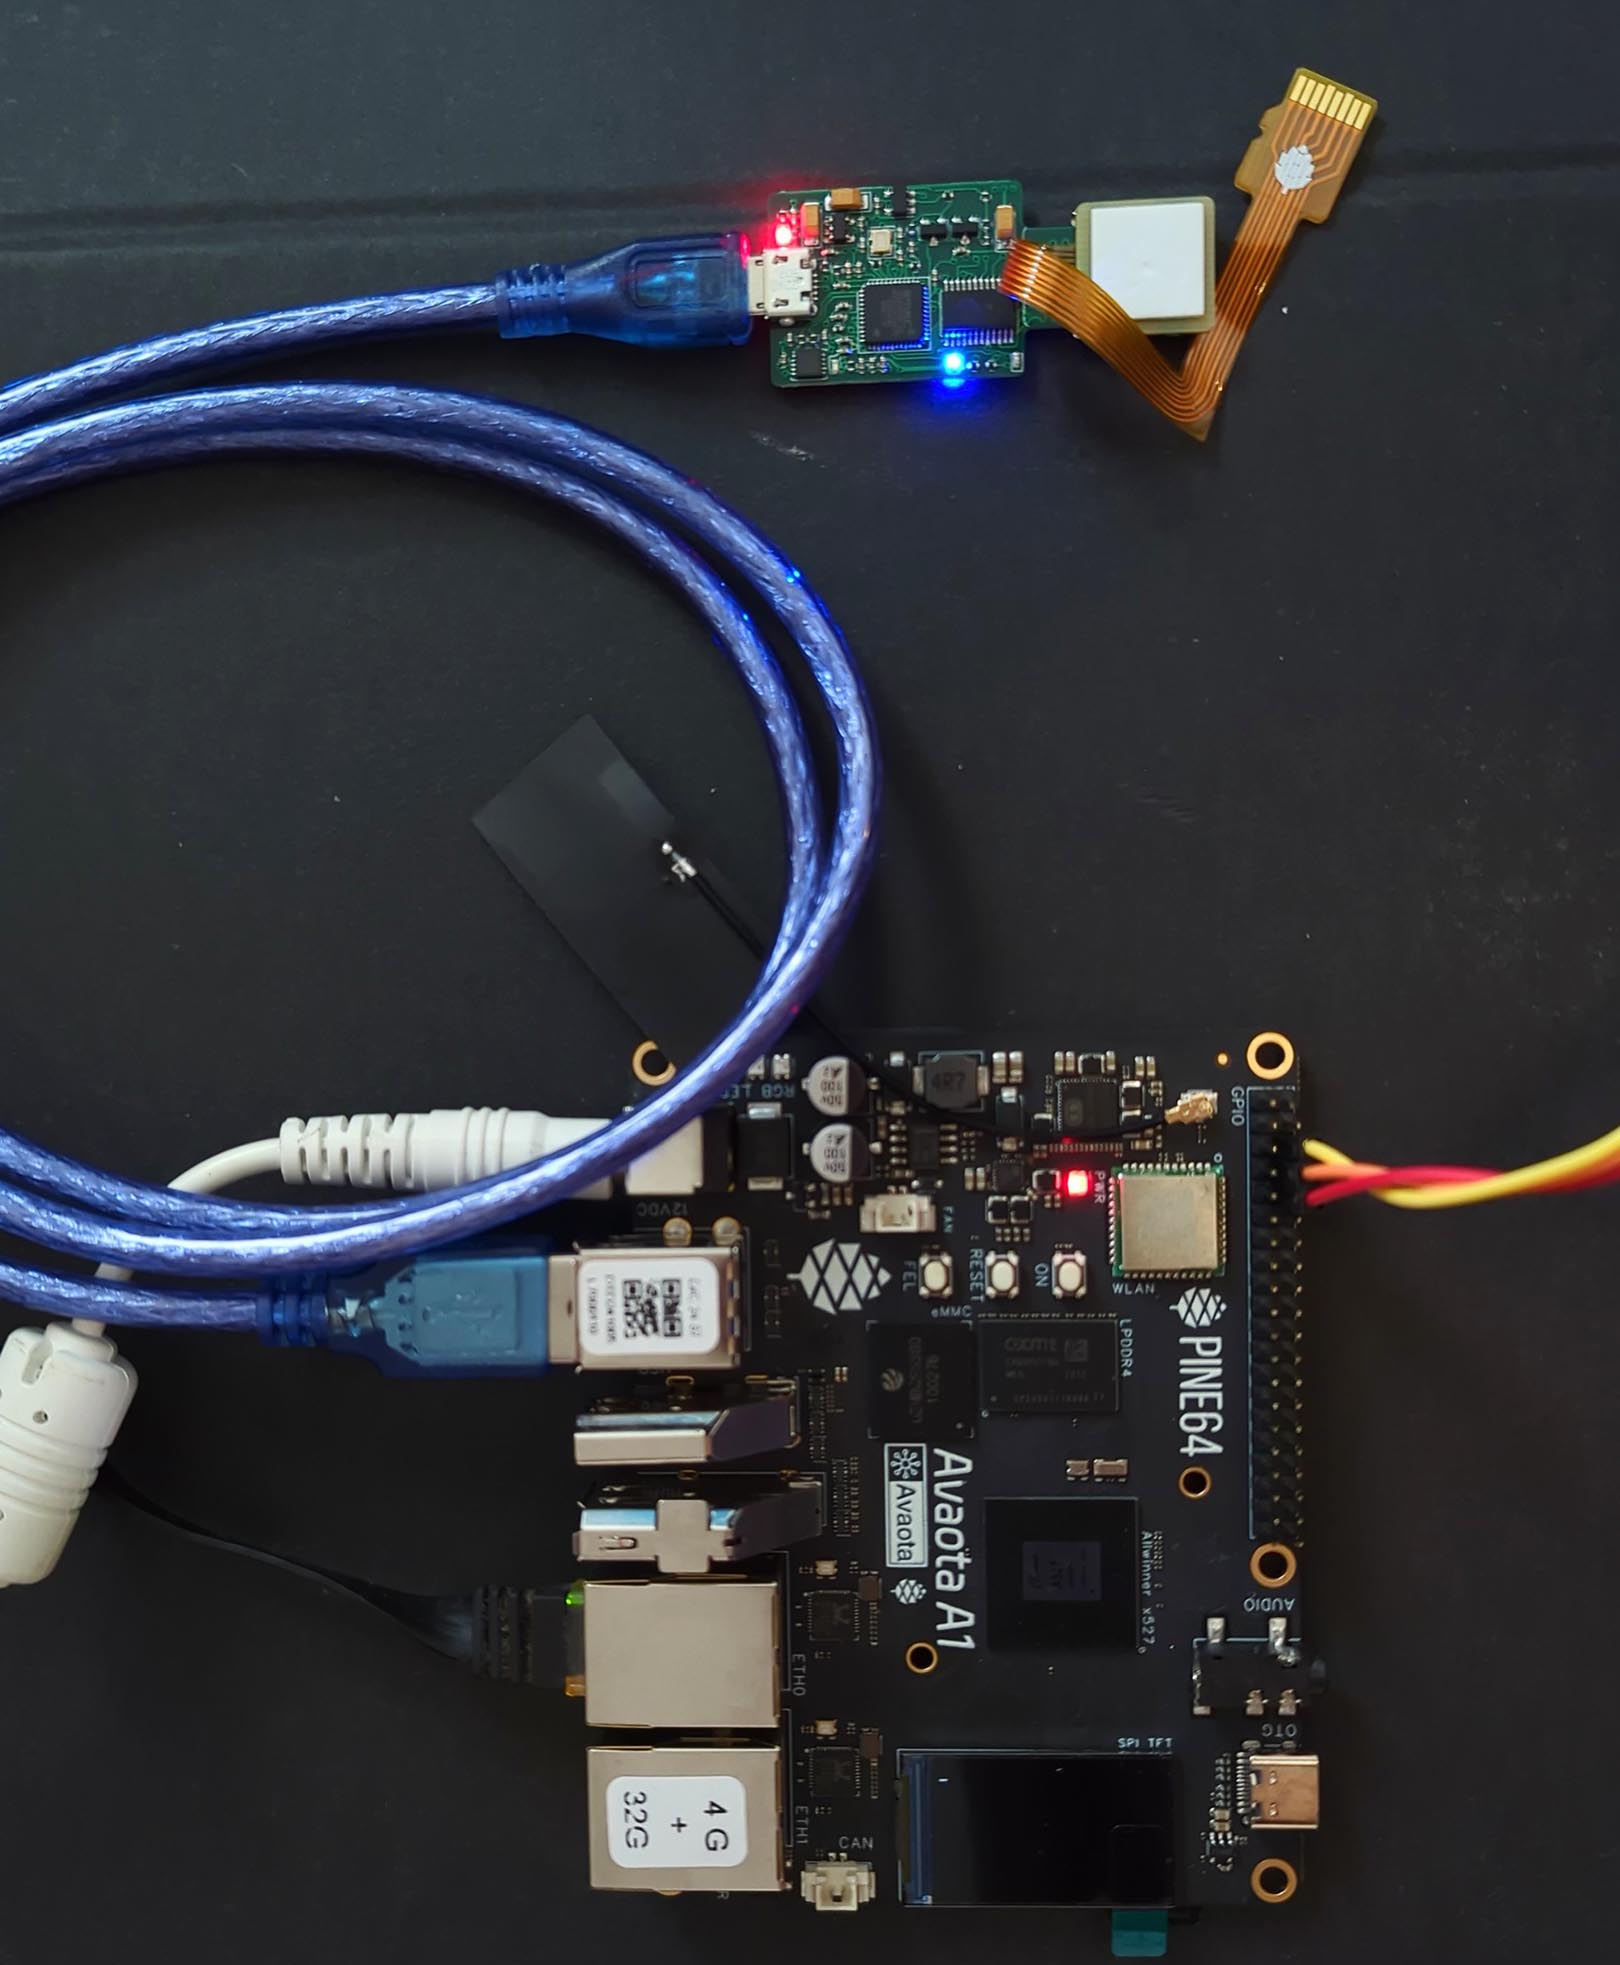
With a Micro-USB Data Cable: Connect SDWire MicroSD Multiplexer to our SBC (pic above). Check that it’s a USB Data Cable, Not Power Cable. Mini-USB won’t work either.
On our SBC, run “sudo dmesg” to watch the Magic of SDWire…
## Show the Linux Kernel Log
$ sudo dmesg

## Linux discovers our USB Device
usb 1-1: New USB device found, idVendor=0424, idProduct=2640, bcdDevice= 0.00
hub 1-1:1.0: USB hub found
hub 1-1:1.0: 3 ports detected

## Yep it's a MicroSD Storage Device
usb 1-1.1: New USB device found, idVendor=0424, idProduct=4050, bcdDevice= 1.76
usb 1-1.1: New USB device strings: Mfr=1, Product=2, SerialNumber=3
usb 1-1.1: Product: Ultra Fast Media Reader
usb-storage 1-1.1:1.0: USB Mass Storage device detected
scsi host0: usb-storage 1-1.1:1.0

## Aha! It's also an SDWire Multiplexer
usb 1-1.2: New USB device found, idVendor=04e8, idProduct=6001, bcdDevice=10.00
usb 1-1.2: New USB device strings: Mfr=1, Product=2, SerialNumber=3
usb 1-1.2: Product: sd-wire
usb 1-1.2: Manufacturer: SRPOL
usb 1-1.2: SerialNumber: sd-wire_02-09

## MicroSD is now accessible at /dev/sda1
scsi 0:0:0:0: Direct-Access Generic Ultra HS-SD/MMC 1.76 PQ: 0 ANSI: 0
sd 0:0:0:0: [sda] 30318592 512-byte logical blocks: (15.5 GB/14.5 GiB)
sd 0:0:0:0: [sda] Write Protect is off
sd 0:0:0:0: [sda] Mode Sense: 23 00 00 00
sd 0:0:0:0: [sda] No Caching mode page found
sd 0:0:0:0: [sda] Assuming drive cache: write through
sd 0:0:0:0: [sda] Attached SCSI removable disk
sda: sda1
Next we test the SDWire Tools…
How to control SDWire? And flip the MicroSD from Test Server to Test Device?
Based on the SDWire Instructions, we install the SDWire Tools…
## Download the Source Code for `sd-mux-ctrl`
sudo apt-get install libftdi1-dev libpopt-dev cmake pkg-config
git clone https://github.com/3mdeb/sd-mux
cd sd-mux
## Build and Install `sd-mux-ctrl`
mkdir build
cd build
cmake ..
make
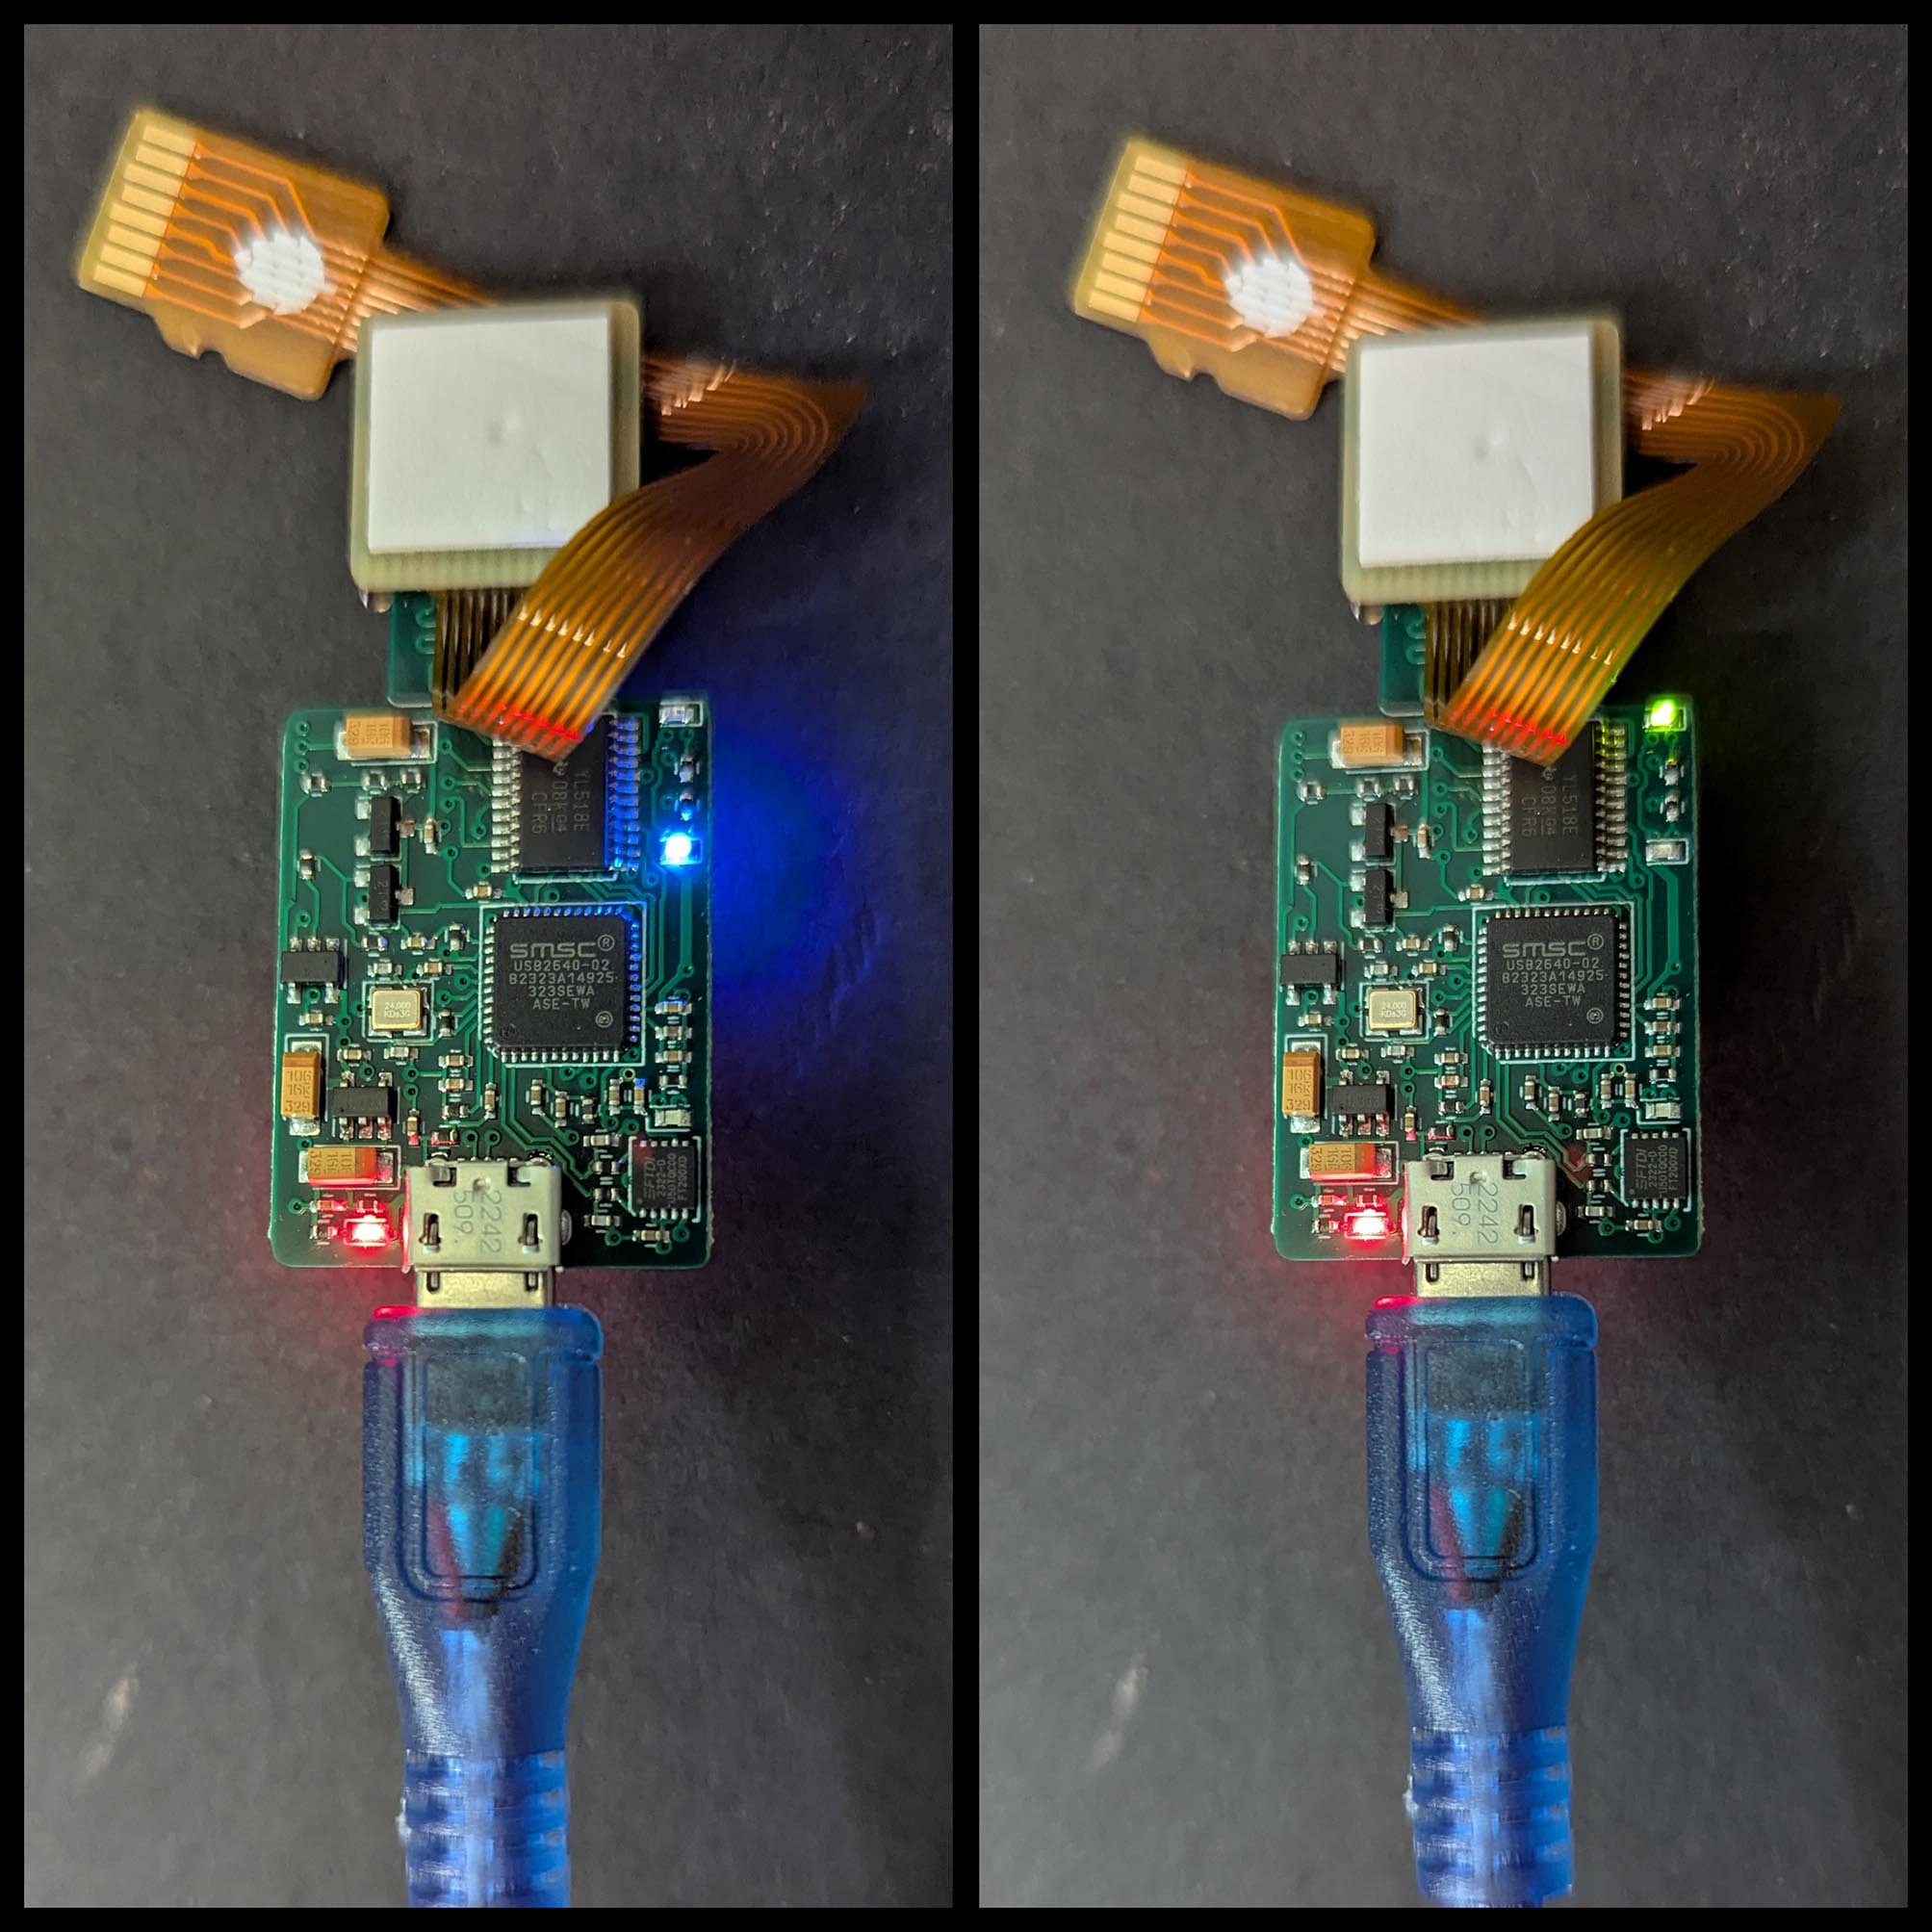
sudo make installWhen we connect SDWire to our SBC, the Blue LED turns on. (Pic left above)
By Default, SDWire runs in Test Server Mode: MicroSD is connected to our SBC. Let’s flip this.
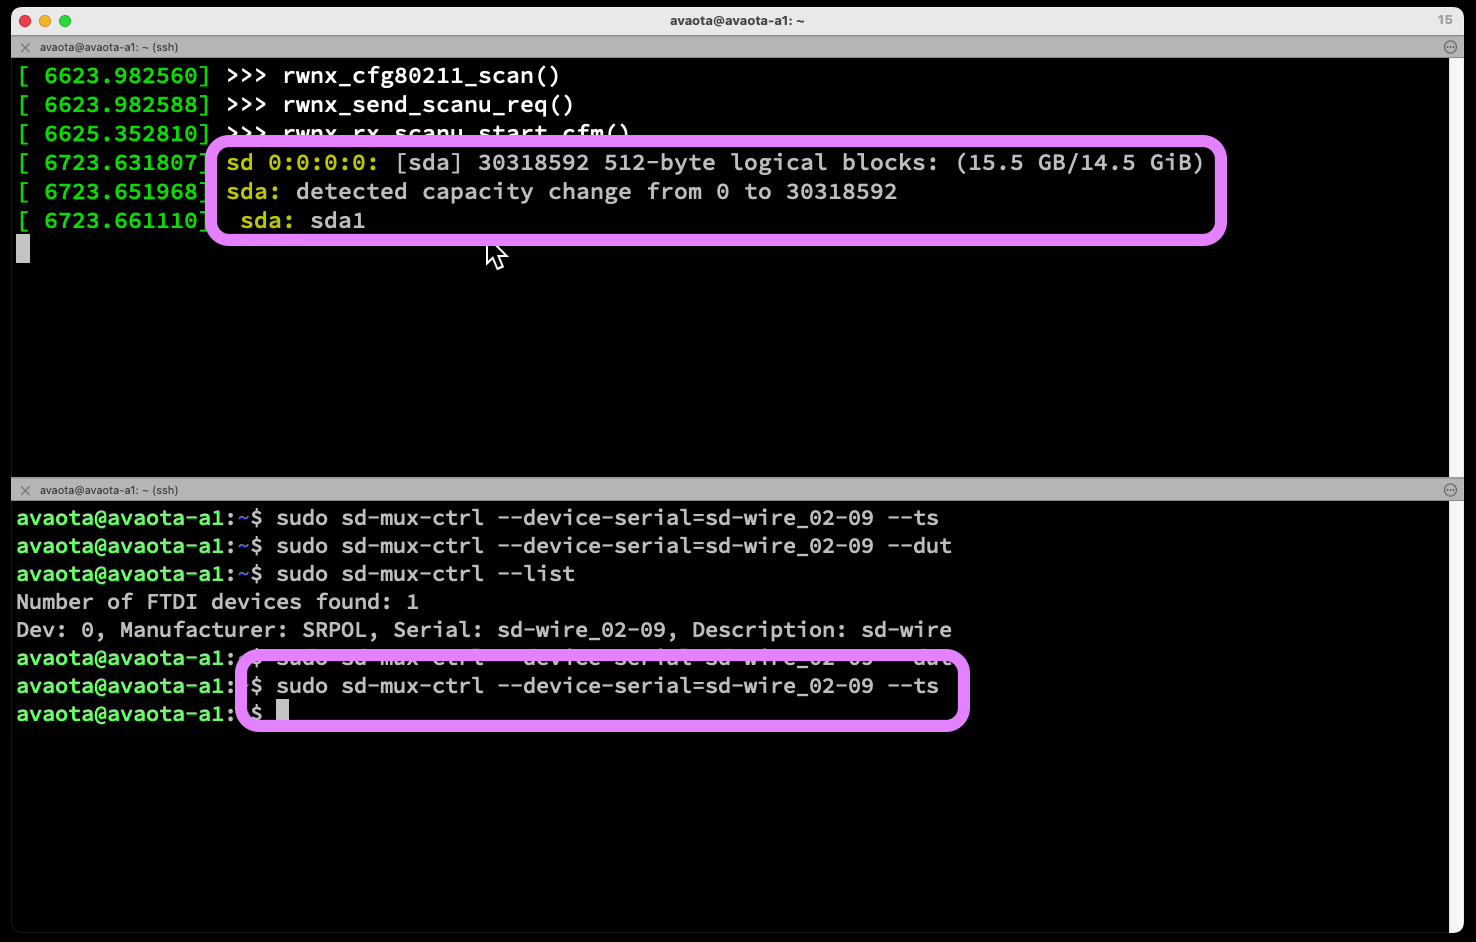
Run “sudo dmesg -w” in a new window to observe the System Messages. Do this to enumerate the SDWire Devices…
$ sudo sd-mux-ctrl --list
Number of FTDI devices found: 1
Dev: 0, Manufacturer: SRPOL
Serial: sd-wire_02-09, Description: sd-wire
Take Note of the Serial ID: sd-wire_02-09. We’ll use it below.
Now we Flip the MicroSD from Test Server to Test Device (DUT: “Device Under Test”)
## Flip the MicroSD to Test Device
## Copy the Serial ID from above
sudo sd-mux-ctrl \
  --device-serial=sd-wire_02-09 \
  --dut

## dmesg shows:
## sda: detected capacity change from 30318592 to 0
Green LED turns on (pic right above). And /dev/sda1 is no longer accessible. Yep our MicroSD has flipped to the Test Device!
Finally do this…
## Flip the MicroSD to Test Server
## Copy the Serial ID from above
sudo sd-mux-ctrl \
  --device-serial=sd-wire_02-09 \
  --ts

## dmesg shows:
## sd 0:0:0:0: [sda] 30318592 512-byte logical blocks: (15.5 GB/14.5 GiB)
## sda: detected capacity change from 0 to 30318592
## sda: sda1
Blue LED turns on (pic left above), /dev/sda1 is back on our SBC. Everything works hunky dory yay!
(We might simplify sudo, see below)
What’s inside sd-mux-ctrl?
sd-mux-ctrl calls the FTDI Library to flip the multiplexer. Simple, elegant and very clever: sd-mux/main.cpp
// When we select a Mux Target: Test Server or Test Device...
int selectTarget(Target target, CCOptionValue options[]) { ...

  // Compute the Pin State based on Mux Target
  pinState = 0xF0;    // Upper half of byte: Sets all Pins to Output (SDWire has only one bit - 0)
  pinState |=         // Lower half of byte: Sets state of Output Pins
    (target == T_DUT) // Is Mux Target = Test Device?
    ? 0x00  // For Test Device: Bit 0 becomes 0
    : 0x01; // For Test Server: Bit 0 becomes 1

  // Call FTDI Library to apply the Pin State
ftdi_set_bitmode(ftdi, pinState, BITMODE_CBUS);How to access the MicroSD at /dev/sda1?
We mount /dev/sda1 like this, to read and write the MicroSD Files…
## Flip the MicroSD to Test Server
## Copy the Serial ID from above
$ sudo sd-mux-ctrl \
  --device-serial=sd-wire_02-09 \
  --ts

## Mount the MicroSD to /tmp/sda1
$ mkdir /tmp/sda1
$ sudo mount /dev/sda1 /tmp/sda1

## MicroSD is now writeable at /tmp/sda1
$ ls -l /tmp/sda1
Image.gz
boot.scr
initramfs.gz
sun50i-a64-pinephone-1.0.dtb
Remember to Unmount the MicroSD before switching back, or the MicroSD Files might get corrupted…
## Unmount the MicroSD
$ sudo umount /tmp/sda1

## Flip the MicroSD to Test Device
## Copy the Serial ID from above
$ sudo sd-mux-ctrl \
  --device-serial=sd-wire_02-09 \
  --dut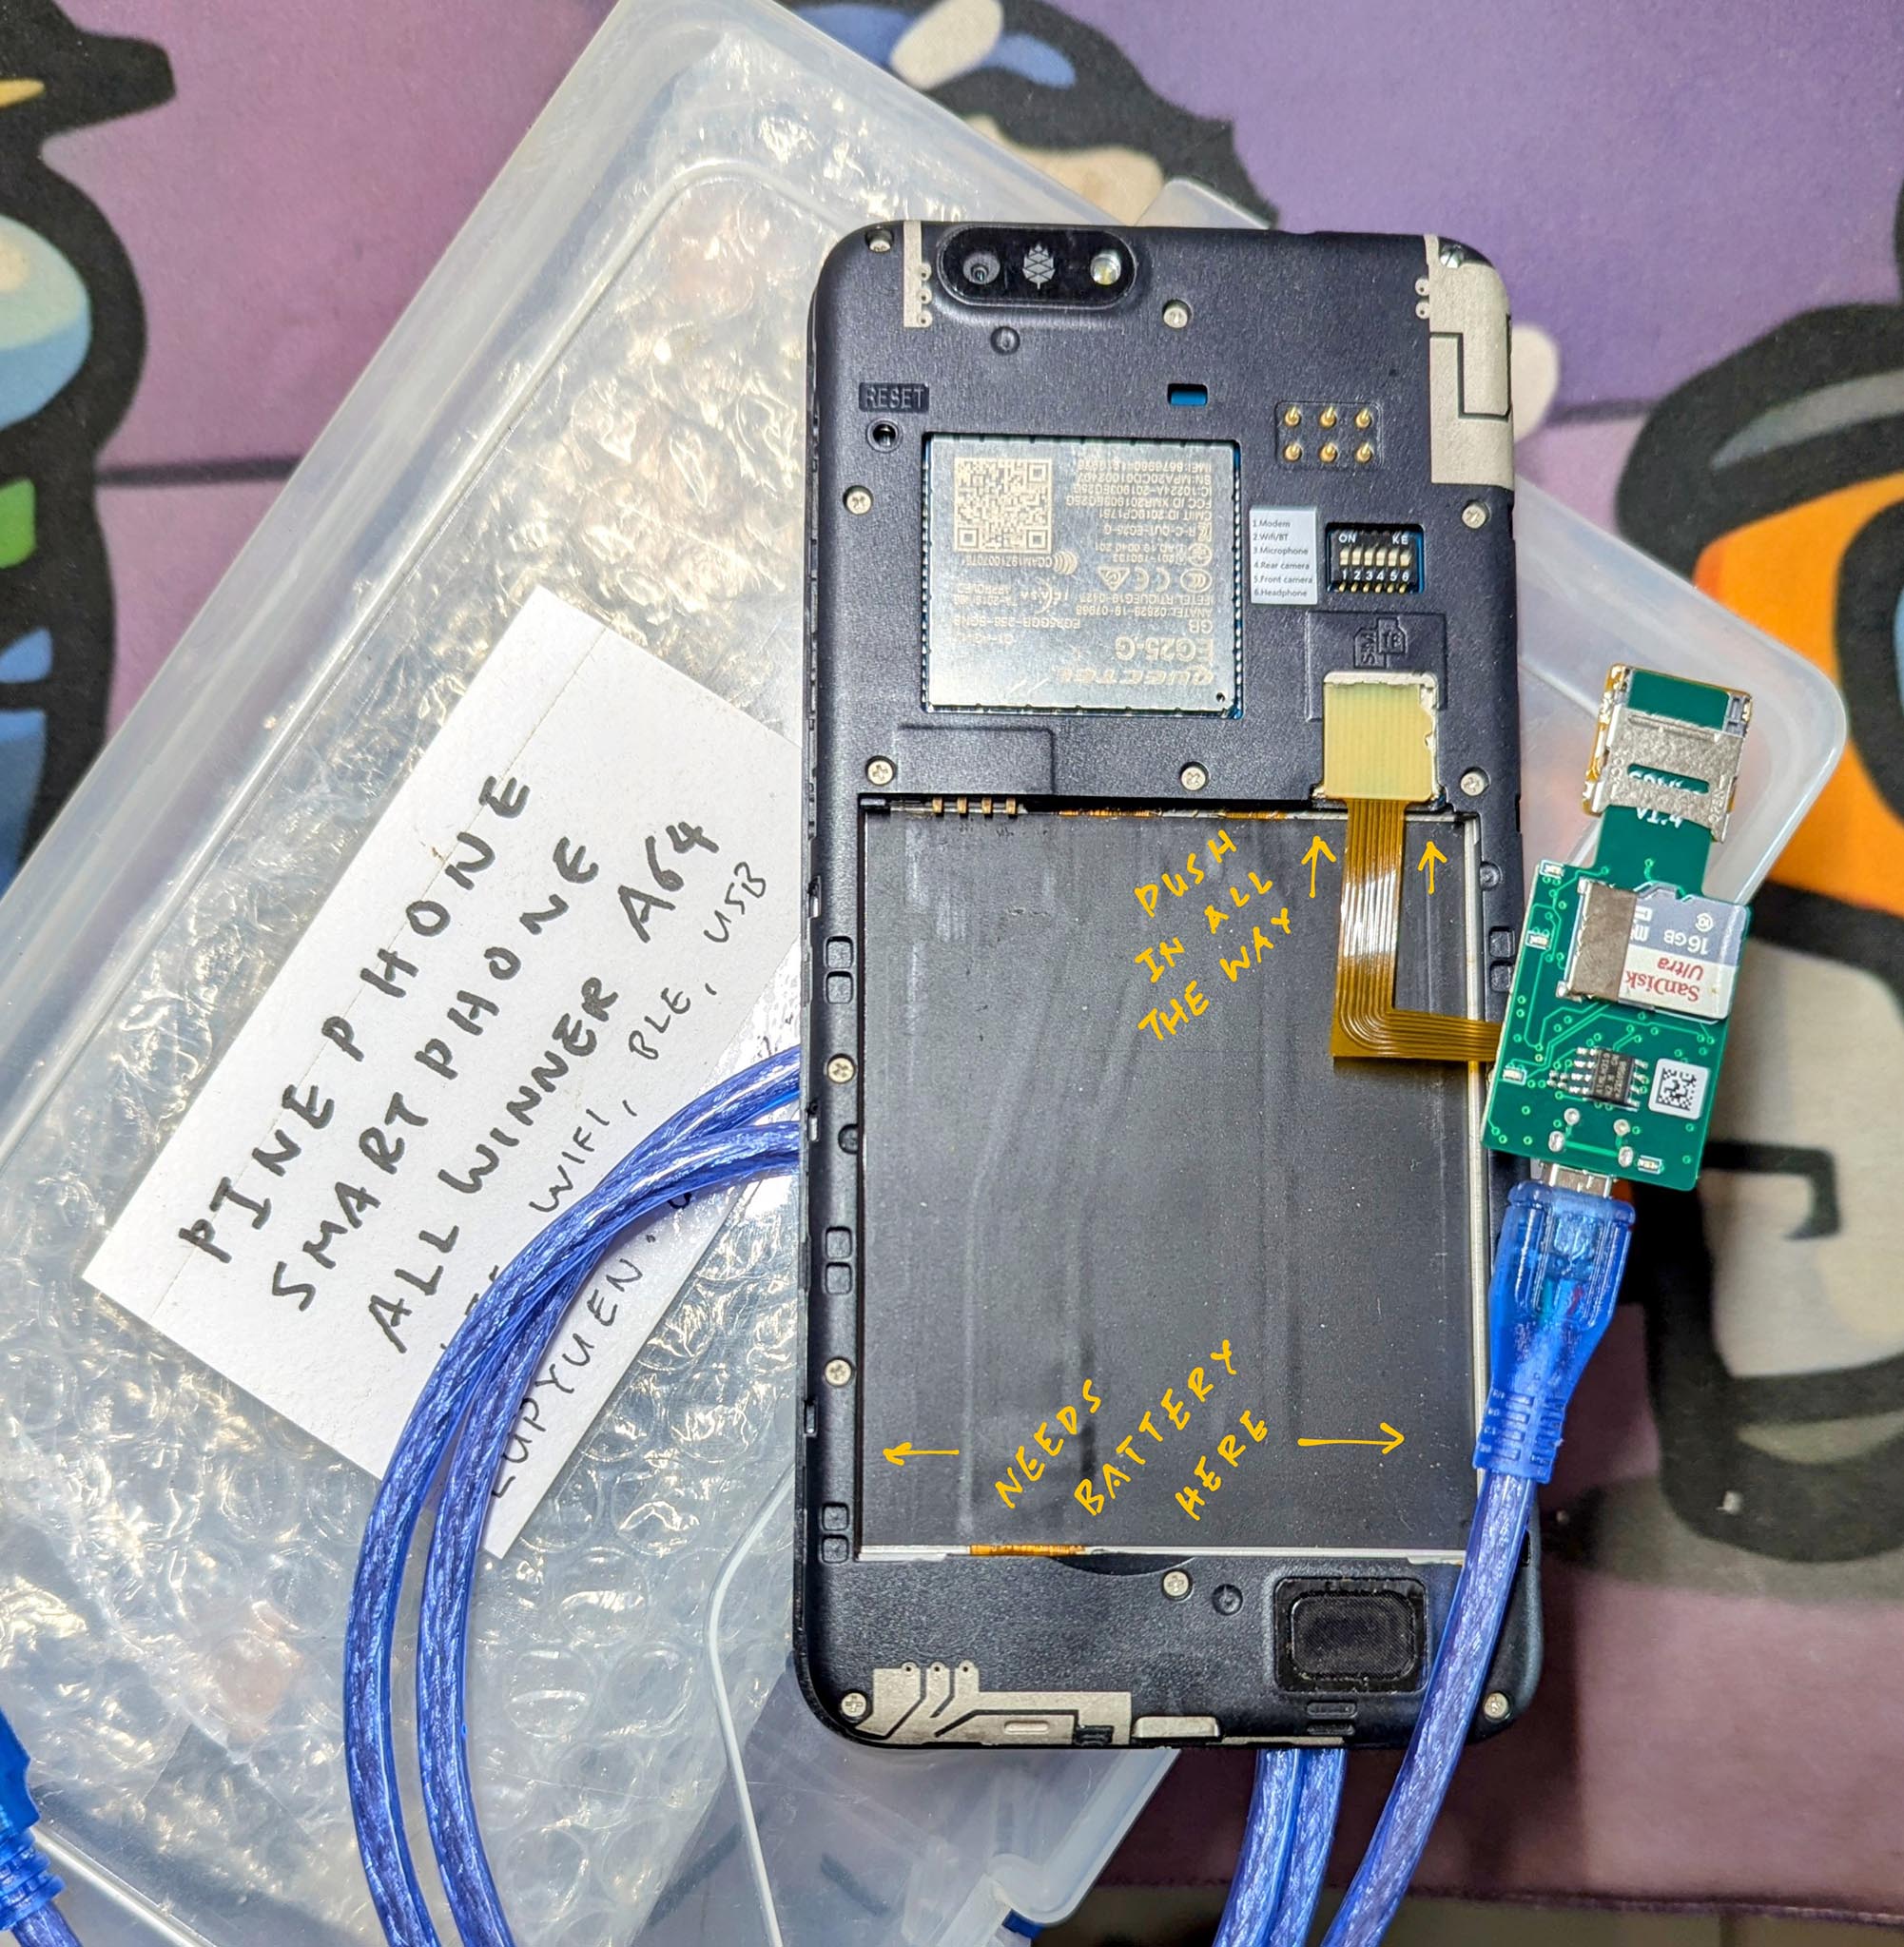
SDWire works OK with our SBC. What next?
Moment of Truth! We connect SDWire MicroSD Multiplexer into…
Test Device: PinePhone (Pic above)
Test Server: Avaota-A1 SBC (Via Micro-USB)
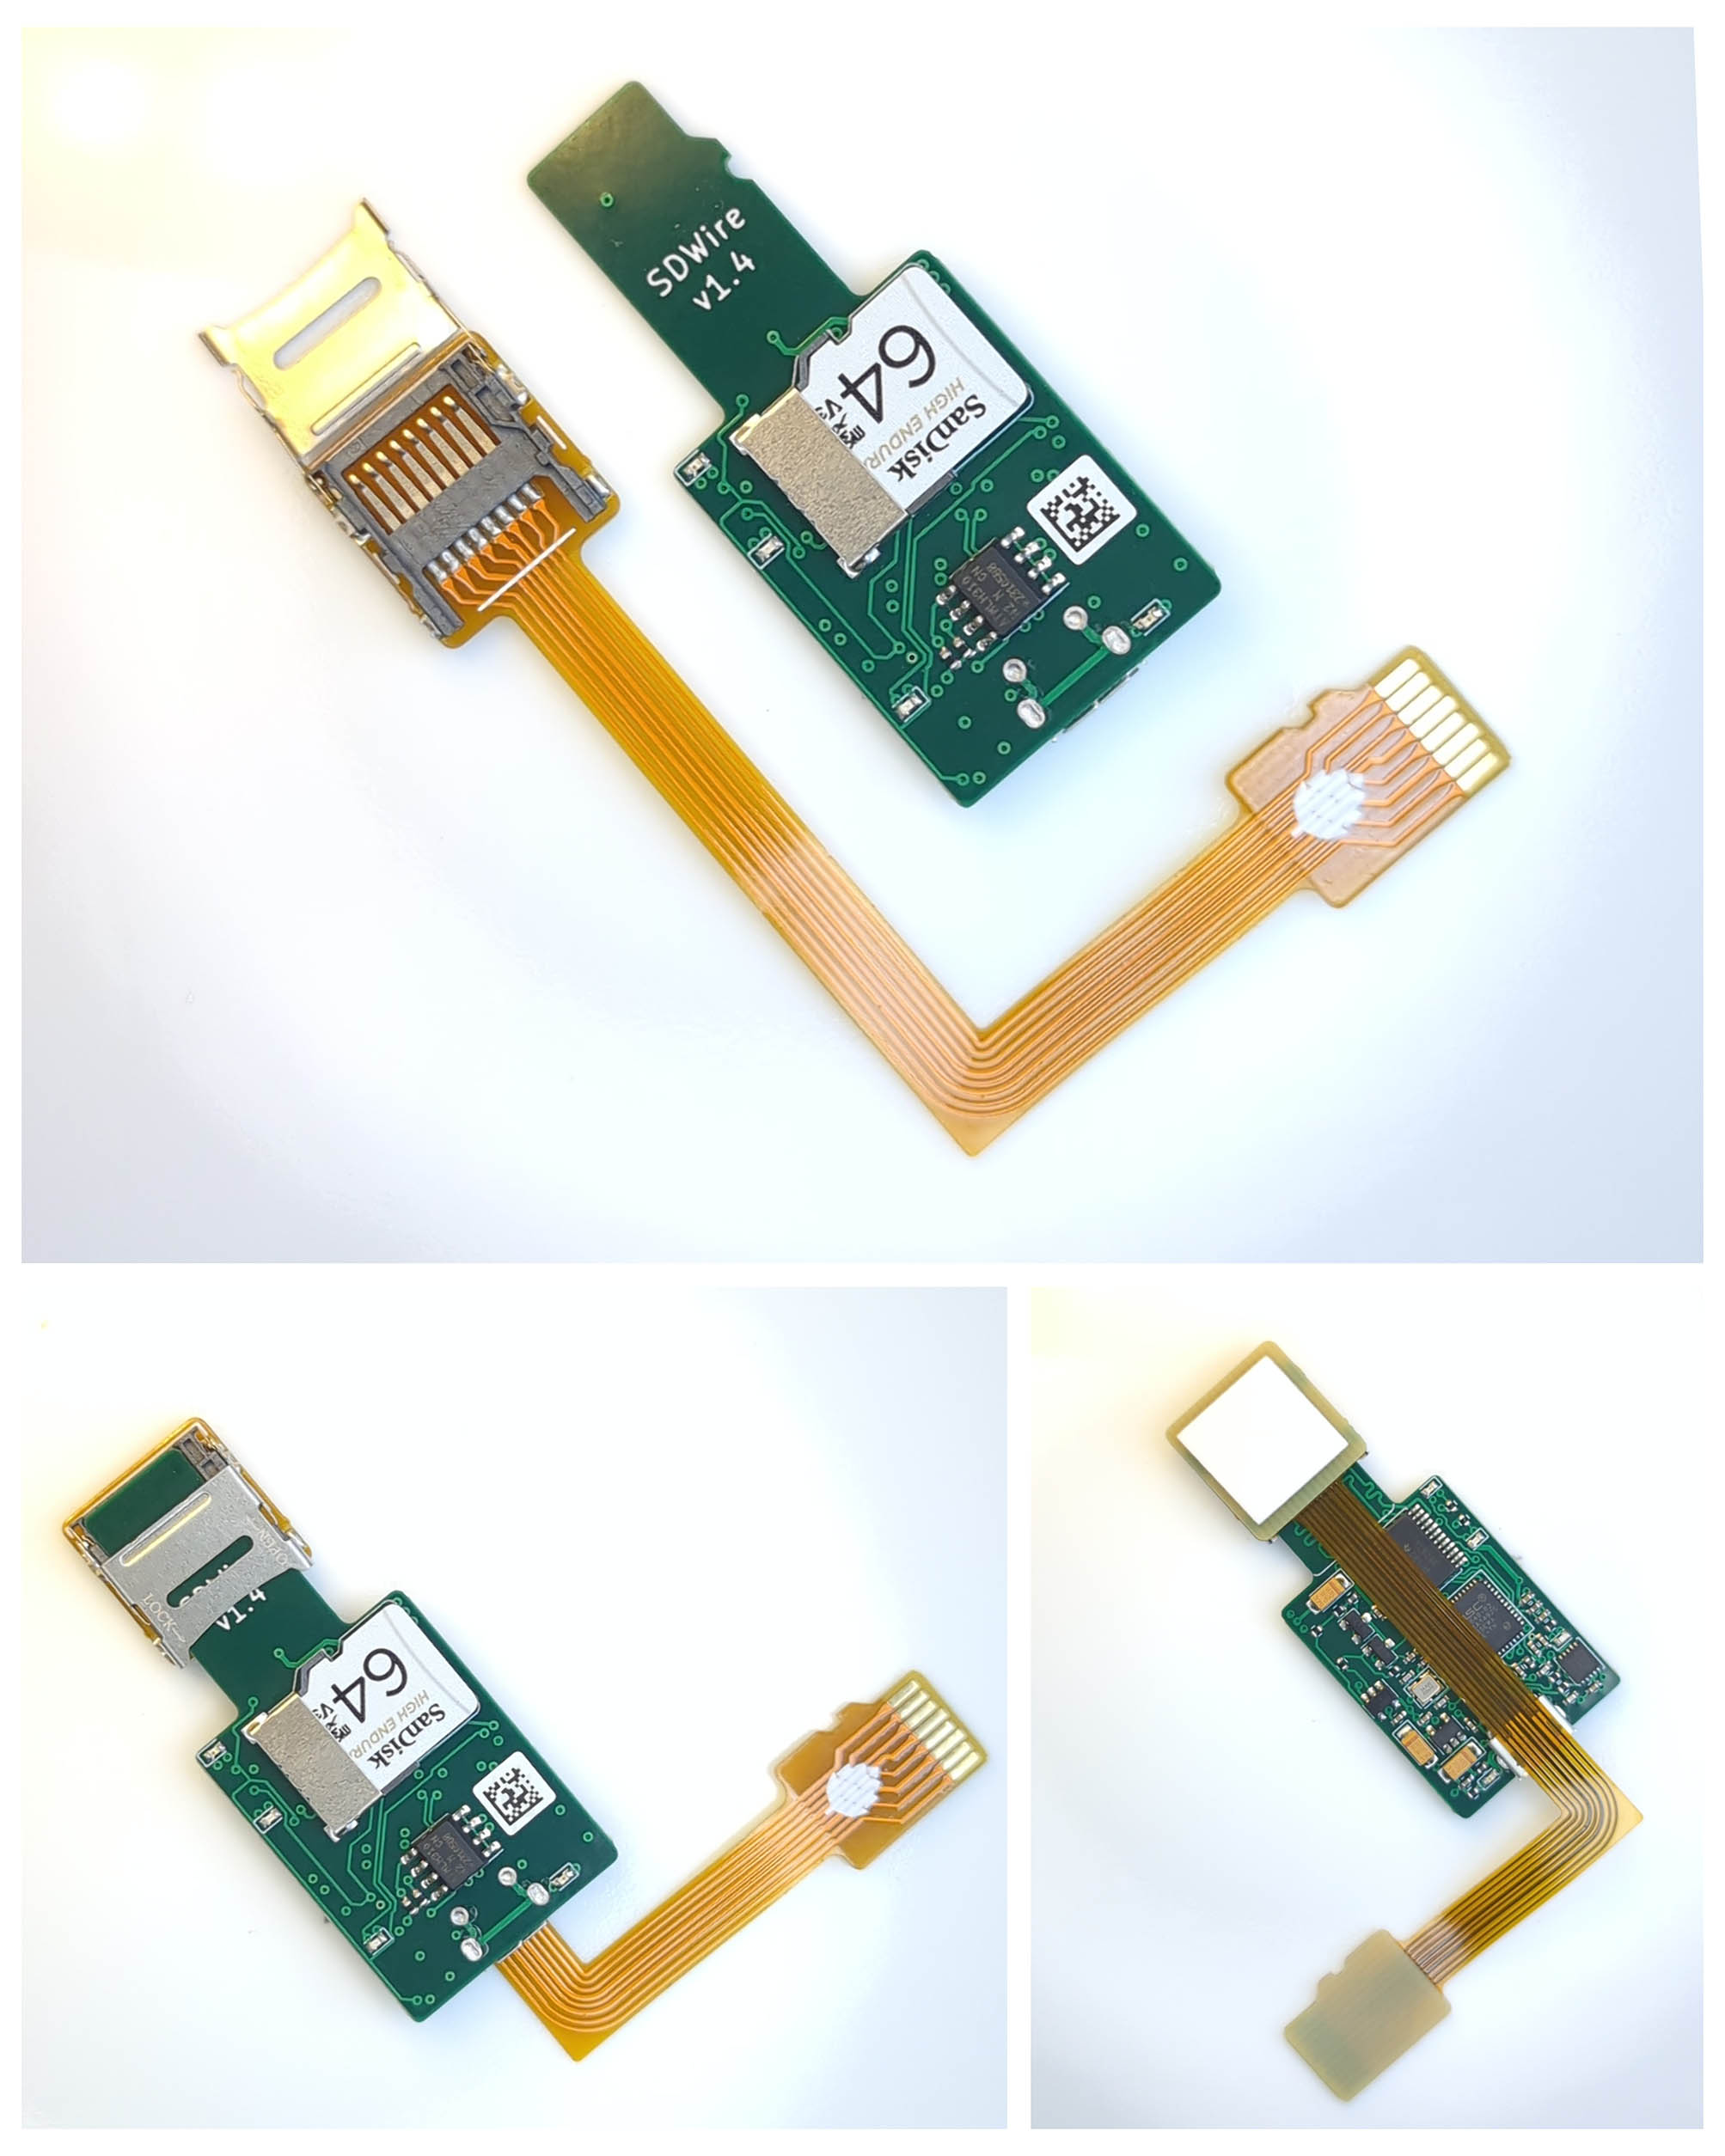
Which is easier with PinePhone MicroSD Extender…
Does it work?
Let’s assume our Build Server has compiled the PR Code into a NuttX Image…
We flip the MicroSD to SBC (Test Server), and mount the MicroSD…
## Flip the MicroSD to Test Server
## Mount the MicroSD to /tmp/sda1
sudo sd-mux-ctrl --device-serial=sd-wire_02-09 --ts
mkdir /tmp/sda1
sudo mount /dev/sda1 /tmp/sda1
Copy the NuttX Image to MicroSD…
## Copy the NuttX Image to MicroSD
sudo cp Image.gz /tmp/sda1
Unmount the MicroSD, and flip the MicroSD to PinePhone (Test Device)
## Unmount the MicroSD
## Flip the MicroSD to Test Device
sudo umount /tmp/sda1
sudo sd-mux-ctrl --device-serial=sd-wire_02-09 --dut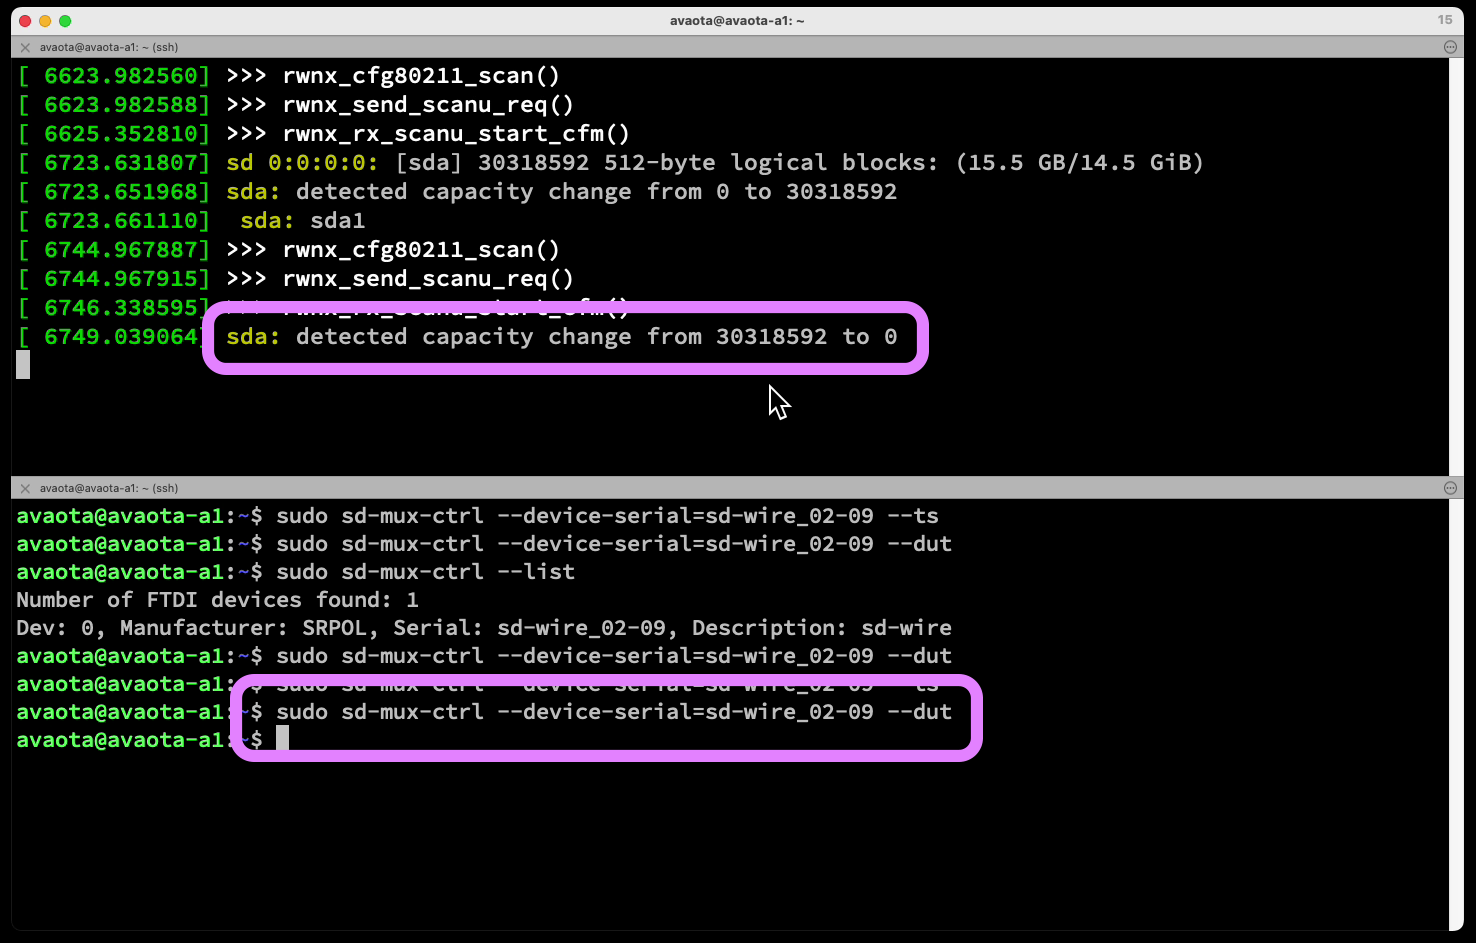
Power on PinePhone with a Smart Power Plug
(Thanks to Home Assistant API)
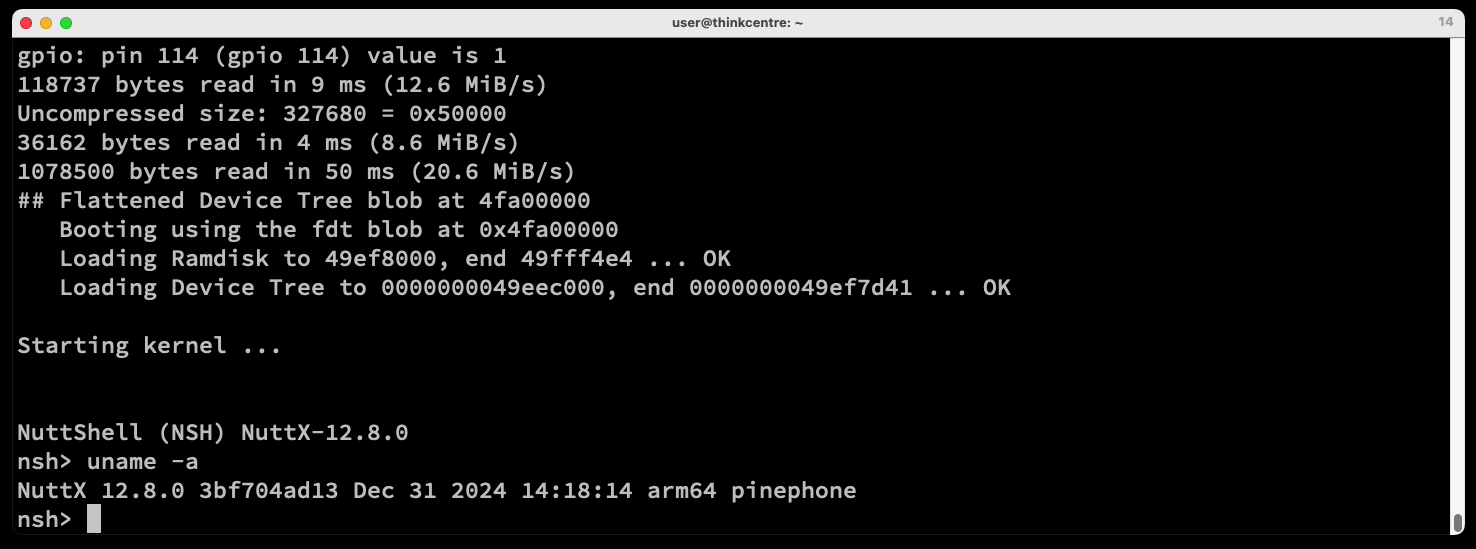
PinePhone boots NuttX yay!
NuttShell (NSH) NuttX-12.8.0
nsh> uname -a
NuttX 12.8.0 3bf704ad13 Dec 31 2024 14:18:14 arm64 pinephoneWhoa that’s a lot of sudo passwords. Any simpler way?
Wrap all the Sudo Commands into a script: copy-image.sh
set -e  ## Exit when any command fails
set -x  ## Echo commands
whoami  ## I am root!

## Copy /tmp/Image to MicroSD
sd-mux-ctrl --device-serial=sd-wire_02-09 --ts
sleep 5
mkdir -p /tmp/sda1
mount /dev/sda1 /tmp/sda1
cp /tmp/Image /tmp/sda1/
ls -l /tmp/sda1

## Unmount MicroSD and flip it to the Test Device (PinePhone)
umount /tmp/sda1
sd-mux-ctrl --device-serial=sd-wire_02-09 --dut
Configure visudo so that our script will run as Sudo Without Password…
## Start the Sudoers Editor
sudo visudo

## Add this line:
user ALL=(ALL) NOPASSWD: /home/user/copy-image.sh
Then we can trigger our script remotely via SSH, Without Sudo Password: run.sh
## Copy NuttX Image to MicroSD
## No password needed for sudo yay!
scp nuttx.bin thinkcentre:/tmp/Image
ssh thinkcentre \
  ls -l /tmp/Image
ssh thinkcentre \
  sudo /home/user/copy-image.sh
We have a problem with the battery…
Huh! PinePhone will power up with a Smart Power Plug?
OK our PinePhone is a little wonky: The Power Button won’t work any more. But powering up the USB-C Port on PinePhone will boot just fine.
What about the PinePhone Battery?
Yeah it gets complicated: USB-C Power will charge up the PinePhone Battery. Which means PinePhone won’t shut down when we power off the USB-C Port!
Thus we have an Automated Way to Power Up PinePhone. And it gets stuck there until the PinePhone Battery totally drains. This is utterly ungood for our Test Bot sigh.
Why not do it on a Battery-Less Device?
I ordered another (battery-less) Arm64 Single-Board Computer. Hope it works better with Test Bot than PinePhone!
There’s an intriguing solution for the conundrum…
How about booting and testing NuttX on Avaota-A1 SBC?
Exactly! Here’s why Avaota-A1 SBC should run NuttX…
Avaota-A1 has the latest Octa-Core Arm64 SoC: Allwinner A527
(Bonus: There’s a tiny RISC-V Core inside)
NuttX Kernel Build sounds ideal for Allwinner A527 SoC
(Instead of the restrictive Flat Build)
Avaota-A1 could be the first Arm64 Port of NuttX Kernel Build
SDWire MicroSD Multiplexer? Avaota SBC was previously the Test Server, now it becomes the Test Device
(Porting NuttX gets a lot quicker)
Open-Source RTOS (NuttX) tested on Open-Source Hardware (Avaota-A1) … Perfectly sensible!
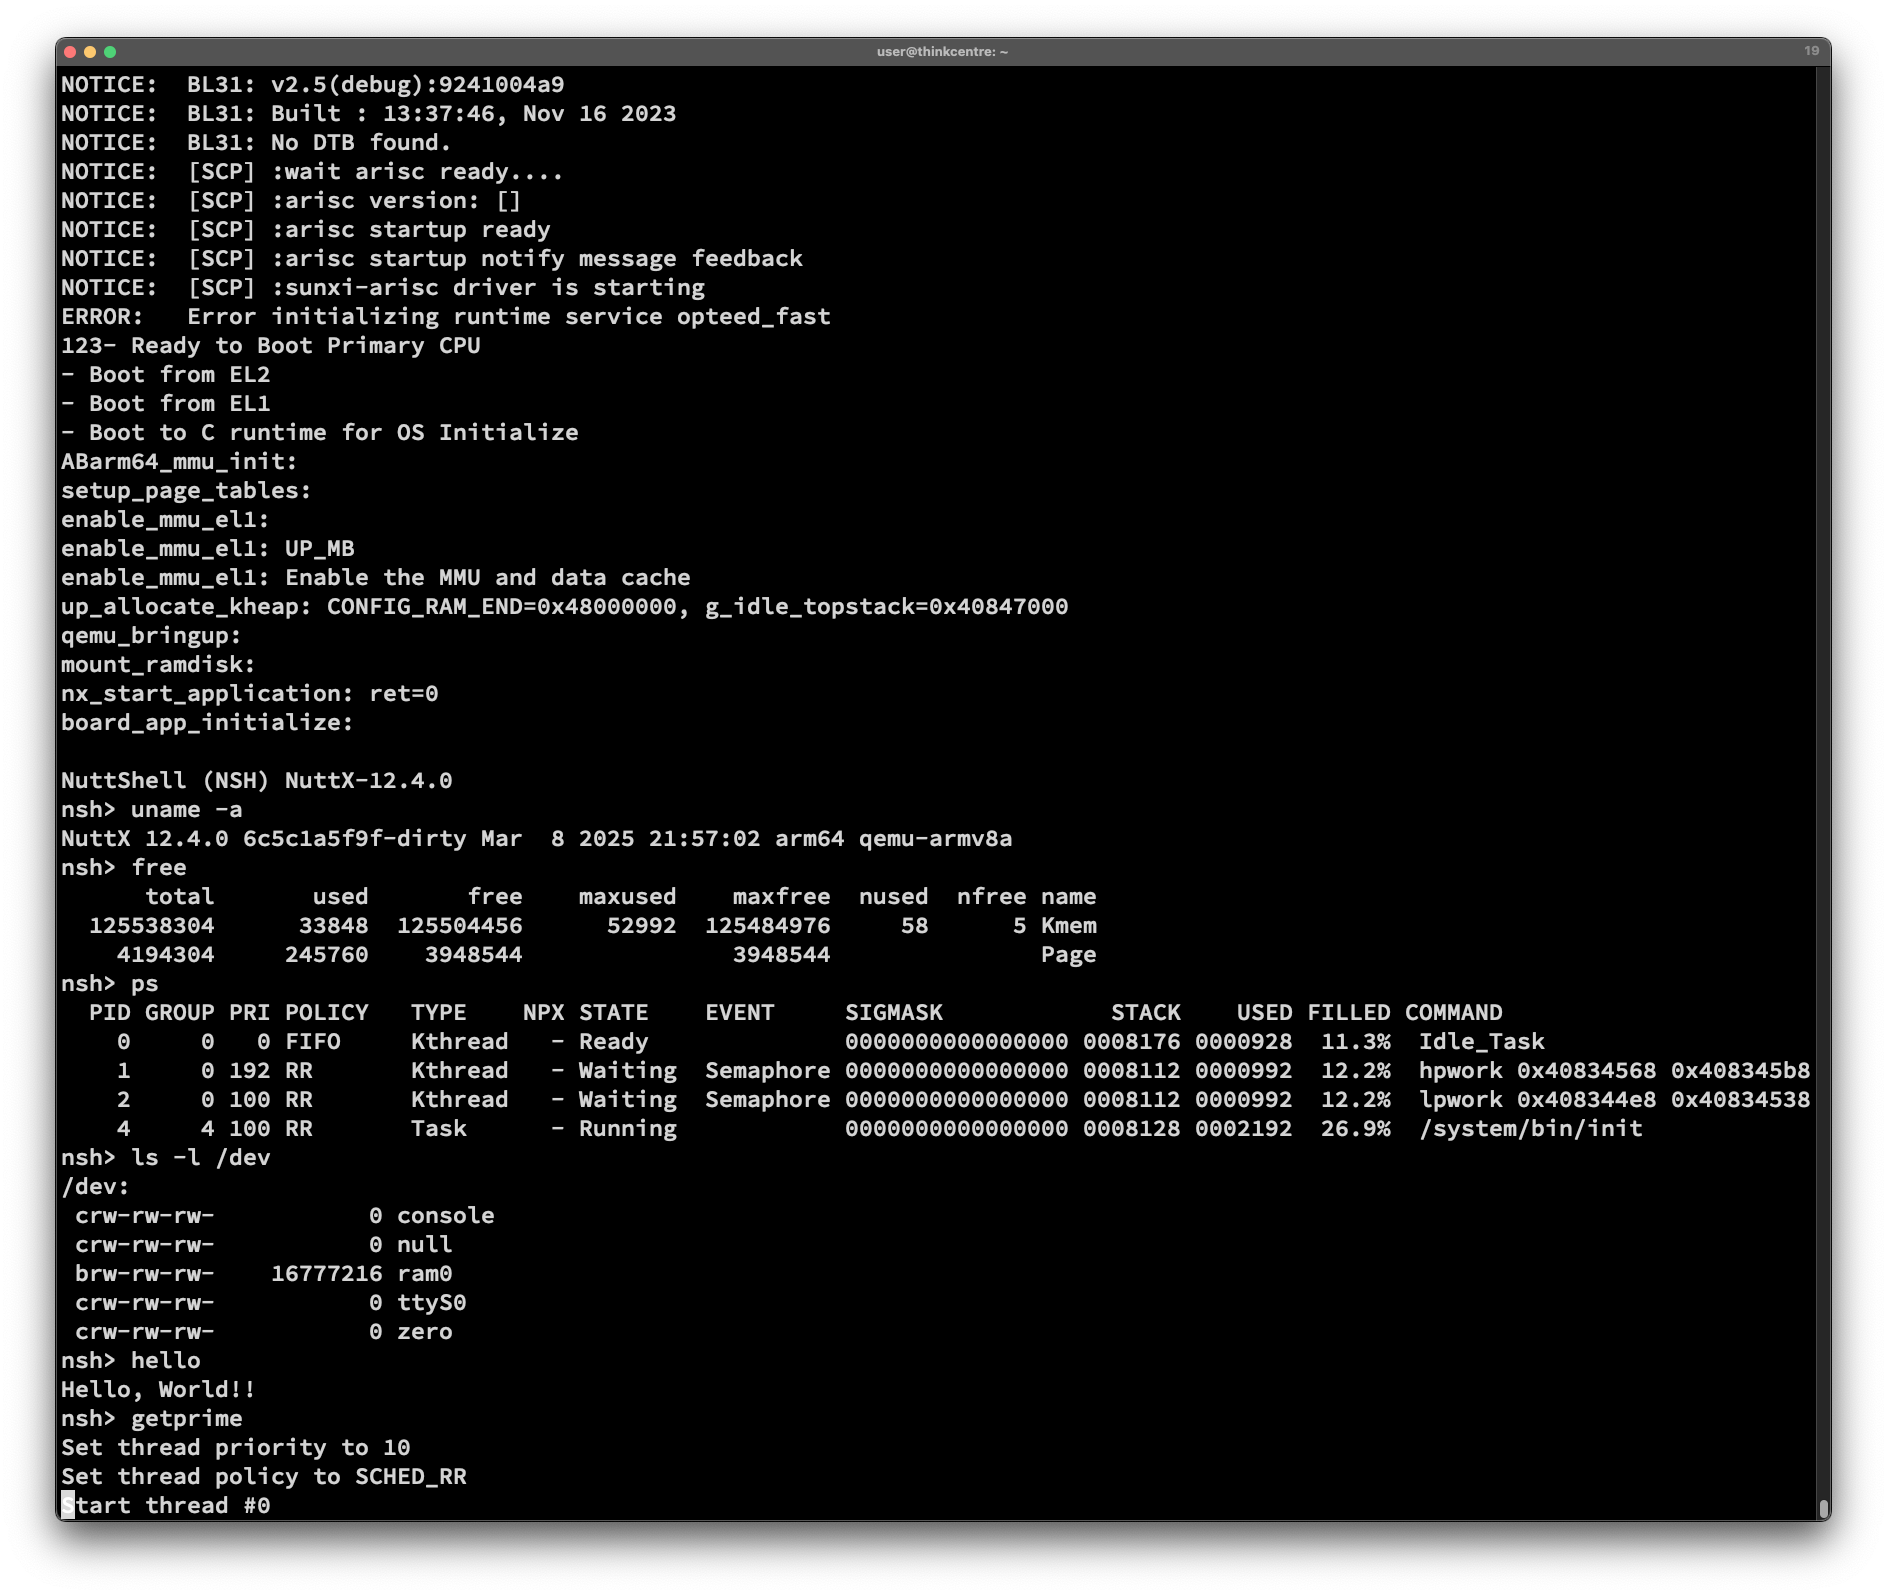
We’ll take the NuttX Kernel Build for QEMU Arm64, boot it on Avaota-A1 SBC. We’re making terrific progress with NuttX on Avaota SBC…
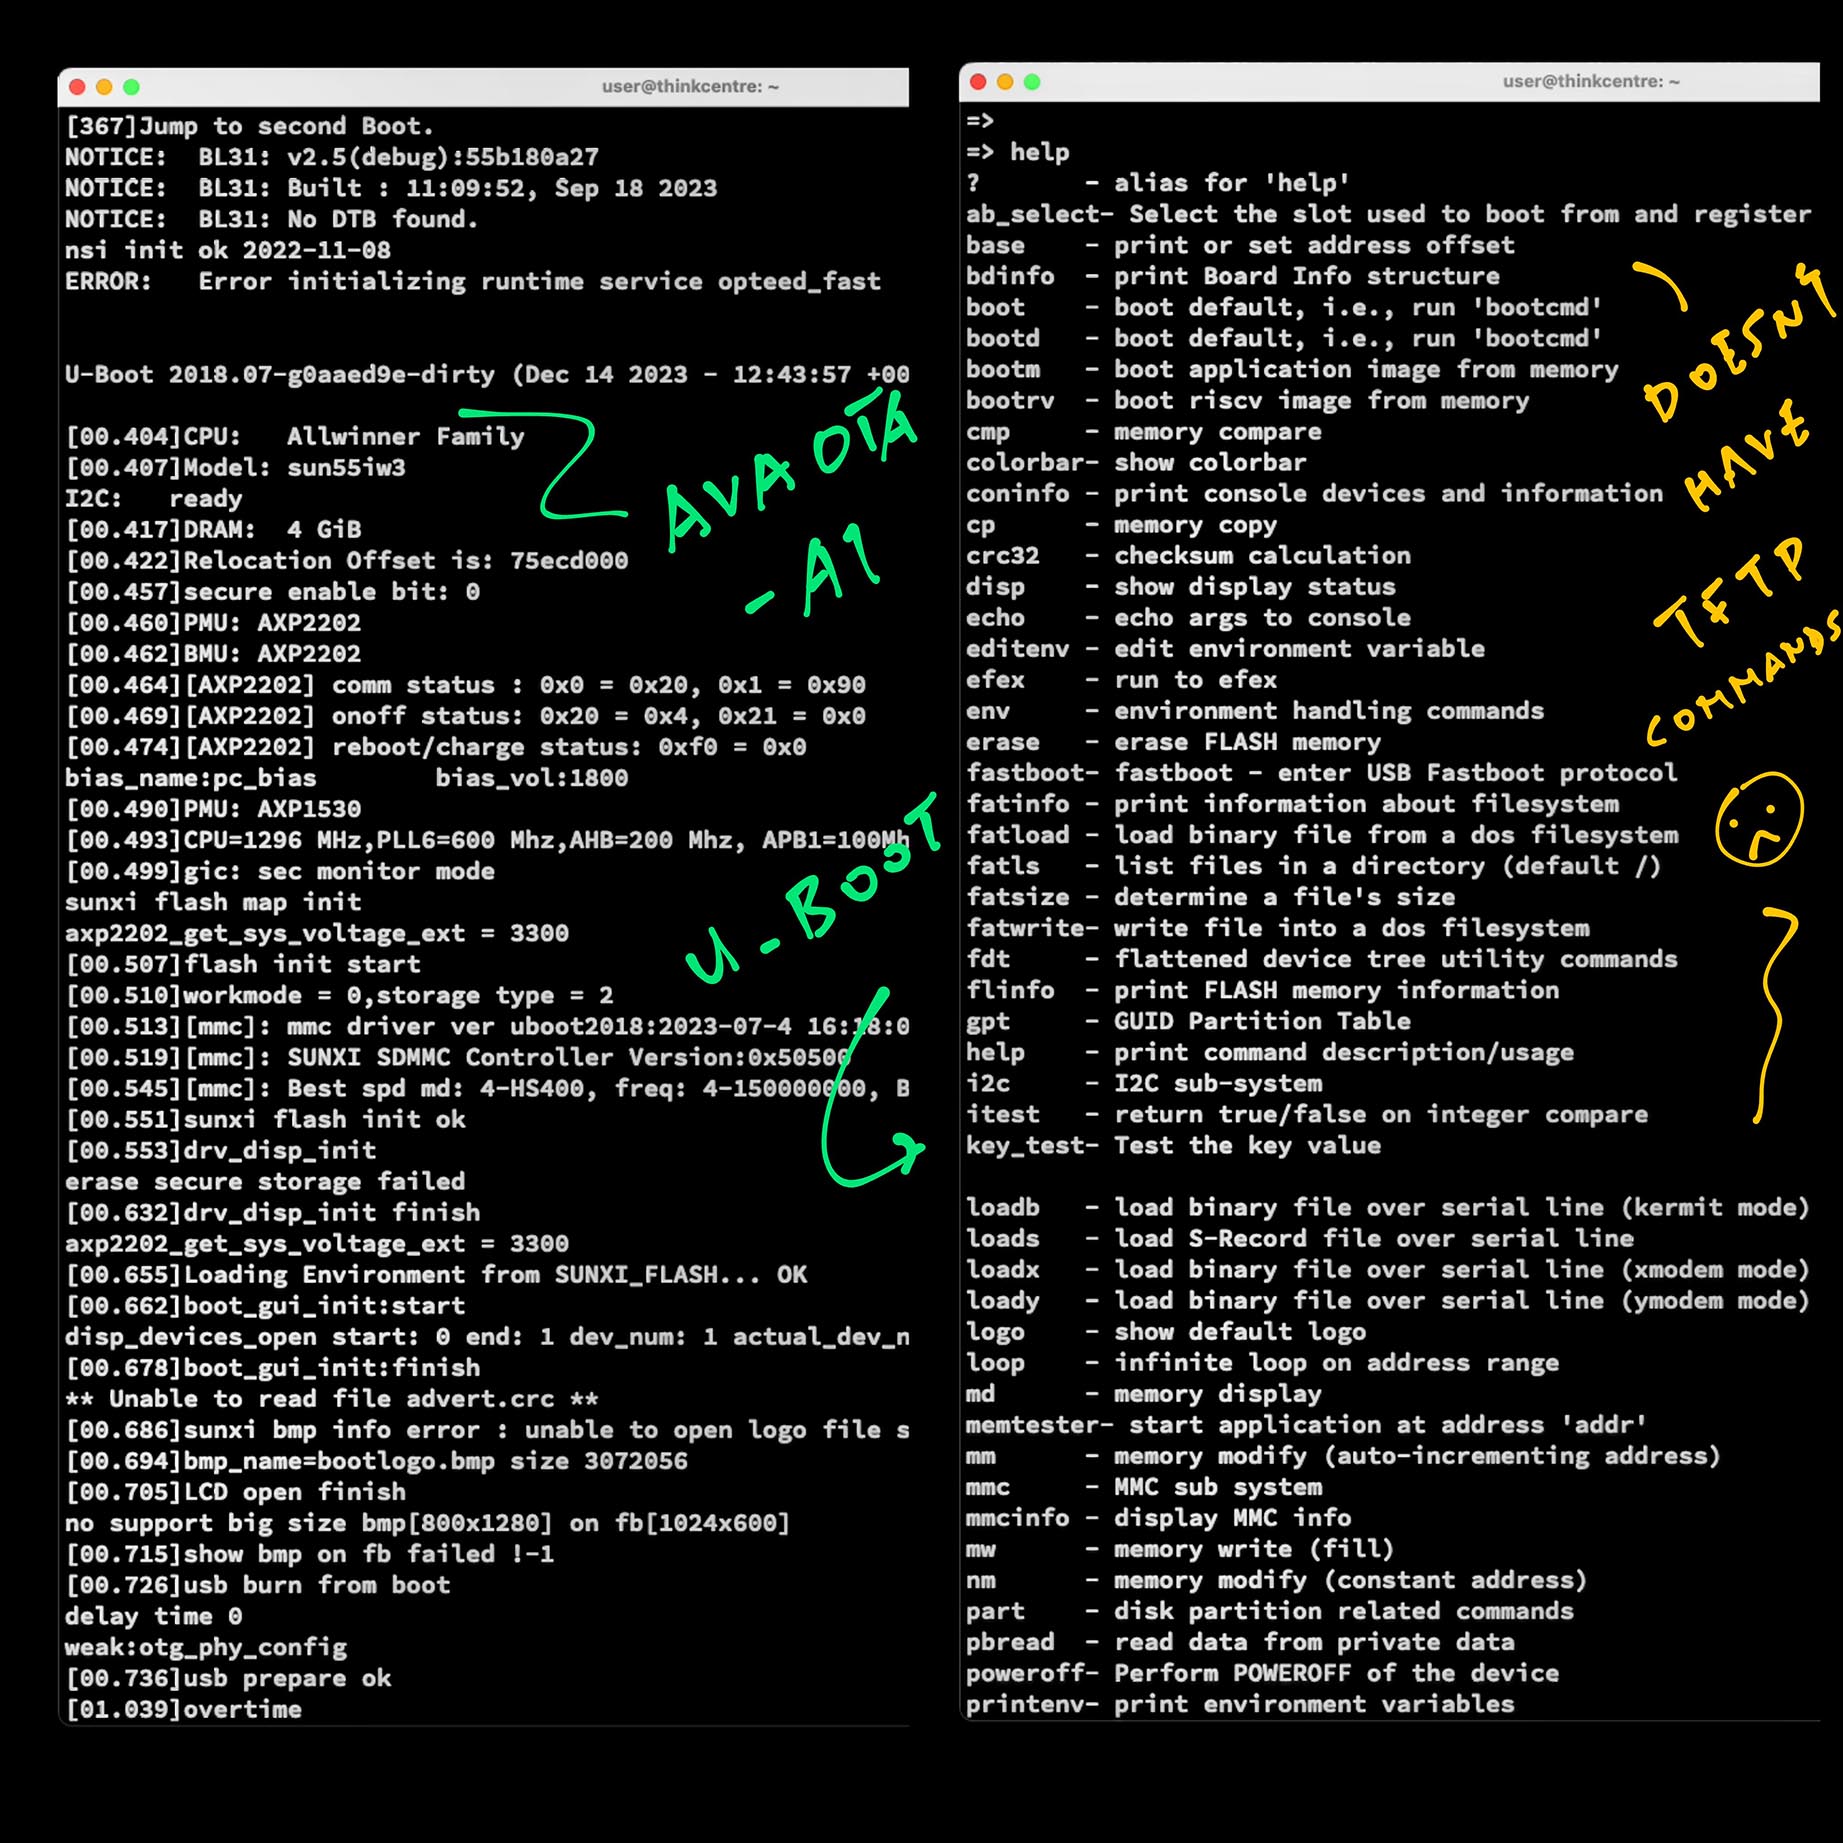
Isn’t it faster to port NuttX with U-Boot TFTP?
Yeah for RISC-V Ports we boot NuttX over TFTP. But Avaota U-Boot doesn’t support TFTP, so it’s back to MicroSD sigh. (Pic below)
Well thankfully we have a MicroSD Multiplexer that will make MicroSD Swapping a lot easier! (Not forgetting our Smart Power Plug)
Next Article: We chat about porting NuttX to Avaota-A1 SBC…
Special Thanks to My Sponsors for supporting my writing. Your support means so much to me 🙏
Got a question, comment or suggestion? Create an Issue or submit a Pull Request here…