📝 2 Mar 2025
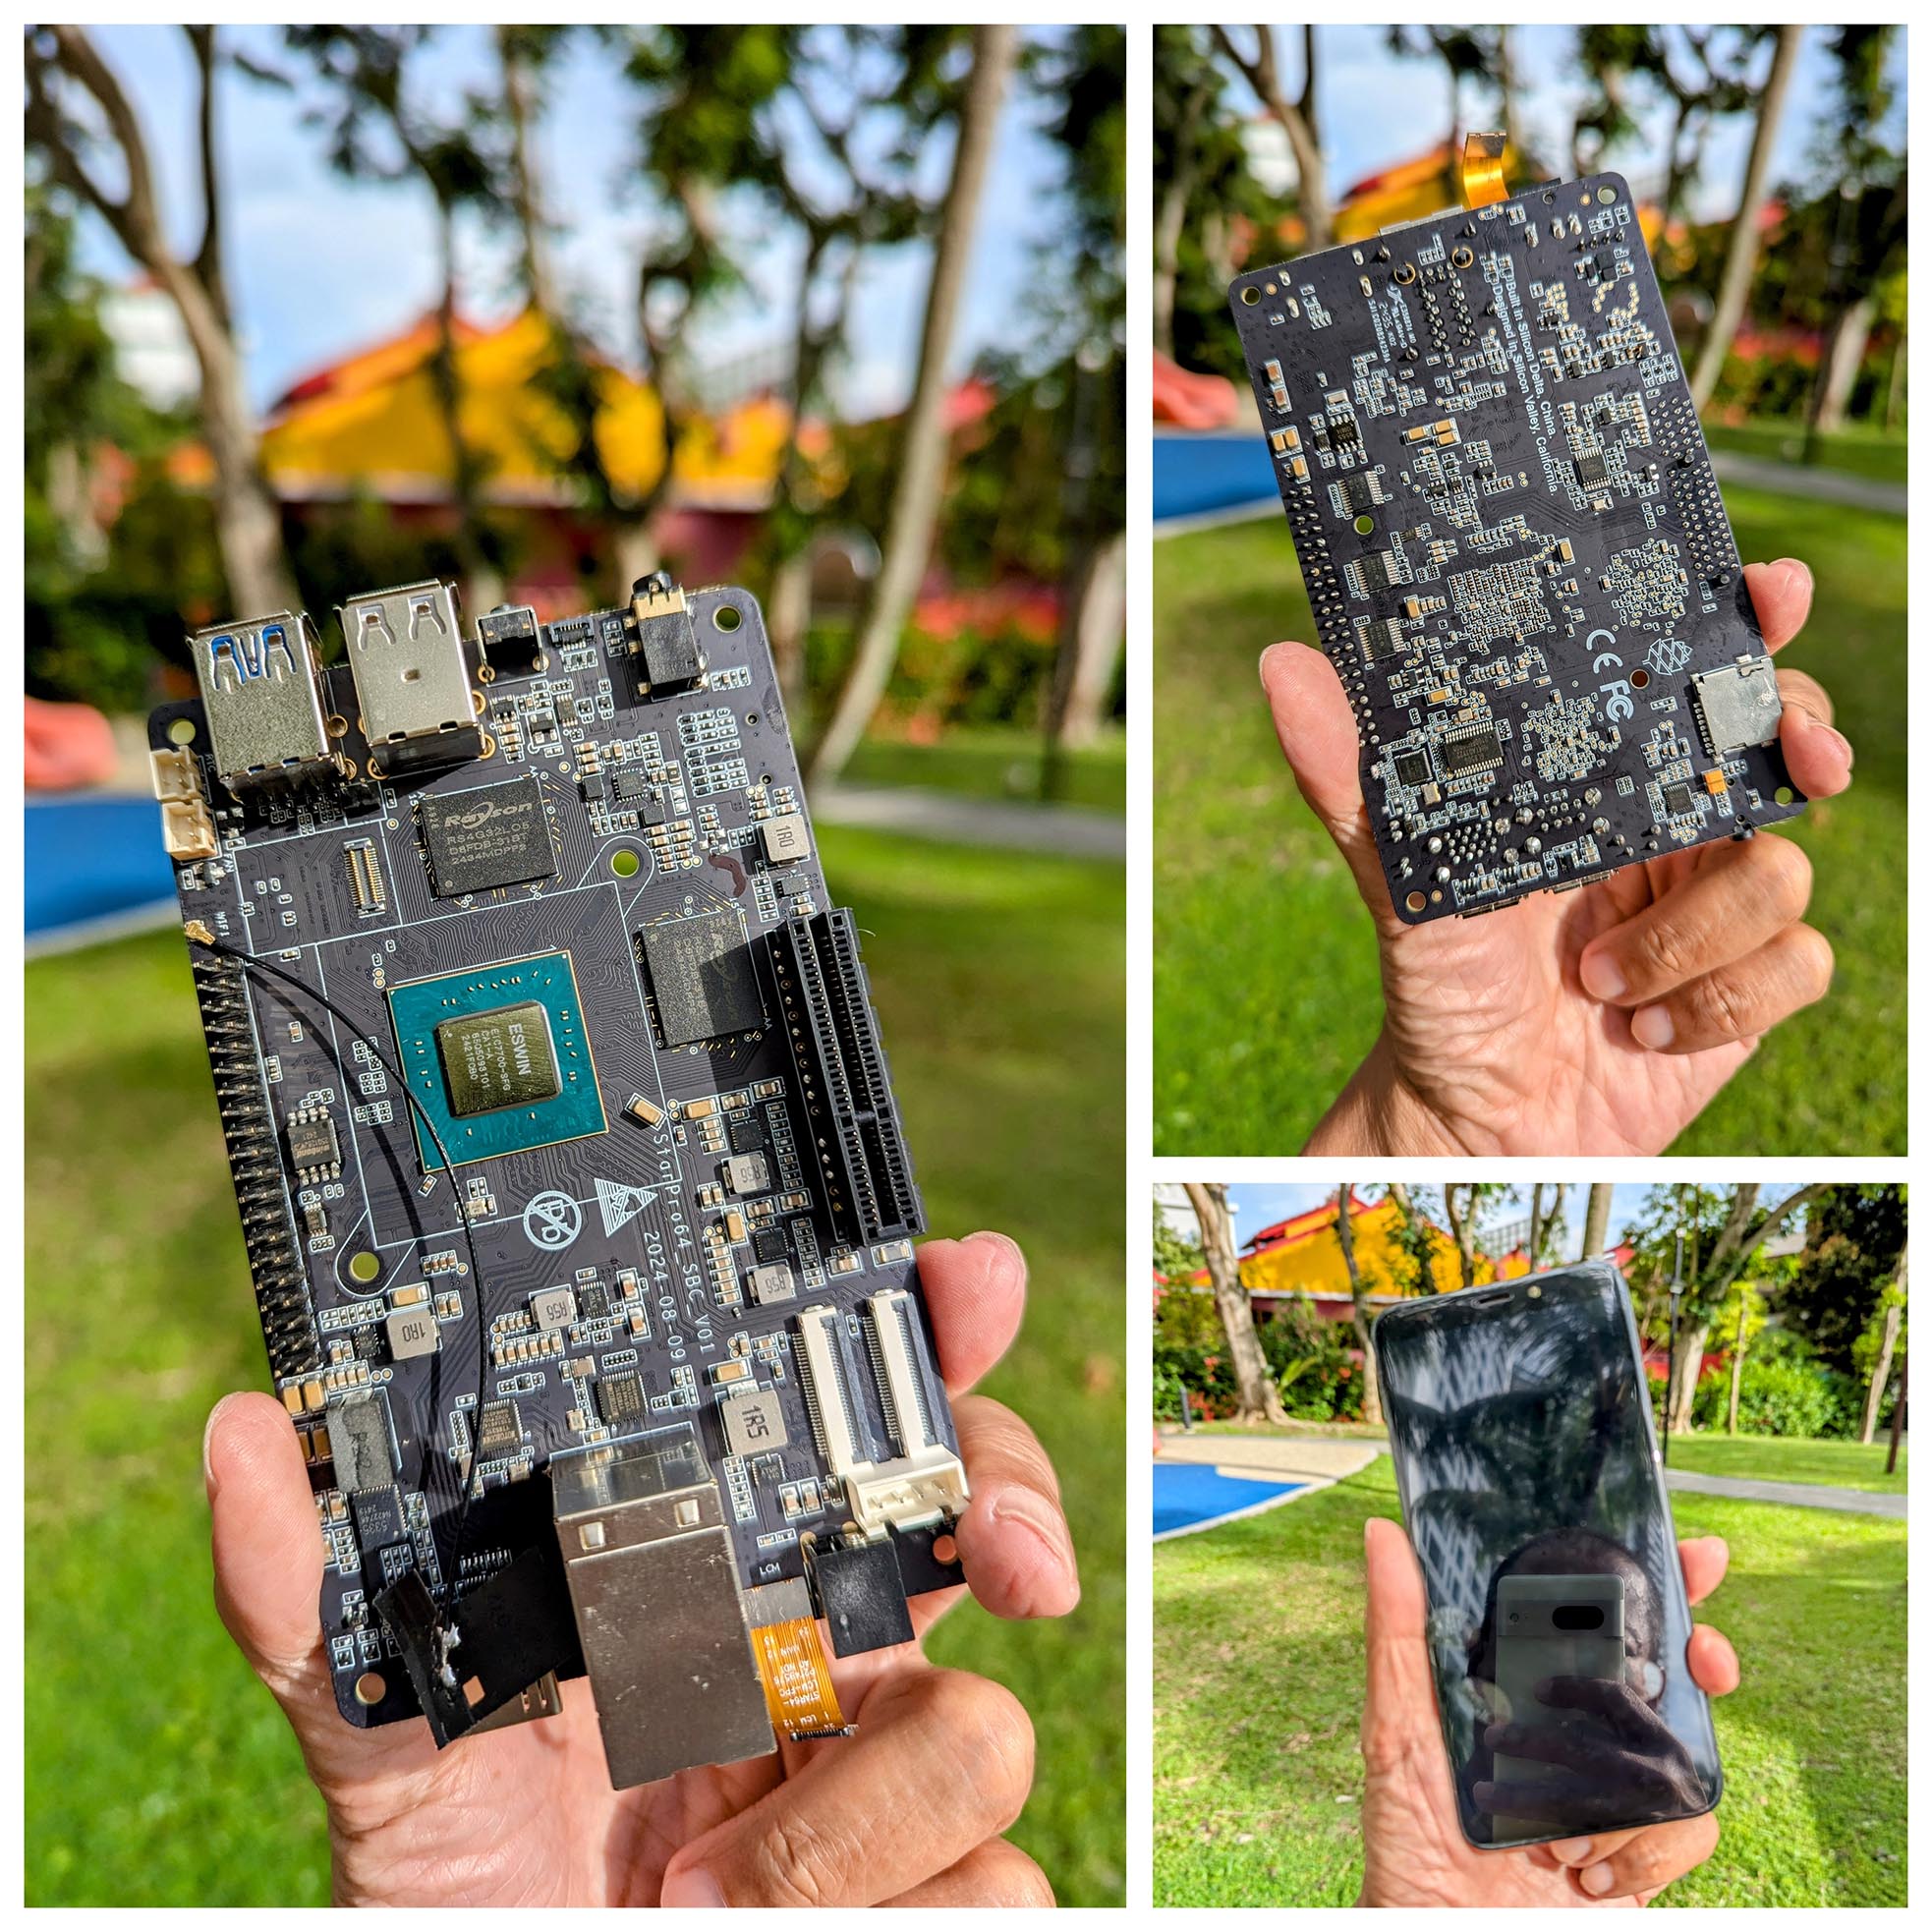
StarPro64 EIC7700X is the (literally) Hot New RISC-V SBC by PINE64. In this article we chat about…
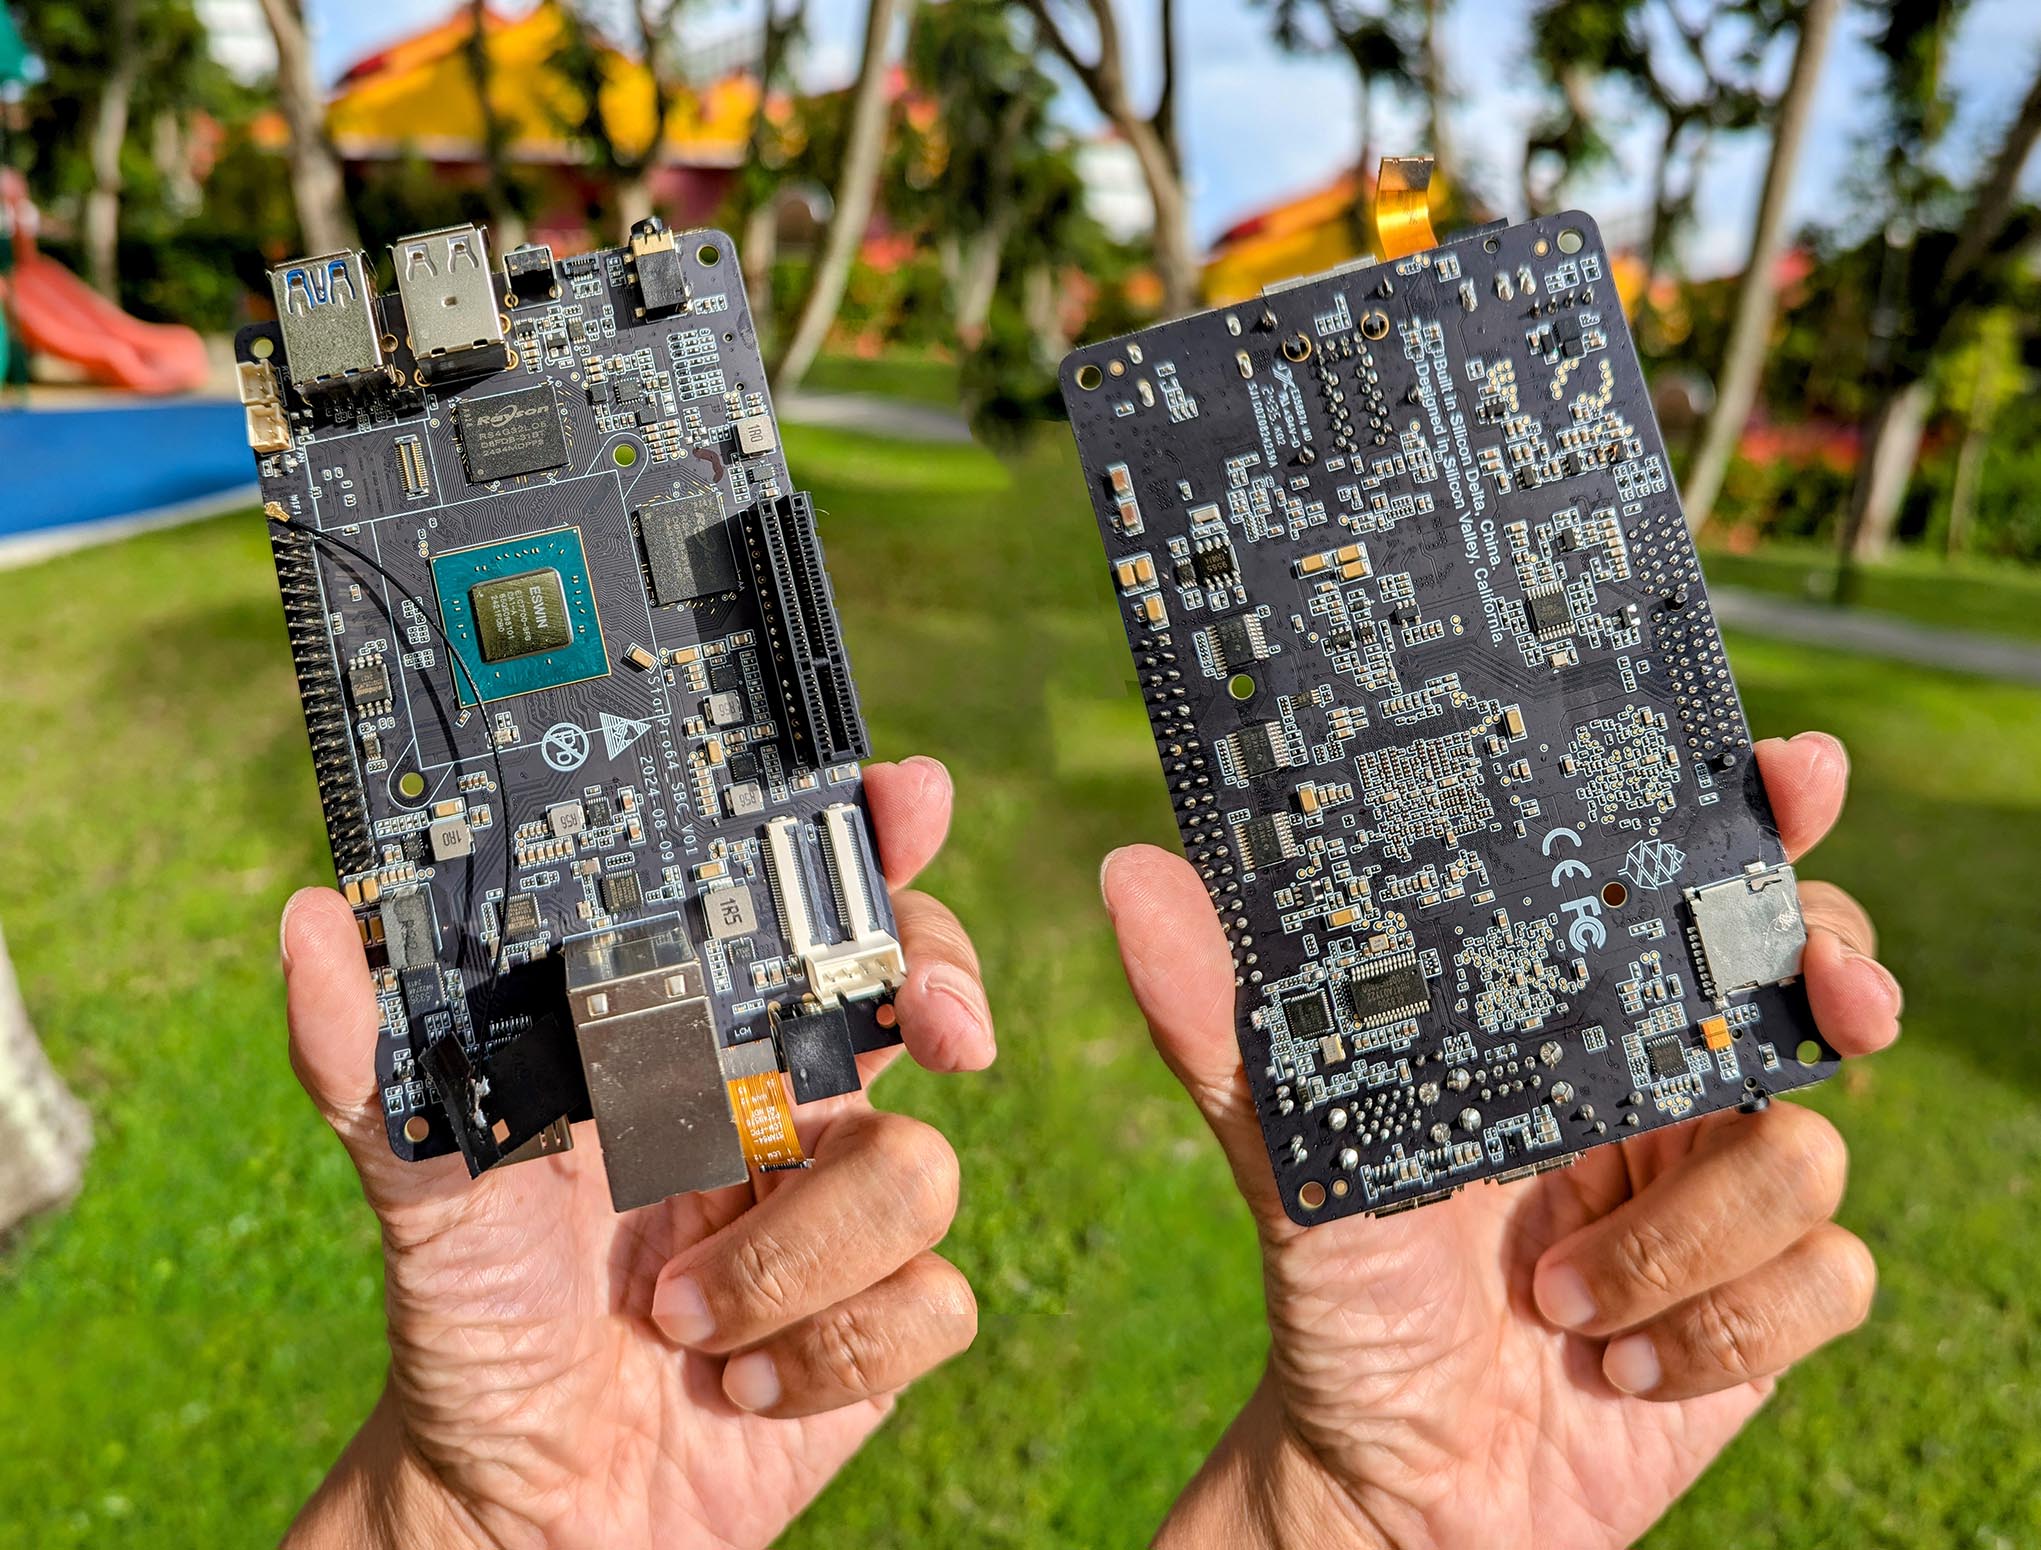
ESWIN EIC7700X, the RISC-V SoC inside StarPro64
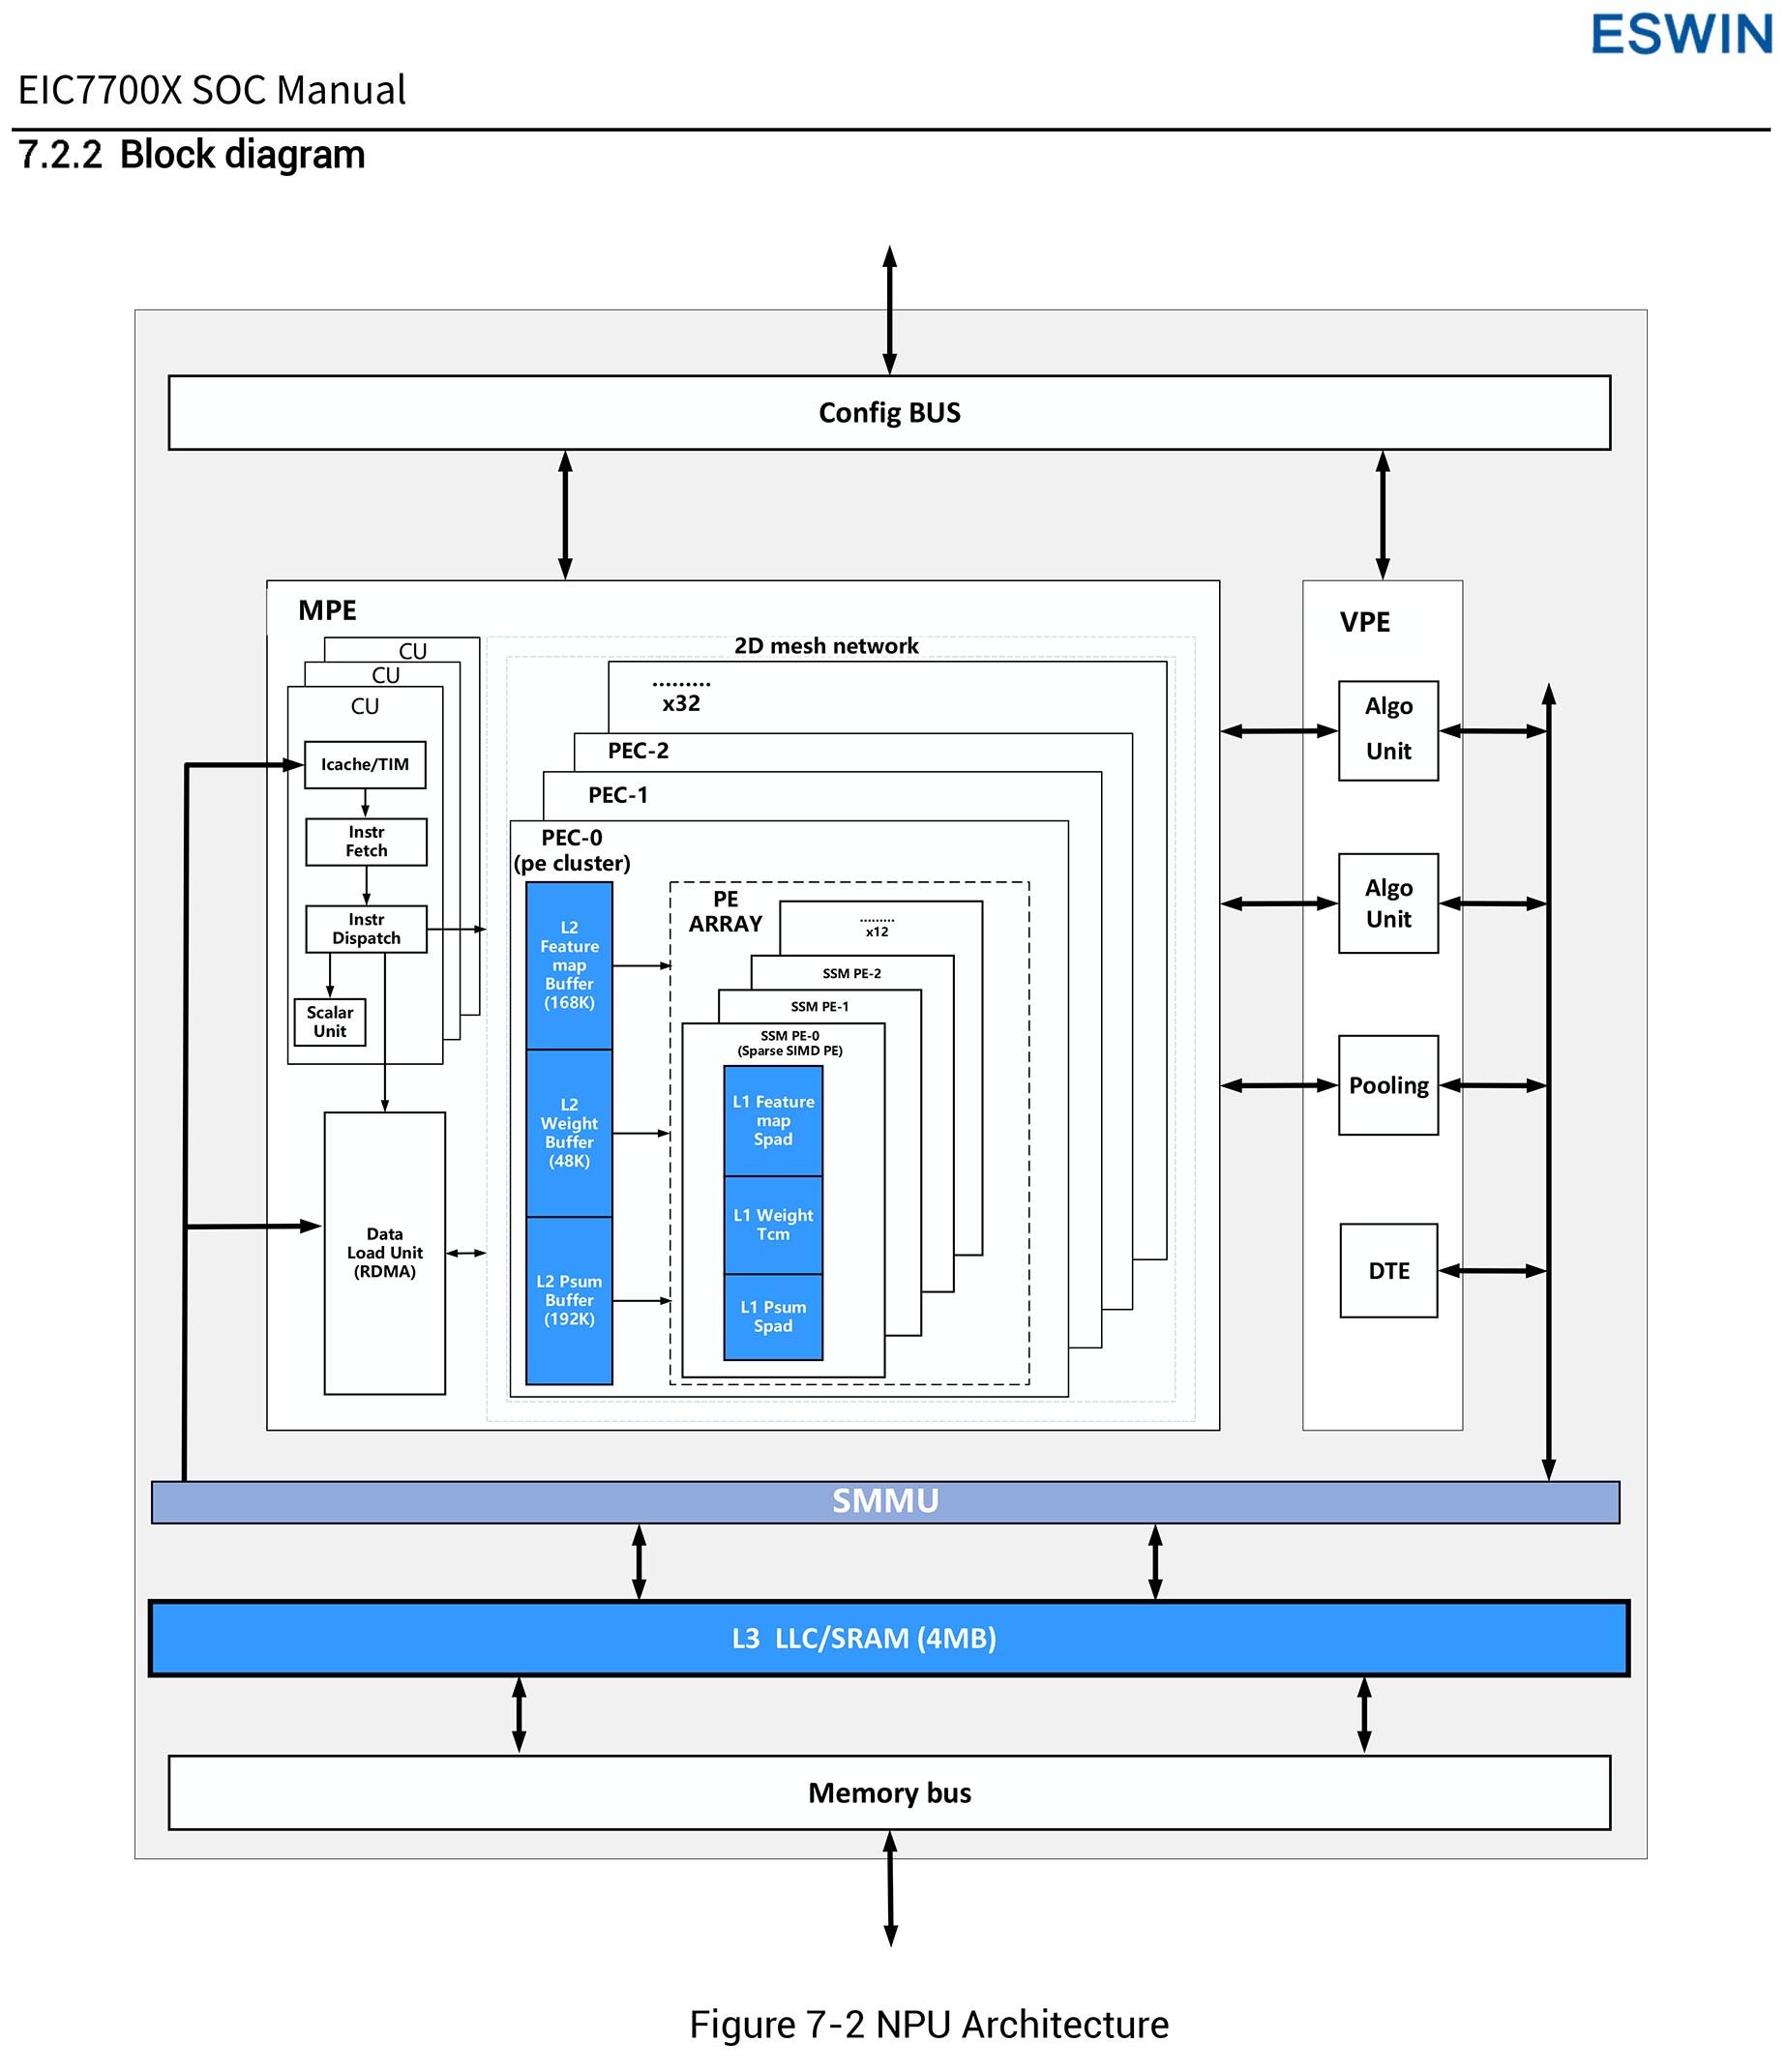
Its Neural Processing Unit (NPU) that supports Large Language Models (LLM)
Booting RockOS Linux on StarPro64
Porting Apache NuttX RTOS to StarPro64
How LLM on NPU on NuttX might work
Multiple Harts are a little problematic
Beware of Overheating!
Smart Power Plug might be helpful
We begin with the RISC-V SoC…
(Watch the NuttX Demo on YouTube)
(Thanks to PINE64 for providing the Prototype StarPro64)
StarPro64: Isn’t it a souped-up Star64?
Nope it’s a totally different beast! (From a different SoC Maker)
Inside StarPro64 is the ESWIN EIC7700X SoC. EIC7700X has Four RISC-V Cores and it’s based on SiFive Architecture (a bit like JH7110 SoC)
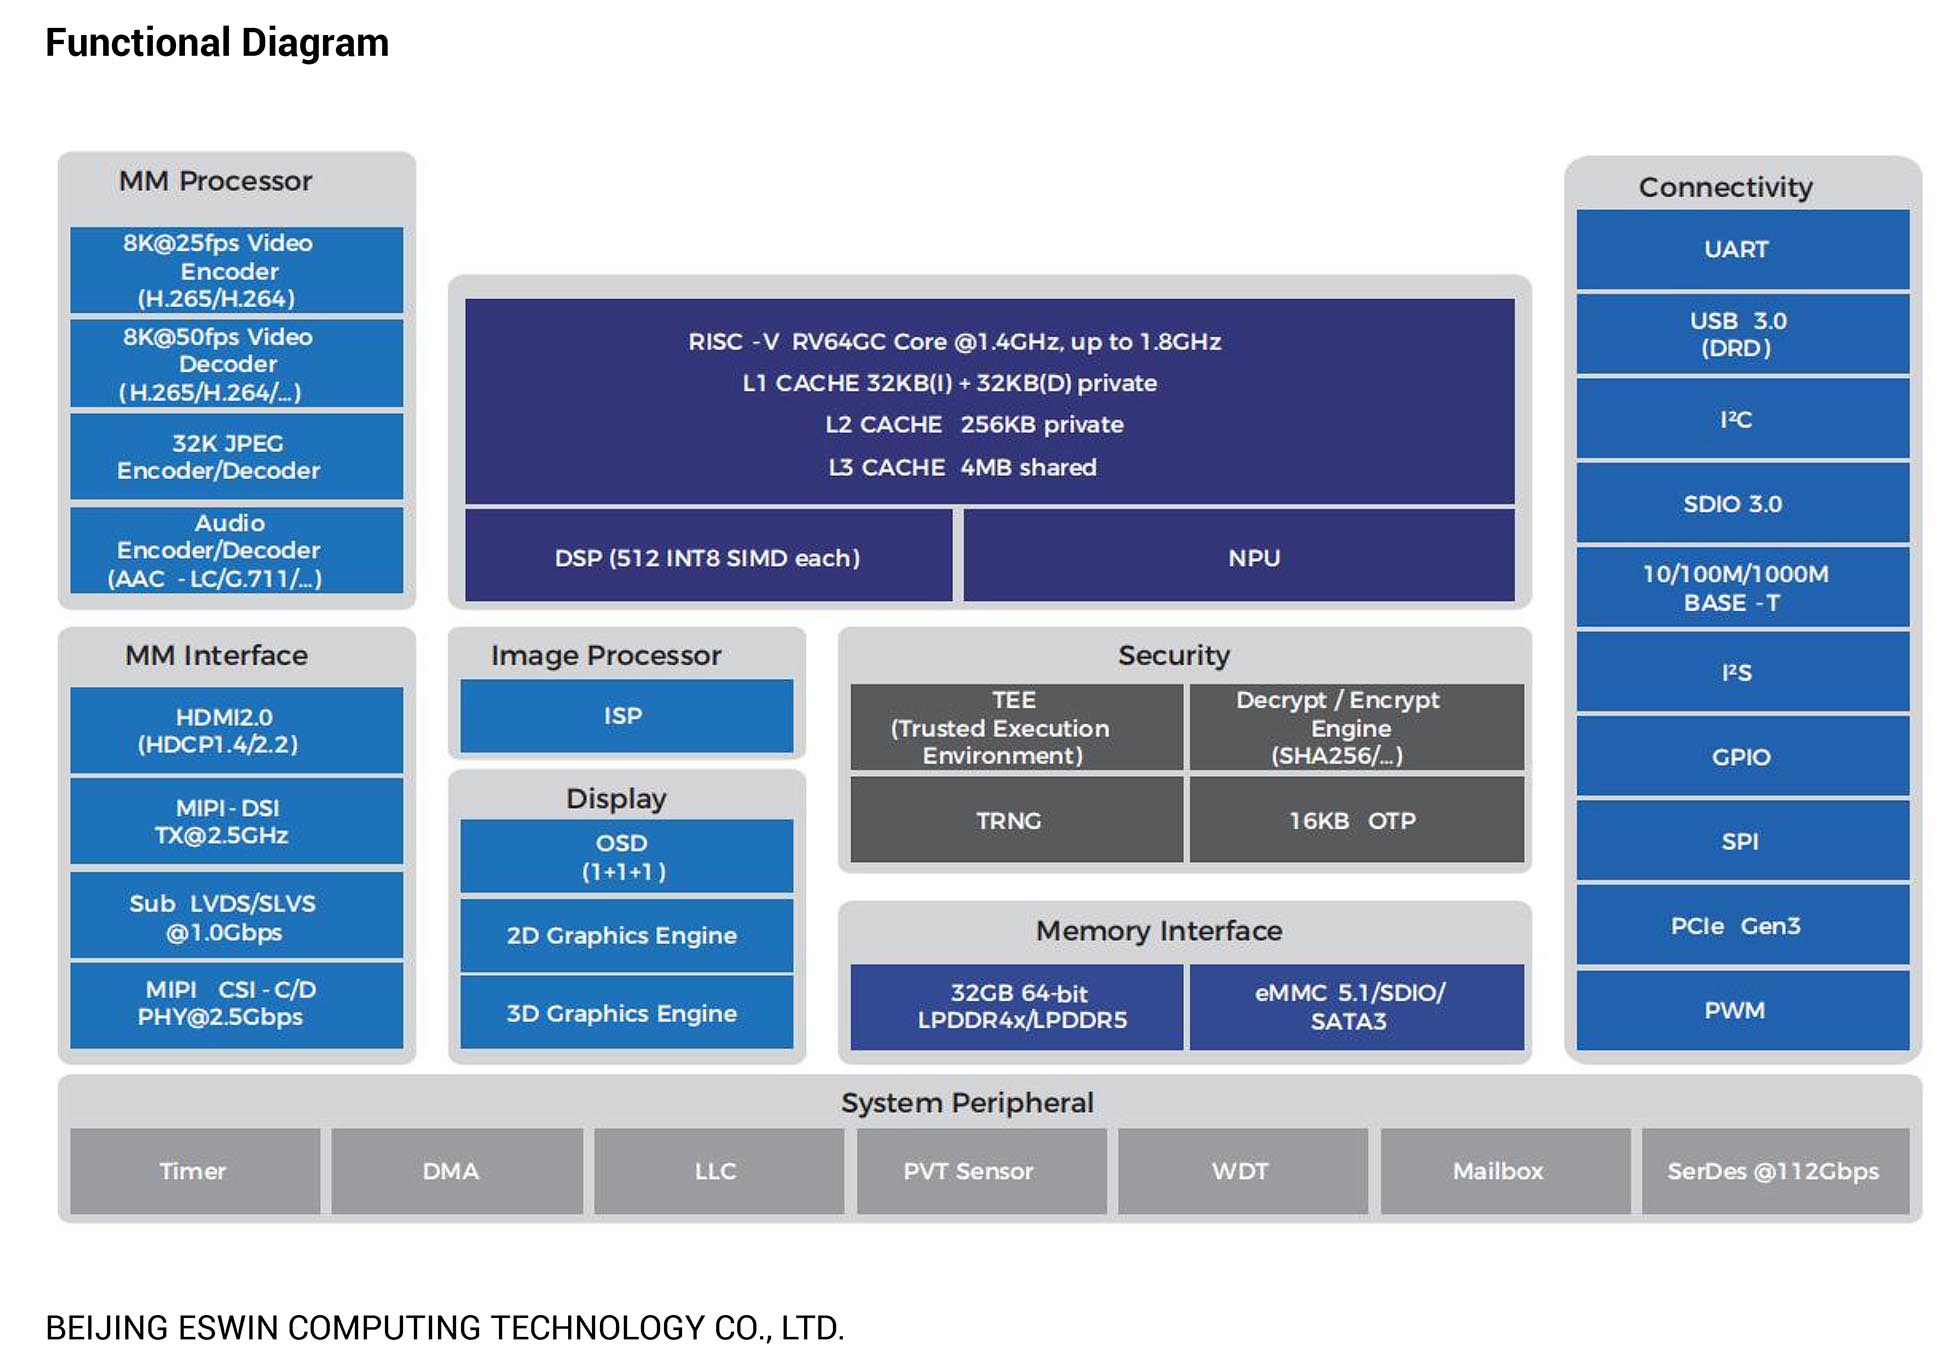
But its super-speedy Neural Processing Unit (NPU) makes it a very special (llama?) beast. Later we’ll talk about the Fun LLM Experiments that we can run on the NPU.
(20 TOPS INT8 = 20 Trillion Ops Per Second for 8-bit Integers)
EIC7700X Technical Reference Manual is probably the best among the RISC-V SoCs (BL808, SG2000, JH7110)
We go hands-on…
What happens if we boot StarPro64? Fresh from the box?
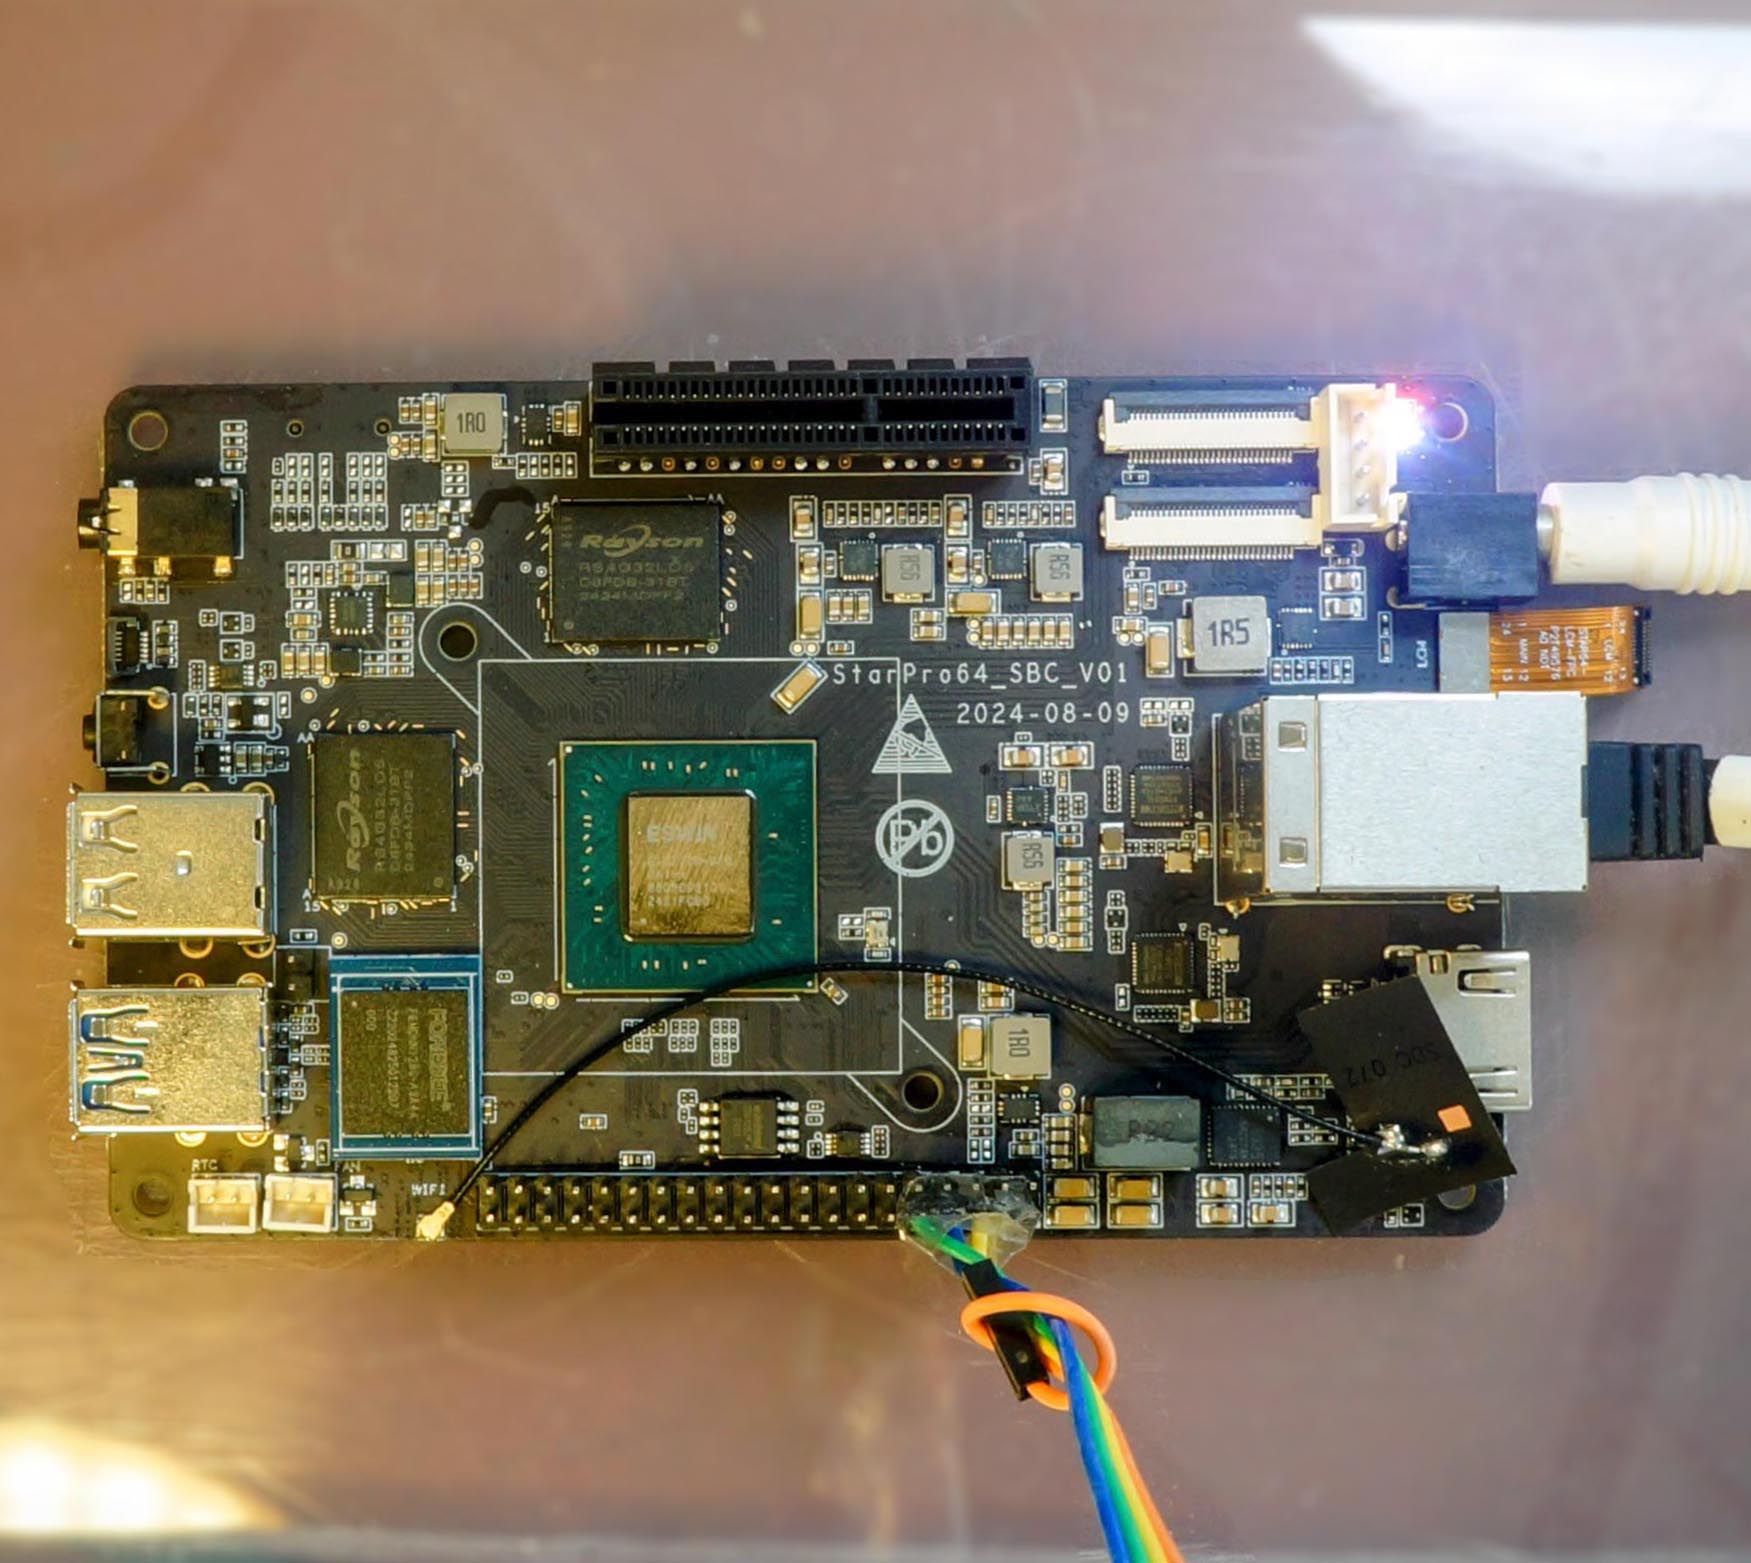
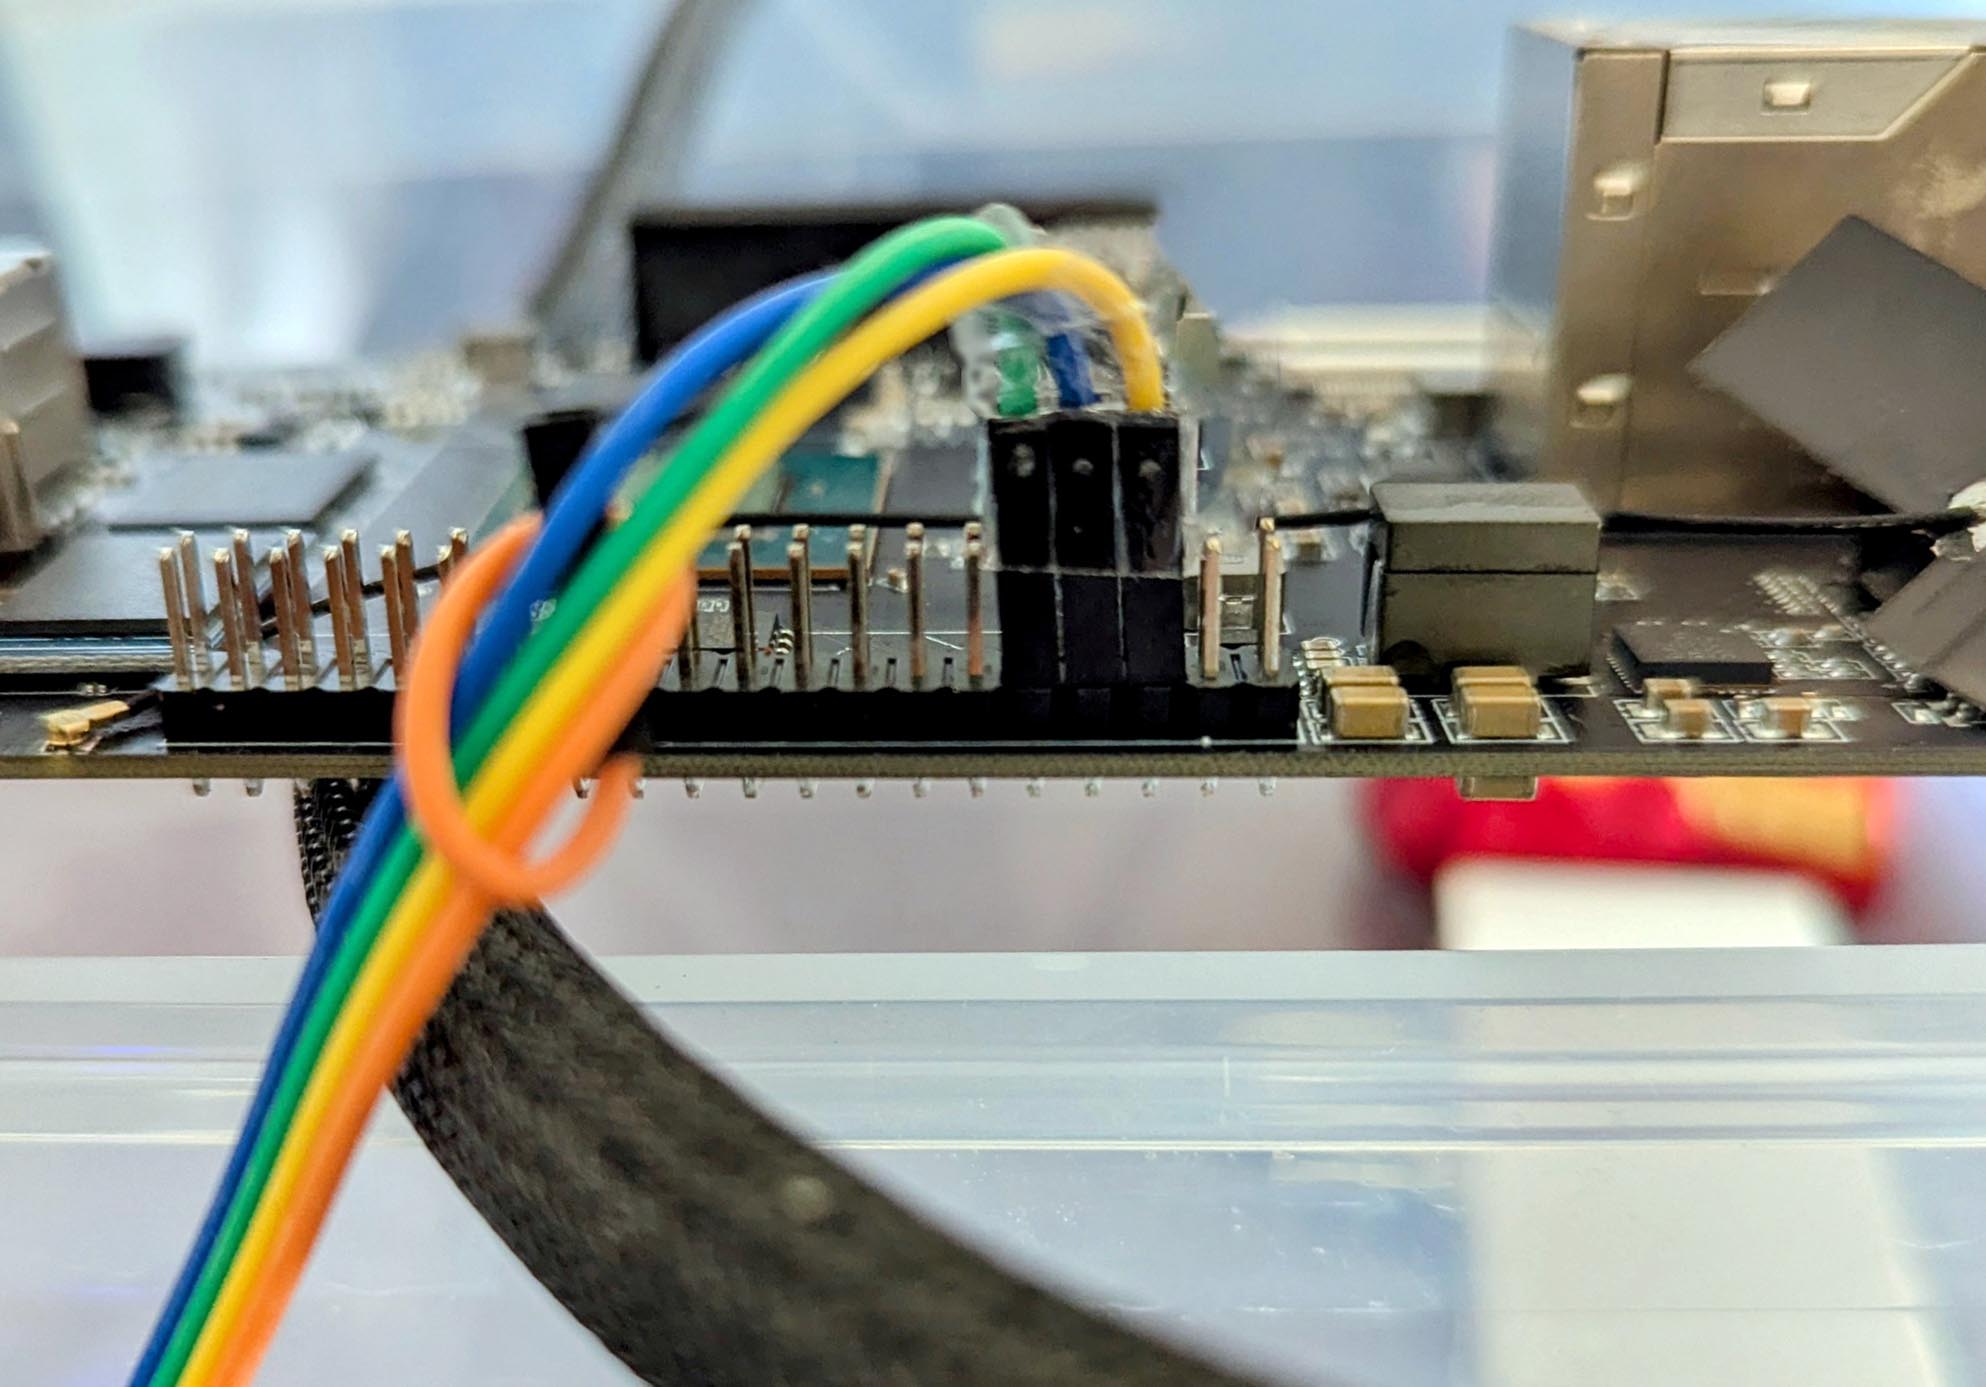
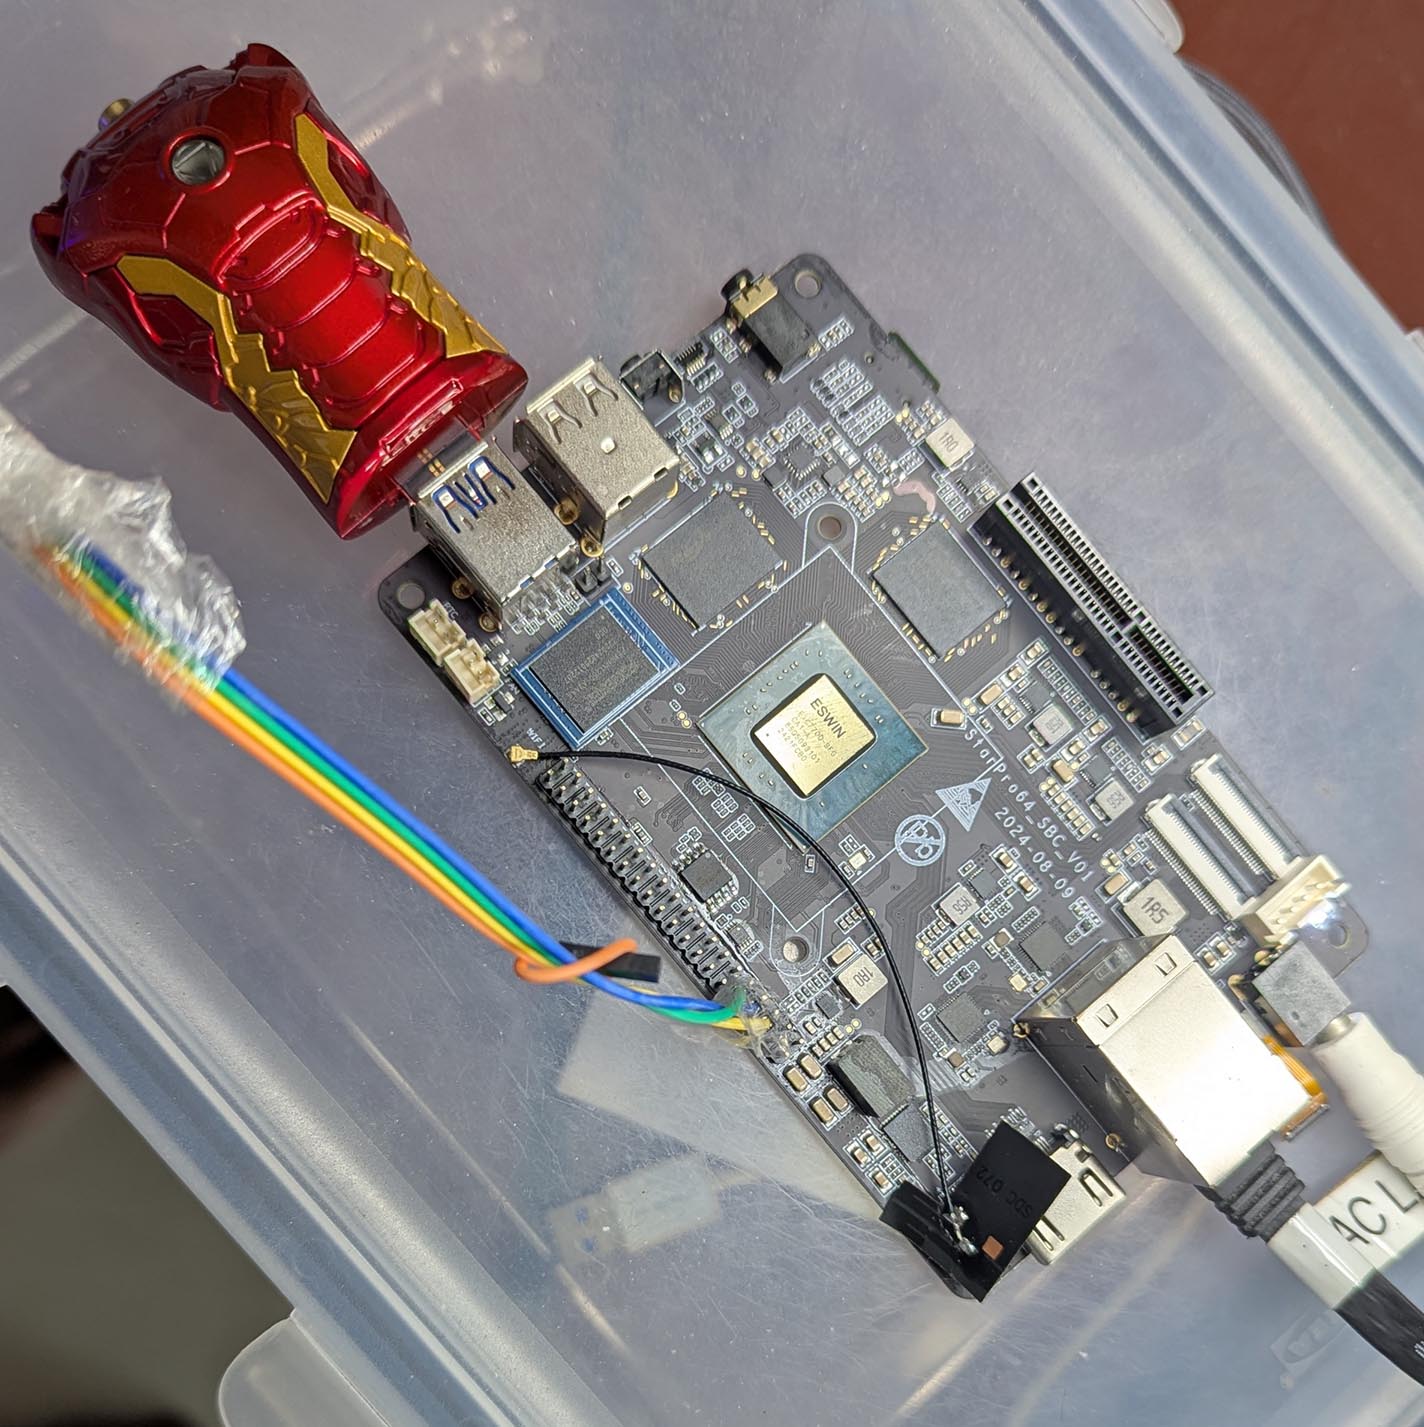
We monitor the UART0 Port for Debug Messages. Connect our USB UART Dongle (CH340 or CP2102) to these pins (pic above)
| StarPro64 | USB UART | Colour |
|---|---|---|
| GND (Pin 6) | GND | Yellow |
| TX (Pin 8) | RX | Blue |
| RX (Pin 10) | TX | Green |
(Same Pins as the GPIO Header on Oz64 SG2000 and Star64 JH7110)
Connect to the USB UART at 115.2 kbps…
screen /dev/ttyUSB0 115200Power up the board with a Power Adapter. (Same one as Star64 JH7110)
We’ll see OpenSBI…
OpenSBI v1.5
   ____                    _____ ____ _____
  / __ \                  / ____|  _ \_   _|
 | |  | |_ __   ___ _ __ | (___ | |_) || |
 | |  | | '_ \ / _ \ '_ \ \___ \|  _ < | |
 | |__| | |_) |  __/ | | |____) | |_) || |_
  \____/| .__/ \___|_| |_|_____/|____/_____|
        | |
        |_|
Platform Name             : ESWIN EIC7700 EVB
Platform Features         : medeleg
Platform HART Count       : 4
Platform Console Device   : uart8250
Firmware Base             : 0x80000000

Domain0 Boot HART         : 2
Domain0 HARTs             : 0*,1*,2*,3*
Domain0 Next Address      : 0x0000000080200000

Boot HART ID              : 2
Boot HART Base ISA        : rv64imafdchx
Boot HART ISA Extensions  : sscofpmf,zihpm,sdtrig
Boot HART MIDELEG         : 0x0000000000002666
Boot HART MEDELEG         : 0x0000000000f0b509
Then U-Boot Bootloader…
U-Boot 2024.01-gaa36f0b4 (Jan 23 2025 - 02:49:59 +0000)
CPU:     rv64imafdc_zba_zbb
Model:   ESWIN EIC7700 EVB
DRAM:    32 GiB (effective 16 GiB)
llCore:  143 devices, 31 uclasses, devicetree: separate
Warning: Device tree includes old 'u-boot,dm-' tags: please fix by 2023.07!
MMC:    sdhci@50450000: 0, sd@50460000: 1

Loading Environment from SPIFlash...
SF: Detected w25q128fw with page size 256 Bytes, erase size 4 KiB, total 16 MiB
*** Warning - bad CRC, using default environment
No SATA device found!
Hit any key to stop autoboot:  0
=>
And it stops at U-Boot, waiting to boot from MicroSD or eMMC. Let’s init our eMMC…
HDMI Output will show U-Boot, but not OpenSBI
Is there a Linux Image for StarPro64?
The fine folks at PLCT Lab RockOS are busy preparing the Linux Image for StarPro64. Thanks to @icenowy, we have a Preview Version of the Linux Image…
Bootloader (OpenSBI + U-Boot)
Linux Boot Image (Linux Kernel)
Linux Root Image (Linux Filesystem)
Uncompress the files and rename them. Copy them to a USB Drive (not MicroSD)
$ ls -lh *.bin *.zst
4.2M  bootloader_secboot_ddr5_pine64-starpro64.bin
154M  boot-rockos-20250123-210346.ext4.zst
2.3G  root-rockos-20250123-210346.ext4.zst

$ unzstd boot-rockos-20250123-210346.ext4.zst
boot-rockos-20250123-210346.ext4.zst: 524288000 bytes

$ unzstd root-rockos-20250123-210346.ext4.zst
root-rockos-20250123-210346.ext4.zst: 7516192768 bytes

$ mv boot-rockos-20250123-210346.ext4 boot.ext4
$ mv root-rockos-20250123-210346.ext4 root.ext4

$ ls -lh *.bin *.ext4
4.2M  bootloader_secboot_ddr5_pine64-starpro64.bin
500M  boot.ext4
7.0G  root.ext4

$ cp *.bin *.ext4 /media/$USER/YOUR_USB_DRIVE
We’ll skip the MicroSD Image, because MicroSD Interface wasn’t working reliably on our Prototype StarPro64.
How to load the Linux Image into eMMC?
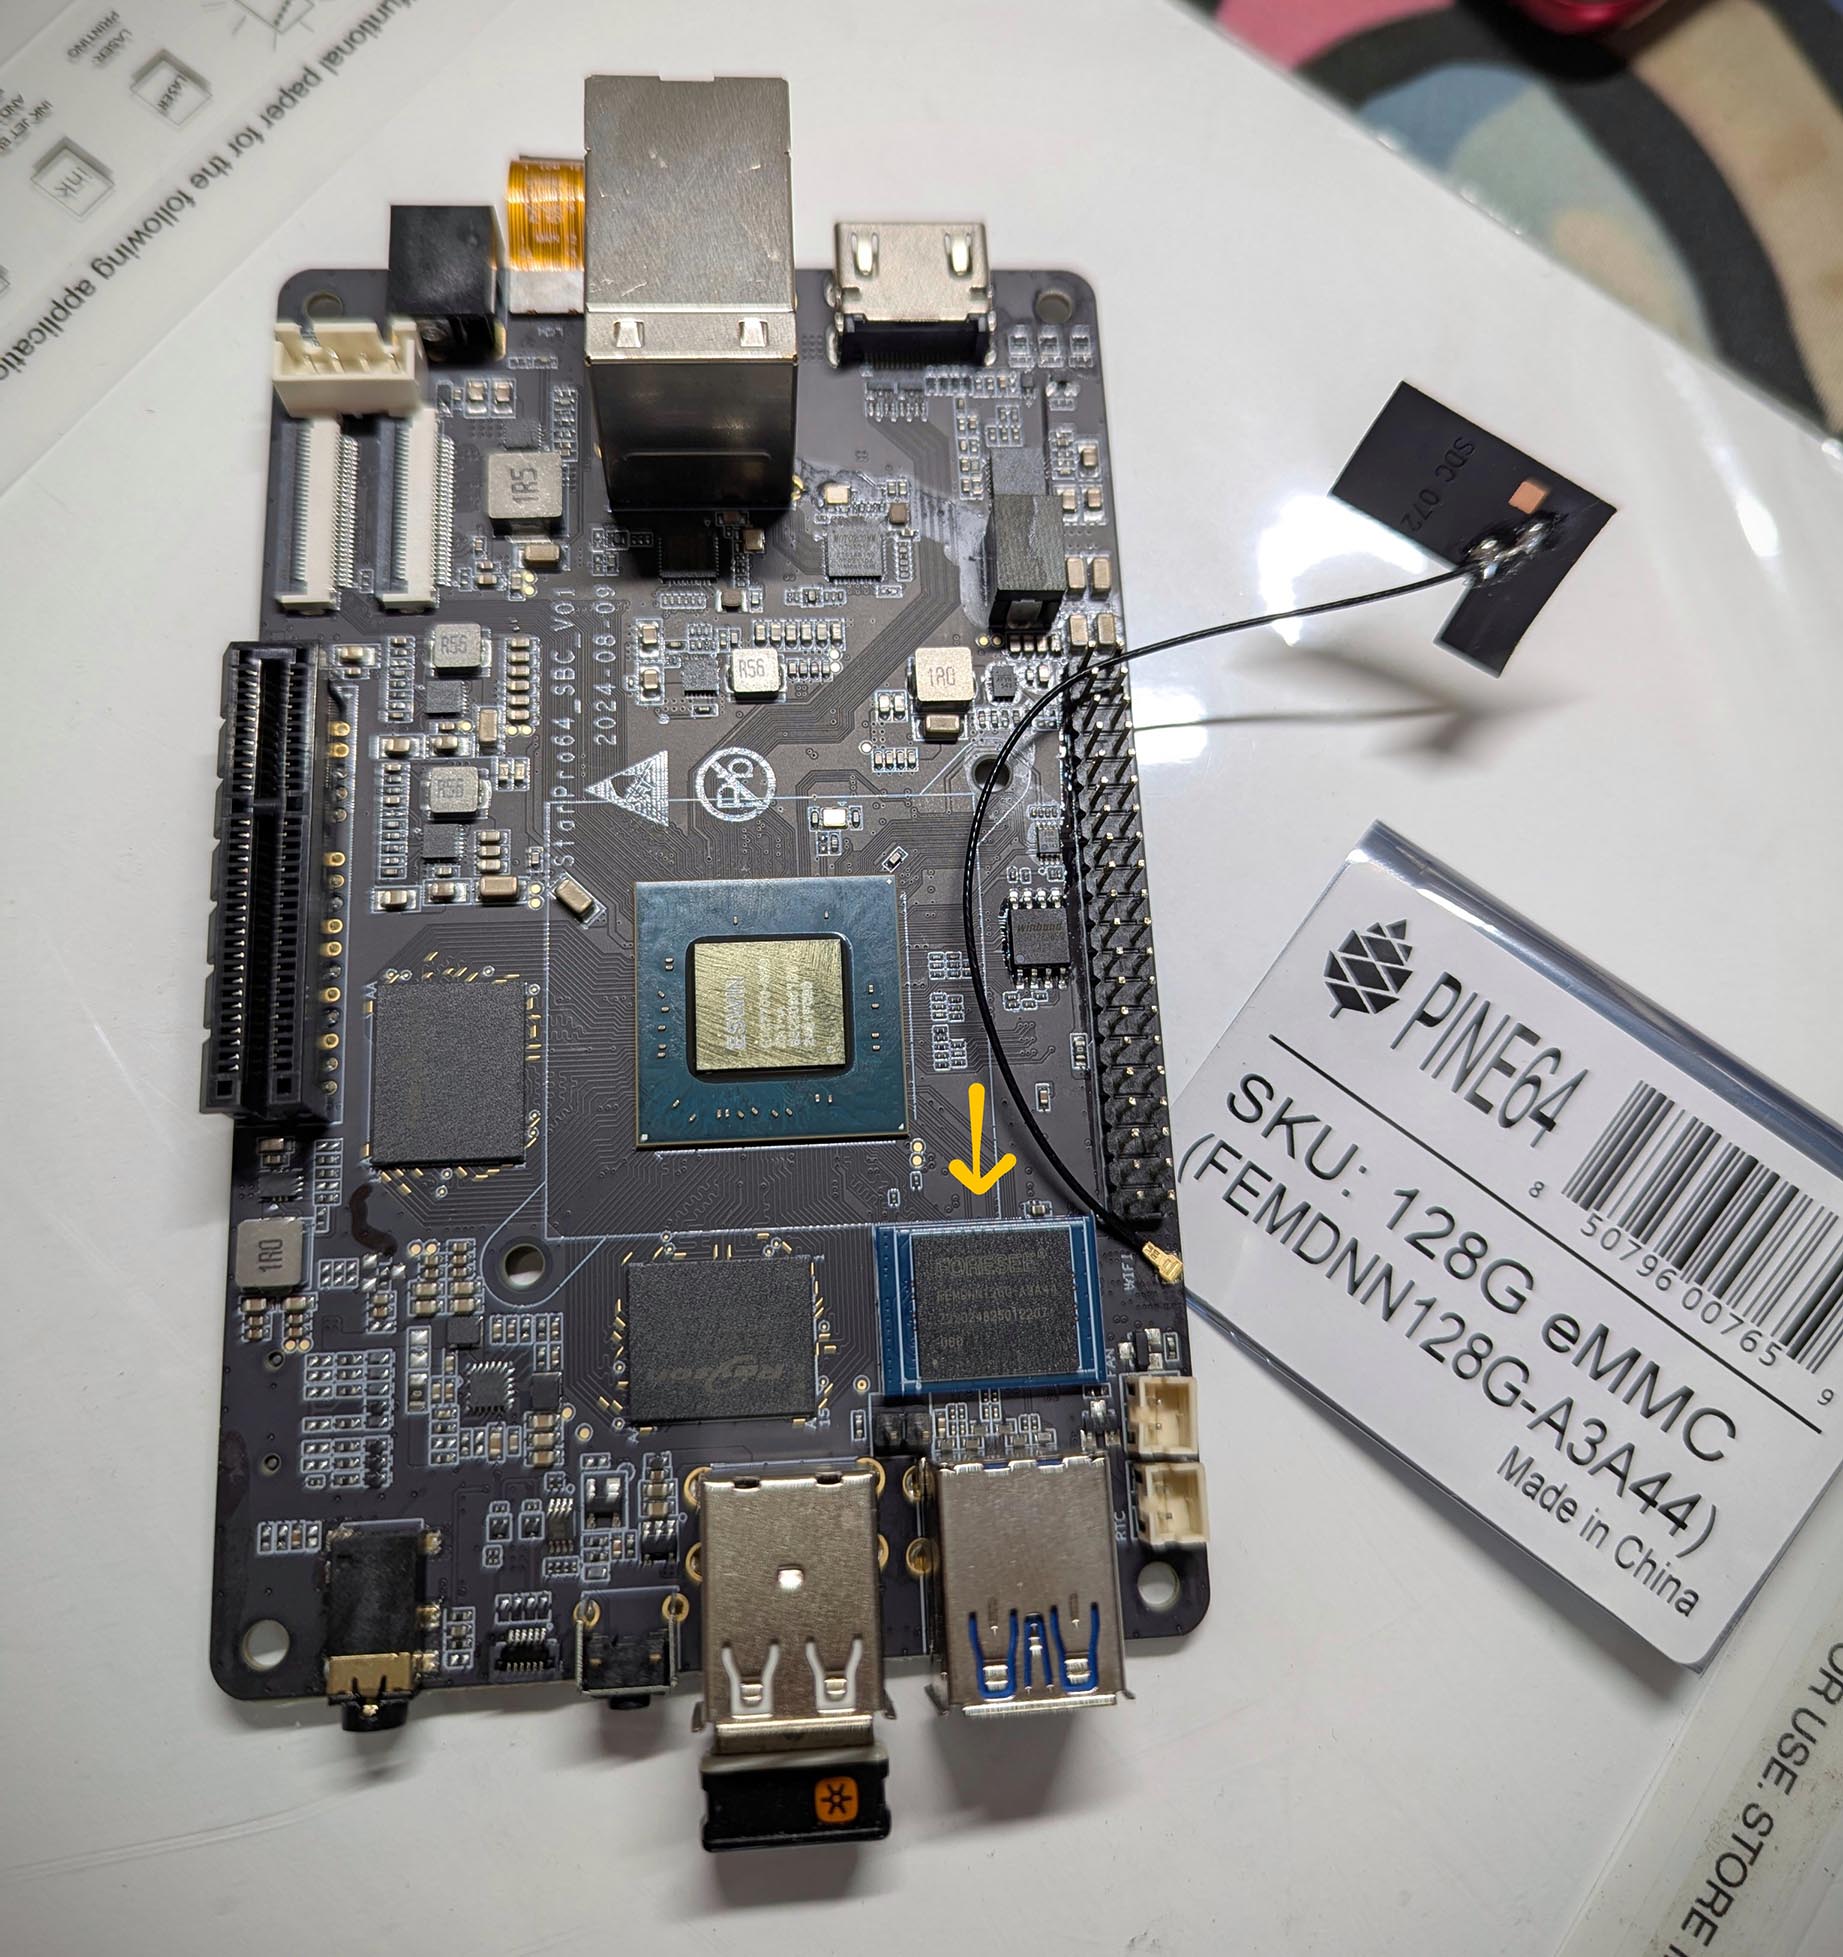
Based on the ESWIN Official Doc…
Connect our eMMC to StarPro64 (pic above)
Connect our USB Drive (Previous Section)
At U-Boot: Press Ctrl-C until U-Boot stops
Verify that the eMMC is OK…
$ ls mmc 0
[ Nothing ]

$ mmc part
[ Nothing ]
First Time Only: GPT Partition our eMMC…
$ echo $partitions
partitions=
  name=boot,start=1MiB,size=2048MiB,type=${typeid_filesystem},uuid=${uuid_boot};
  name=swap,size=4096MiB,type=${typeid_swap},uuid=${uuid_swap};
  name=root,size=-,type=${typeid_filesystem},uuid=${uuid_root}

$ run gpt_partition
$ mmc part
  1 0x00000800 0x001007ff "boot"
  2 0x00100800 0x009007ff "swap"
  3 0x00900800 0x0e677fde "root"
Verify that our USB Drive works…
$ ls usb 0
 524288000 boot.ext4
7516192768 root.ext4
   4380760 bootloader_secboot_ddr5_pine64-starpro64.bin
Install the Bootloader, Boot Image and Root Image, from USB Drive to eMMC…
$ es_fs update usb 0 boot.ext4 mmc 0:1
mmc has been successfully writen in mmc 0:1

$ es_fs update usb 0 root.ext4 mmc 0:3
mmc has been successfully writen in mmc 0:3

$ ext4load usb 0 0x100000000 bootloader_secboot_ddr5_pine64-starpro64.bin
4380760 bytes read in 162 ms (25.8 MiB/s)

$ es_burn write 0x100000000 flash
bootloader write OKBeware of Overheating! Keep StarPro64 cool, or the previous step might corrupt the SPI Boot Flash and cause unspeakable agony…
Something is smelling like barbecue?
Whoa StarPro64 is on fire: Drop it, stop it and power off! StarPro64 will show PLL Errors when it overheats…
pll failed.
pll failed.
pll failed.
Also watch for Thermal Errors when booting Linux…
thermal thermal_zone0: thermal0:
critical temperature reached, shutting down
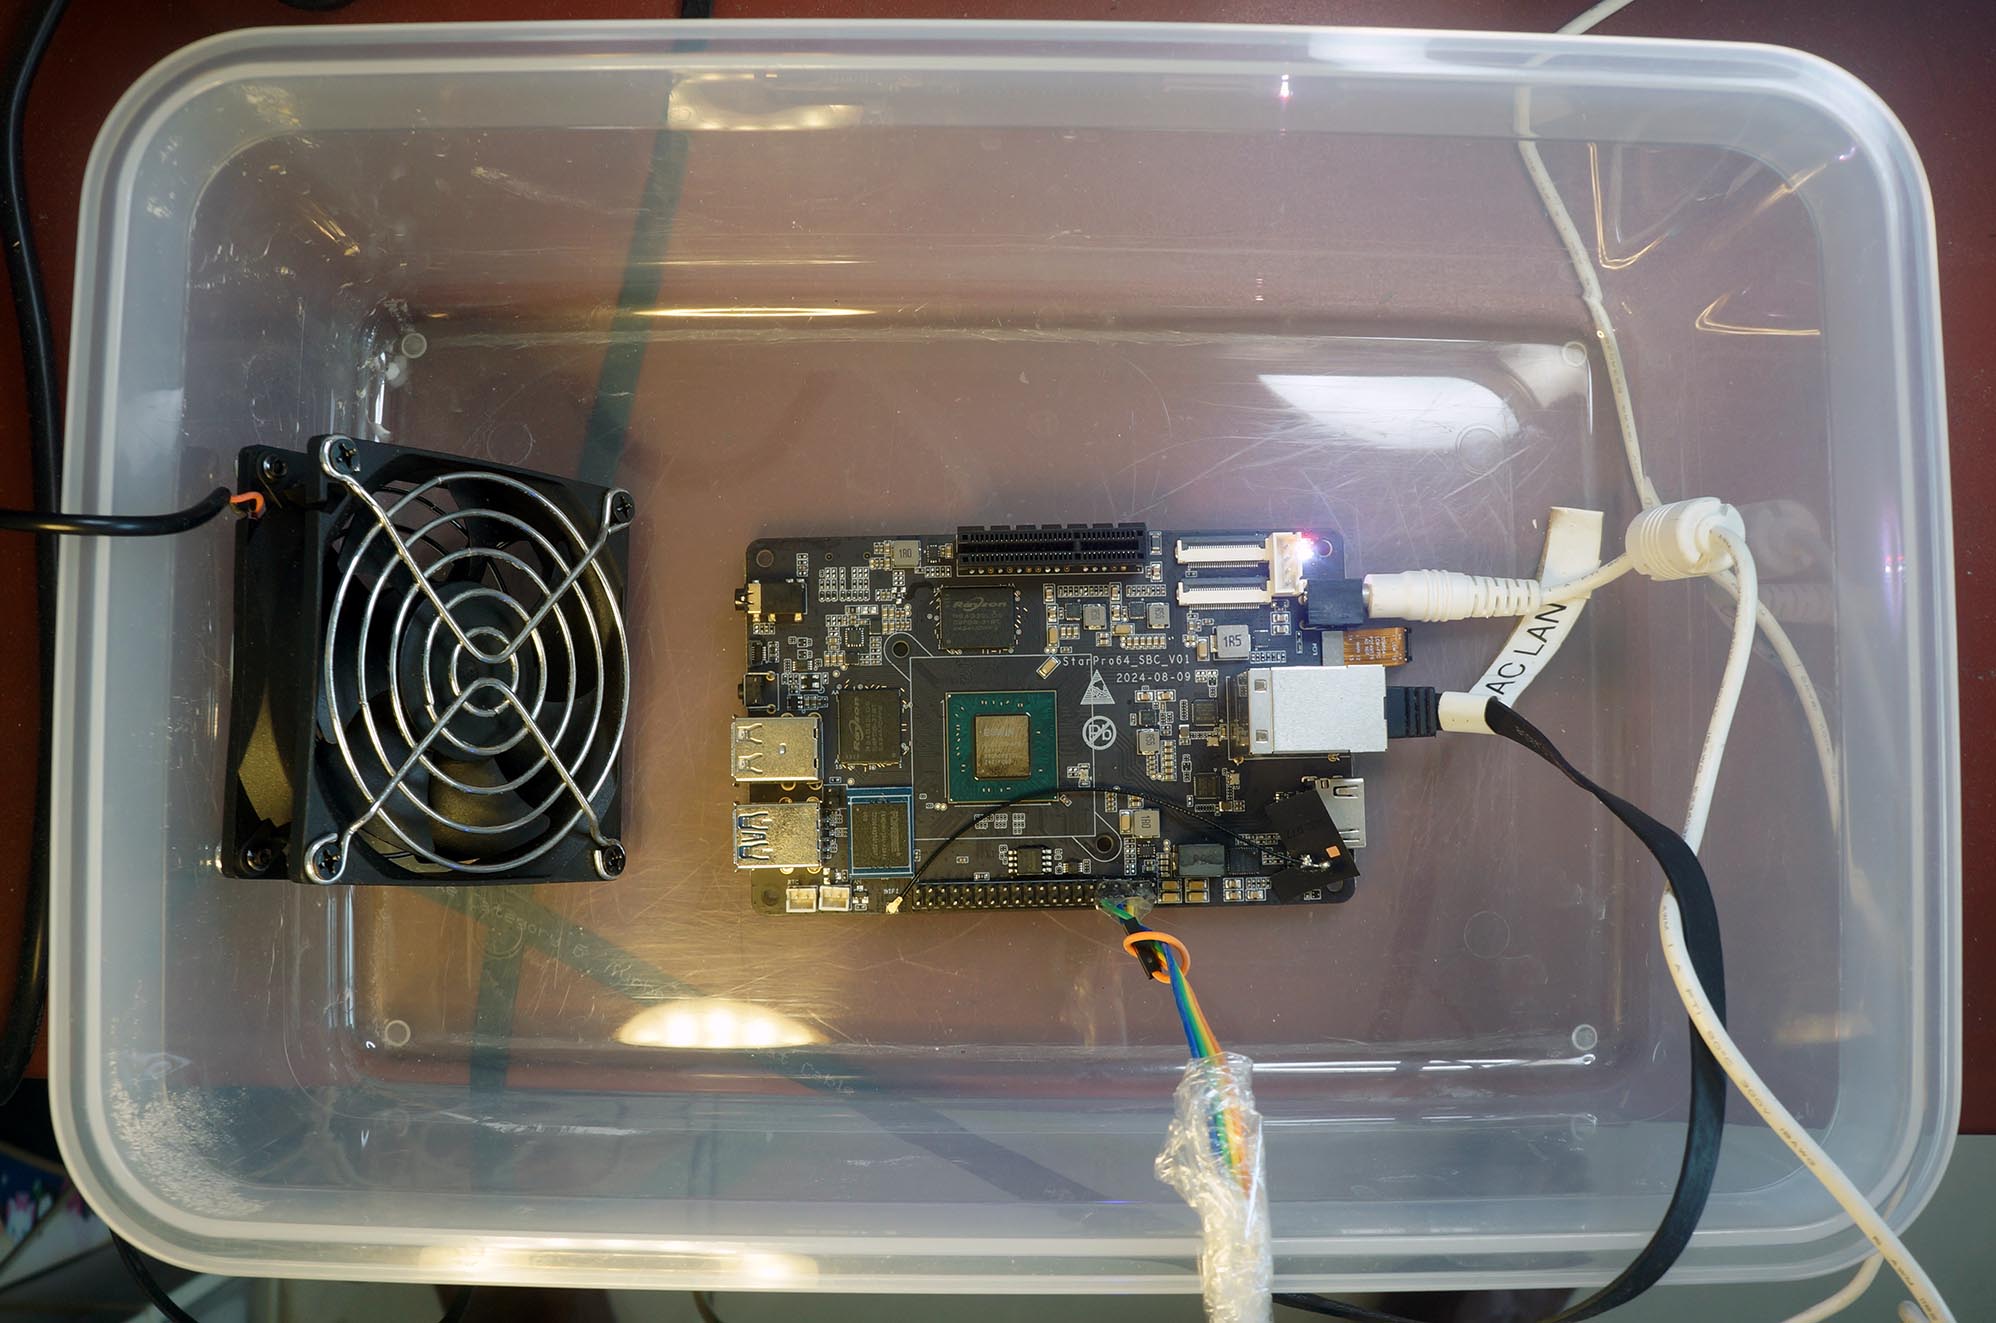
reboot: HARDWARE PROTECTION shutdown (Temperature too high)Install a USB Fan, preferably something stronger. (Pic above, boxed up with IKEA 365+)
But don’t power it with the USB Port on StarPro64! Instead, connect it to our Smart Power Plug.
Anything else we should worry about?
The MicroSD Interface wasn’t working well on our Prototype StarPro64. The MicroSD Card deactivated itself after a bit of U-Boot Access.
Hence the Headless Ironman: USB Drive on StarPro64…
Earlier we flashed Linux to eMMC. Can we boot Linux now?
Yep just power up StarPro64. eMMC will Boot Linux…
U-Boot menu
1: RockOS GNU/Linux 6.6.73-win2030
2: RockOS GNU/Linux 6.6.73-win2030 (rescue target)
Enter choice: 1: RockOS GNU/Linux 6.6.73-win2030
Retrieving file: /vmlinuz-6.6.73-win2030
Retrieving file: /initrd.img-6.6.73-win2030
append: root=PARTUUID=b0f77ad6-36cd-4a99-a8c0-31d73649aa08 console=ttyS0,115200 root=PARTUUID=b0f77ad6-36cd-4a99-a8c0-31d73649aa08 rootfstype=ext4 rootwait rw earlycon selinux=0 LANG=en_US.UTF-8
Retrieving file: /dtbs/linux-image-6.6.73-win2030/eswin/eic7700-pine64-starpro64.dtb
Uncompressing Kernel Image
Moving Image from 0x84000000 to 0x80200000, end=81e63000
## Flattened Device Tree blob at 88000000
Booting using the fdt blob at 0x88000000
Working FDT set to 88000000
ERROR: reserving fdt memory region failed (addr=fffff000 size=1000 flags=4)
Using Device Tree in place at 0000000088000000, end 0000000088027af4
Working FDT set to 88000000
Starting kernel ...
Linux version 6.6.73-win2030 (riscv@riscv-builder) (riscv64-unknown-linux-gnu-gcc () 13.2.0, GNU ld (GNU Binutils) 2.42) #2025.01.23.02.46+aeb0f375c SMP Thu Jan 23 03:08:39 UTC 2025
Machine model: Pine64 StarPro64
...
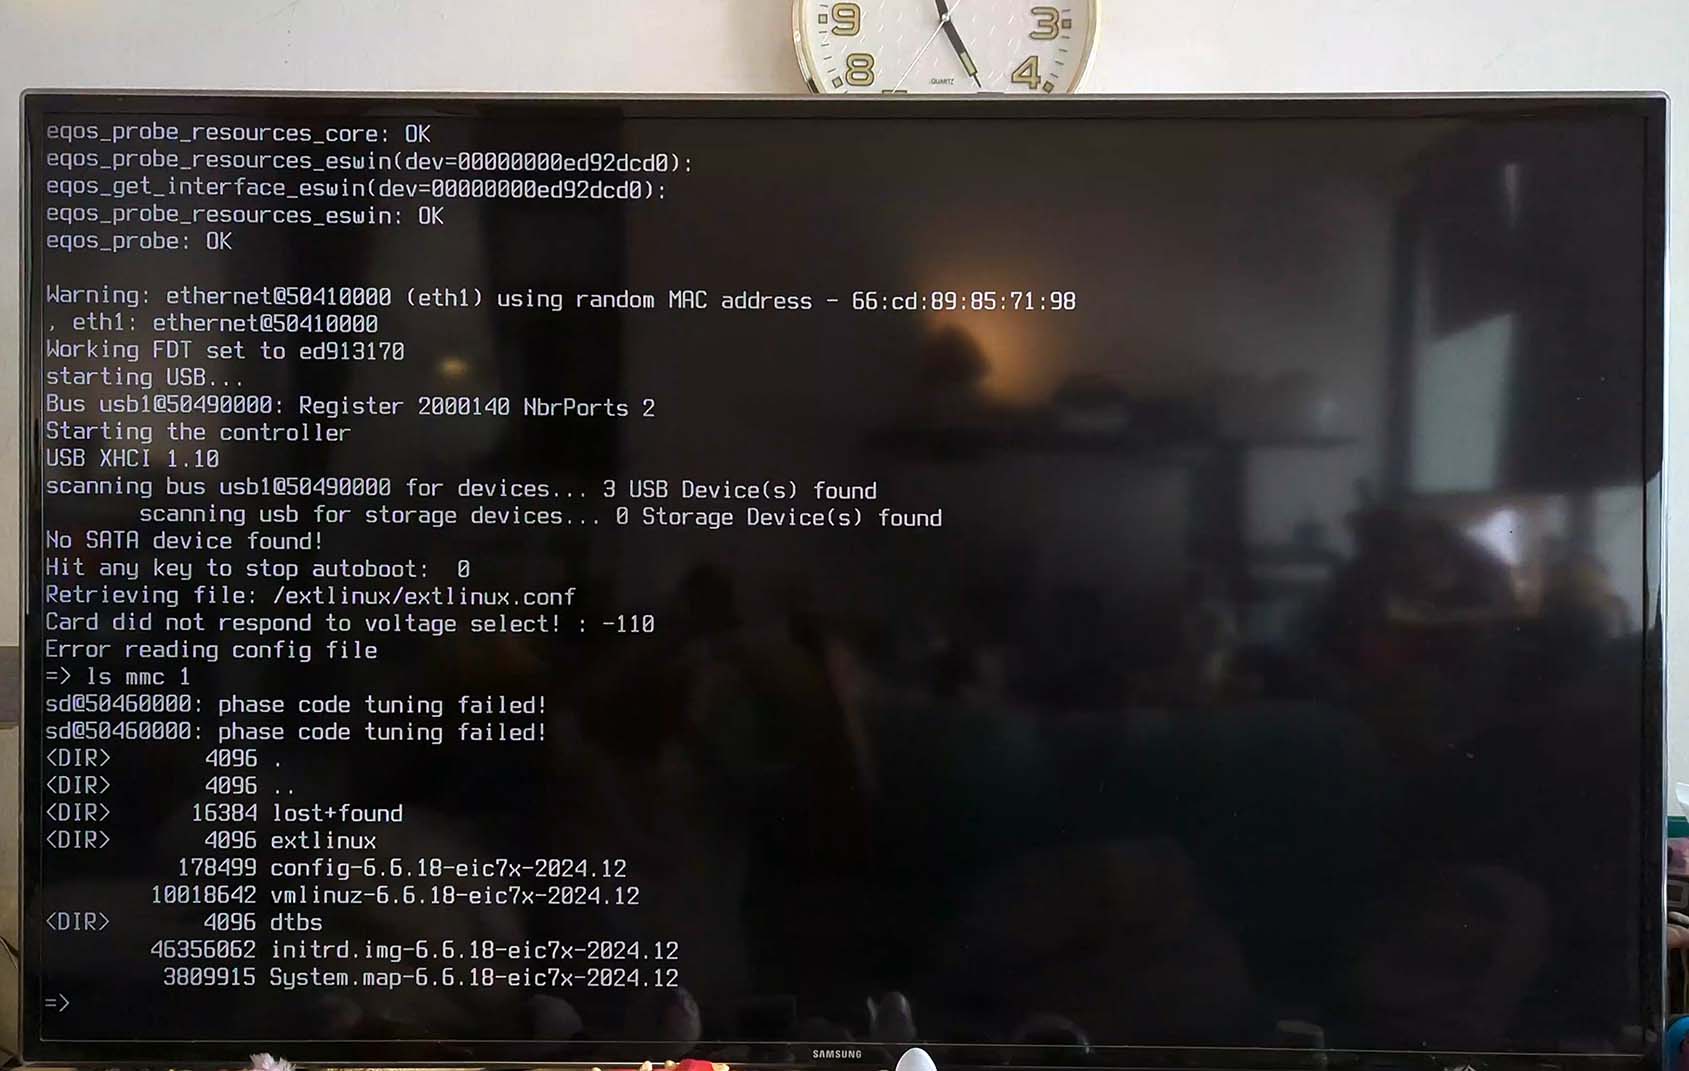
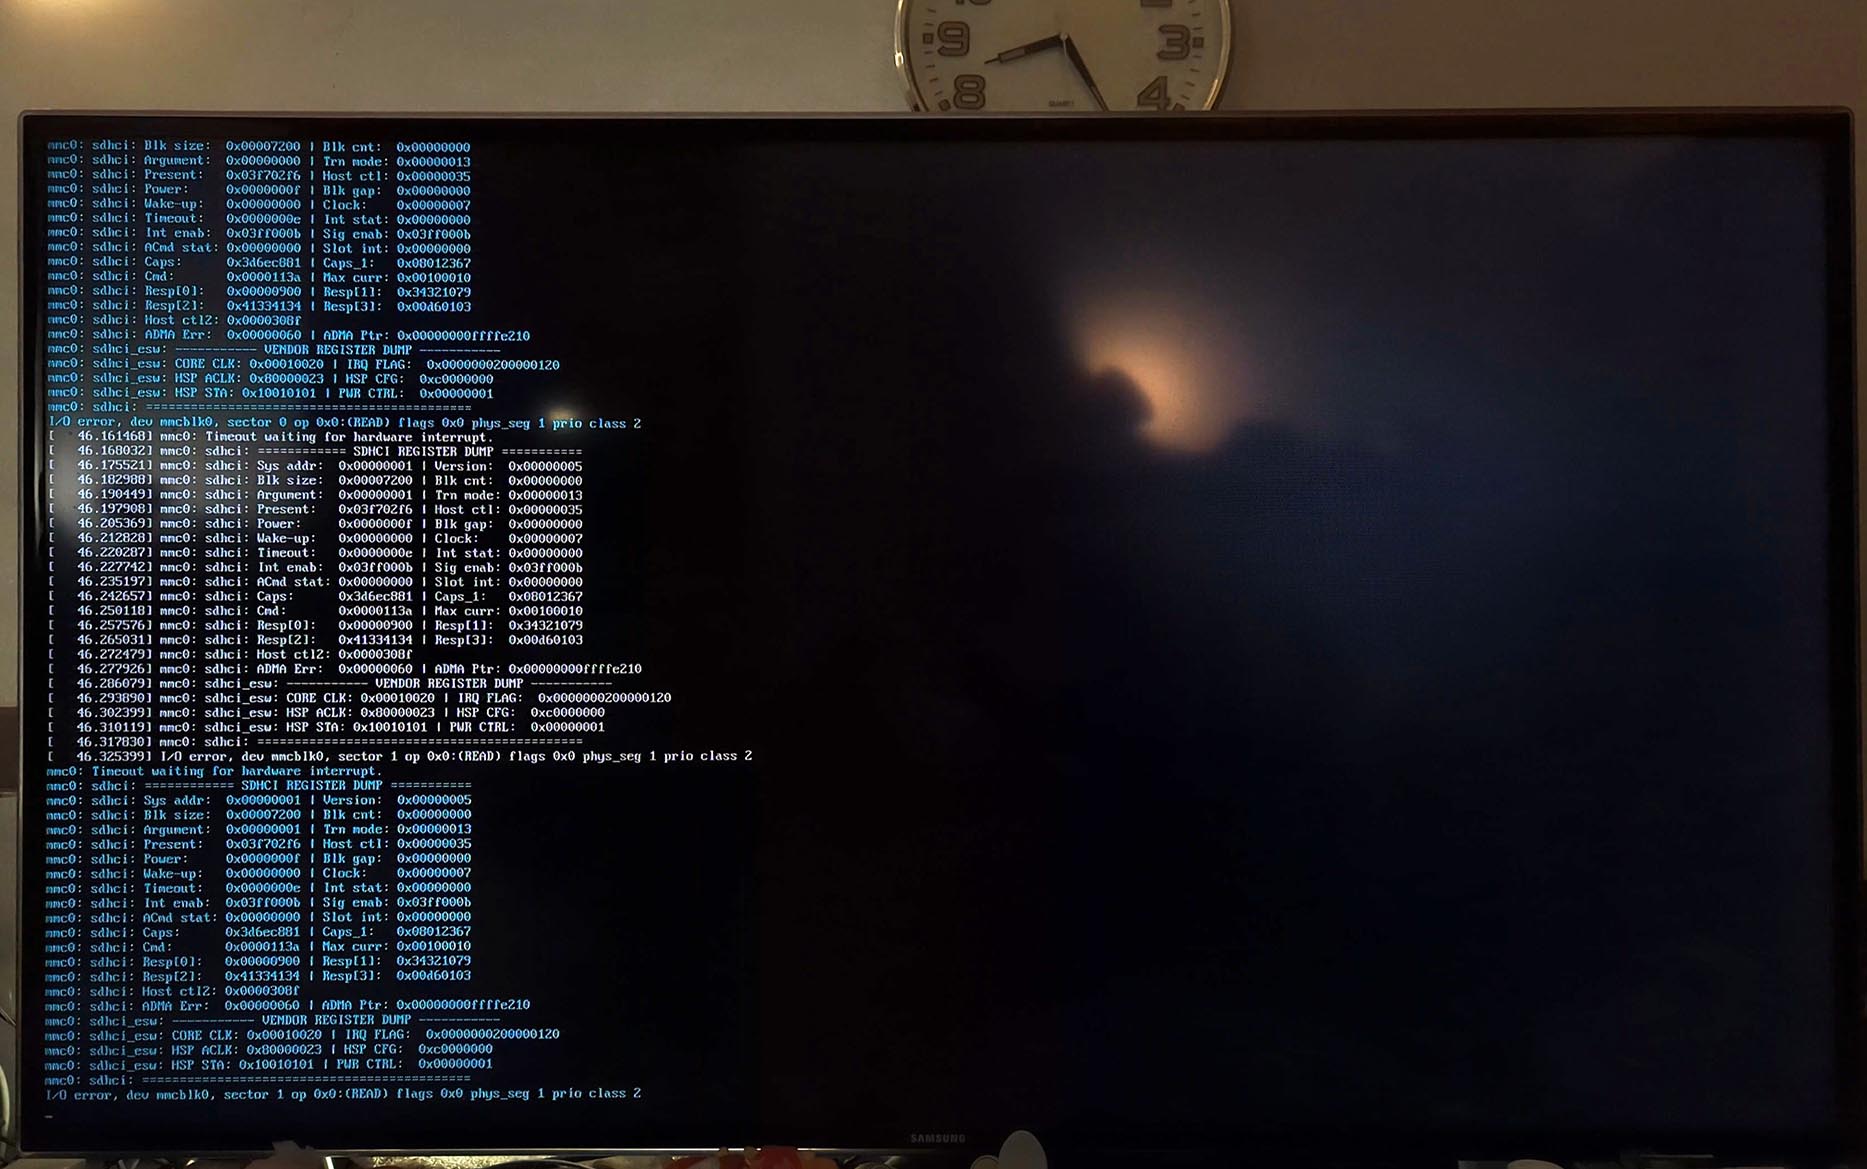
mmc0: Timeout waiting for hardware interrupt.
mmc0: sdhci: ============ SDHCI REGISTER DUMP ===========
mmc0: sdhci: Sys addr: 0x00000008 | Version: 0x00000005
mmc0: sdhci: Blk size: 0x00007200 | Blk cnt: 0x00000000Sadly the Preview Version of RockOS won’t boot correctly on our Prototype StarPro64 (pic below). Hopefully we’ll sort this out real soon and do some Serious NPU LLM!
Bummer. What else can we boot on StarPro64?
Let’s snoop around U-Boot Bootloader. And figure out how to boot Apache NuttX RTOS.
Power up StarPro64 and press Ctrl-C until U-Boot stops. At the U-Boot Prompt: We enter these commands…
$ help
printenv  - print environment variables
saveenv   - save environment variables to persistent storage
net       - NET sub-system
dhcp      - boot image via network using DHCP/TFTP protocol
tftpboot  - load file via network using TFTP protocol
fdt       - flattened device tree utility commands
booti     - boot Linux kernel 'Image' format from memory

$ printenv
fdt_addr_r=0x88000000
kernel_addr_r=0x84000000
loadaddr=0x80200000A-ha! This says…
U-Boot supports booting over TFTP: Trivial File Transfer Protocol
It will load the Kernel Image (Linux / NuttX) into RAM at 0x8400 0000
Then it will move the Kernel Image to 0x8020 0000 and boot there
Also it loads the Device Tree into 0x8800 0000
Thanks U-Boot! You told us everything we need to Boot NuttX…
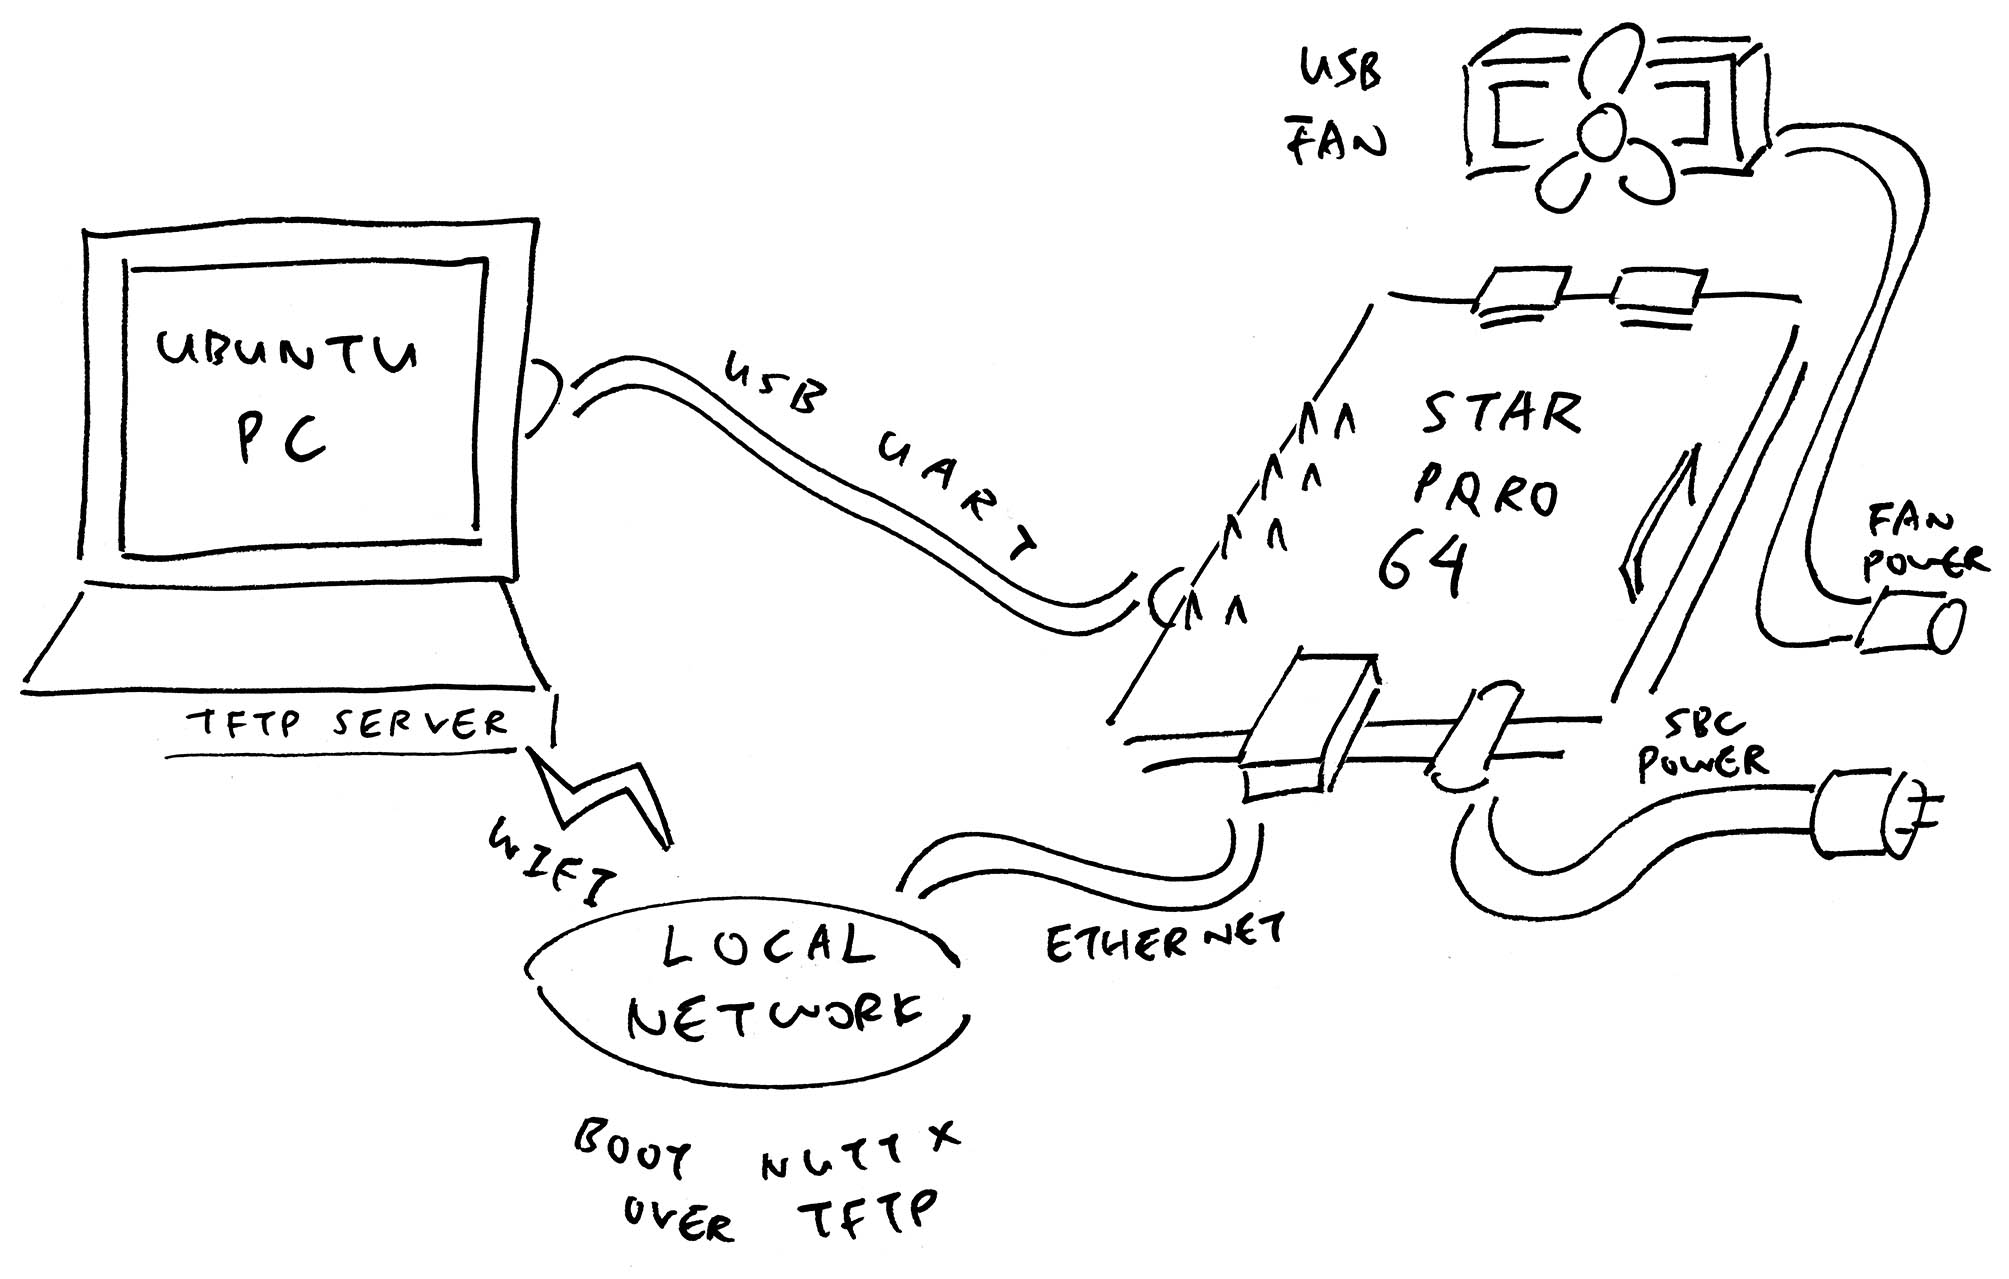
How to boot NuttX over TFTP? (Pic above)
Install our TFTP Server: Follow the instructions here
Copy these files to our TFTP Server…
Like so…
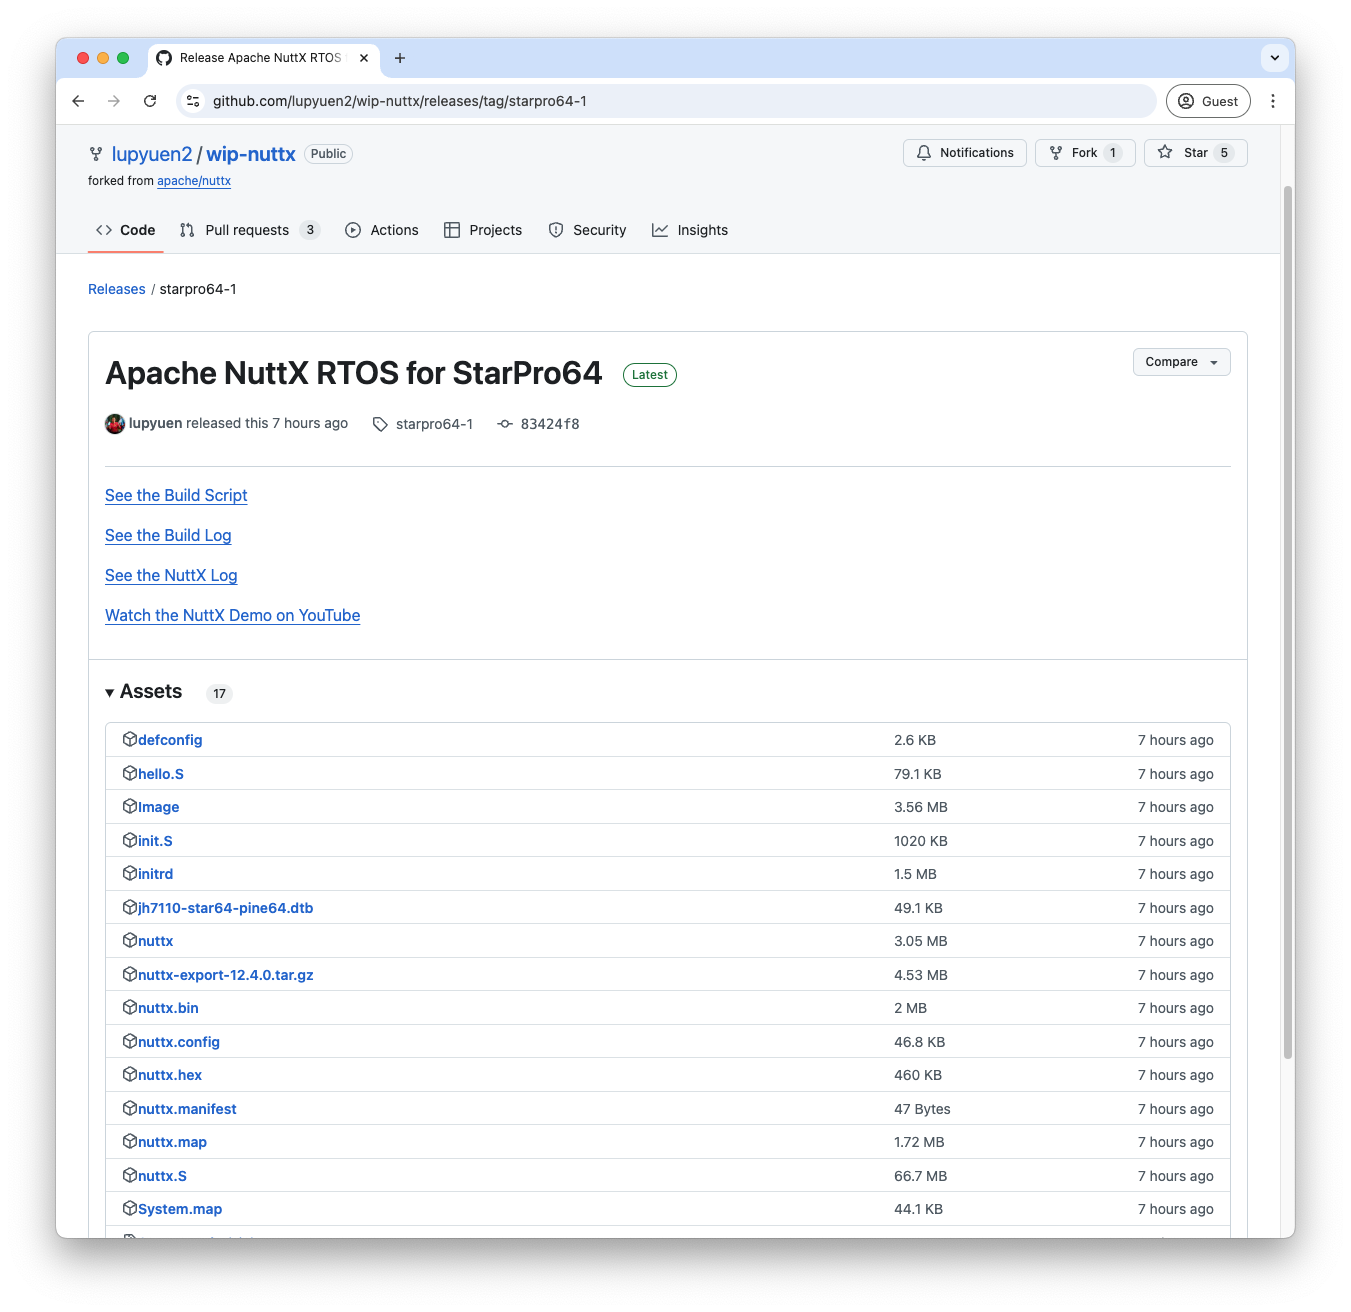
## Download the NuttX Image and Device Tree
wget https://github.com/lupyuen2/wip-nuttx/releases/download/starpro64-2/Image
wget https://github.com/lupyuen/nuttx-starpro64/raw/refs/heads/main/eic7700-evb.dtb

## Copy the NuttX Image and Device Tree to our TFTP Server
scp Image tftpserver:/tftpboot/Image-starpro64
scp eic7700-evb.dtb tftpserver:/tftpboot/
ssh tftpserver ls -l /tftpboot/
(How to Build NuttX ourselves)
(NuttX won’t read the Device Tree)
Power up StarPro64 and press Ctrl-C until U-Boot stops
At the U-Boot Prompt: Enter these commands…
## Check if the Network Adapter is alive
## "eth0 : ethernet@50400000 f6:70:f9:6e:73:ae active"
net list

## Set the U-Boot TFTP Server
## TODO: Change to your TFTP Server
setenv tftp_server 192.168.31.10

## Save the U-Boot Config for future reboots
saveenv

## Fetch the IP Address over DHCP
## Load the NuttX Image from TFTP Server
## kernel_addr_r=0x84000000
dhcp ${kernel_addr_r} ${tftp_server}:Image-starpro64

## Load the Device Tree from TFTP Server
## fdt_addr_r=0x88000000
## TODO: Fix the Device Tree, it's not needed by NuttX
tftpboot ${fdt_addr_r} ${tftp_server}:eic7700-evb.dtb

## Set the RAM Address of Device Tree
## fdt_addr_r=0x88000000
## TODO: Fix the Device Tree, it's not needed by NuttX
fdt addr ${fdt_addr_r}

## Boot the NuttX Image with the Device Tree
## kernel_addr_r=0x84000000
## fdt_addr_r=0x88000000
## TODO: Fix the Device Tree, it's not needed by NuttX
booti ${kernel_addr_r} - ${fdt_addr_r}
(U-Boot dropping chars? Try iTerm > Edit > Paste Special > Paste Slowly)
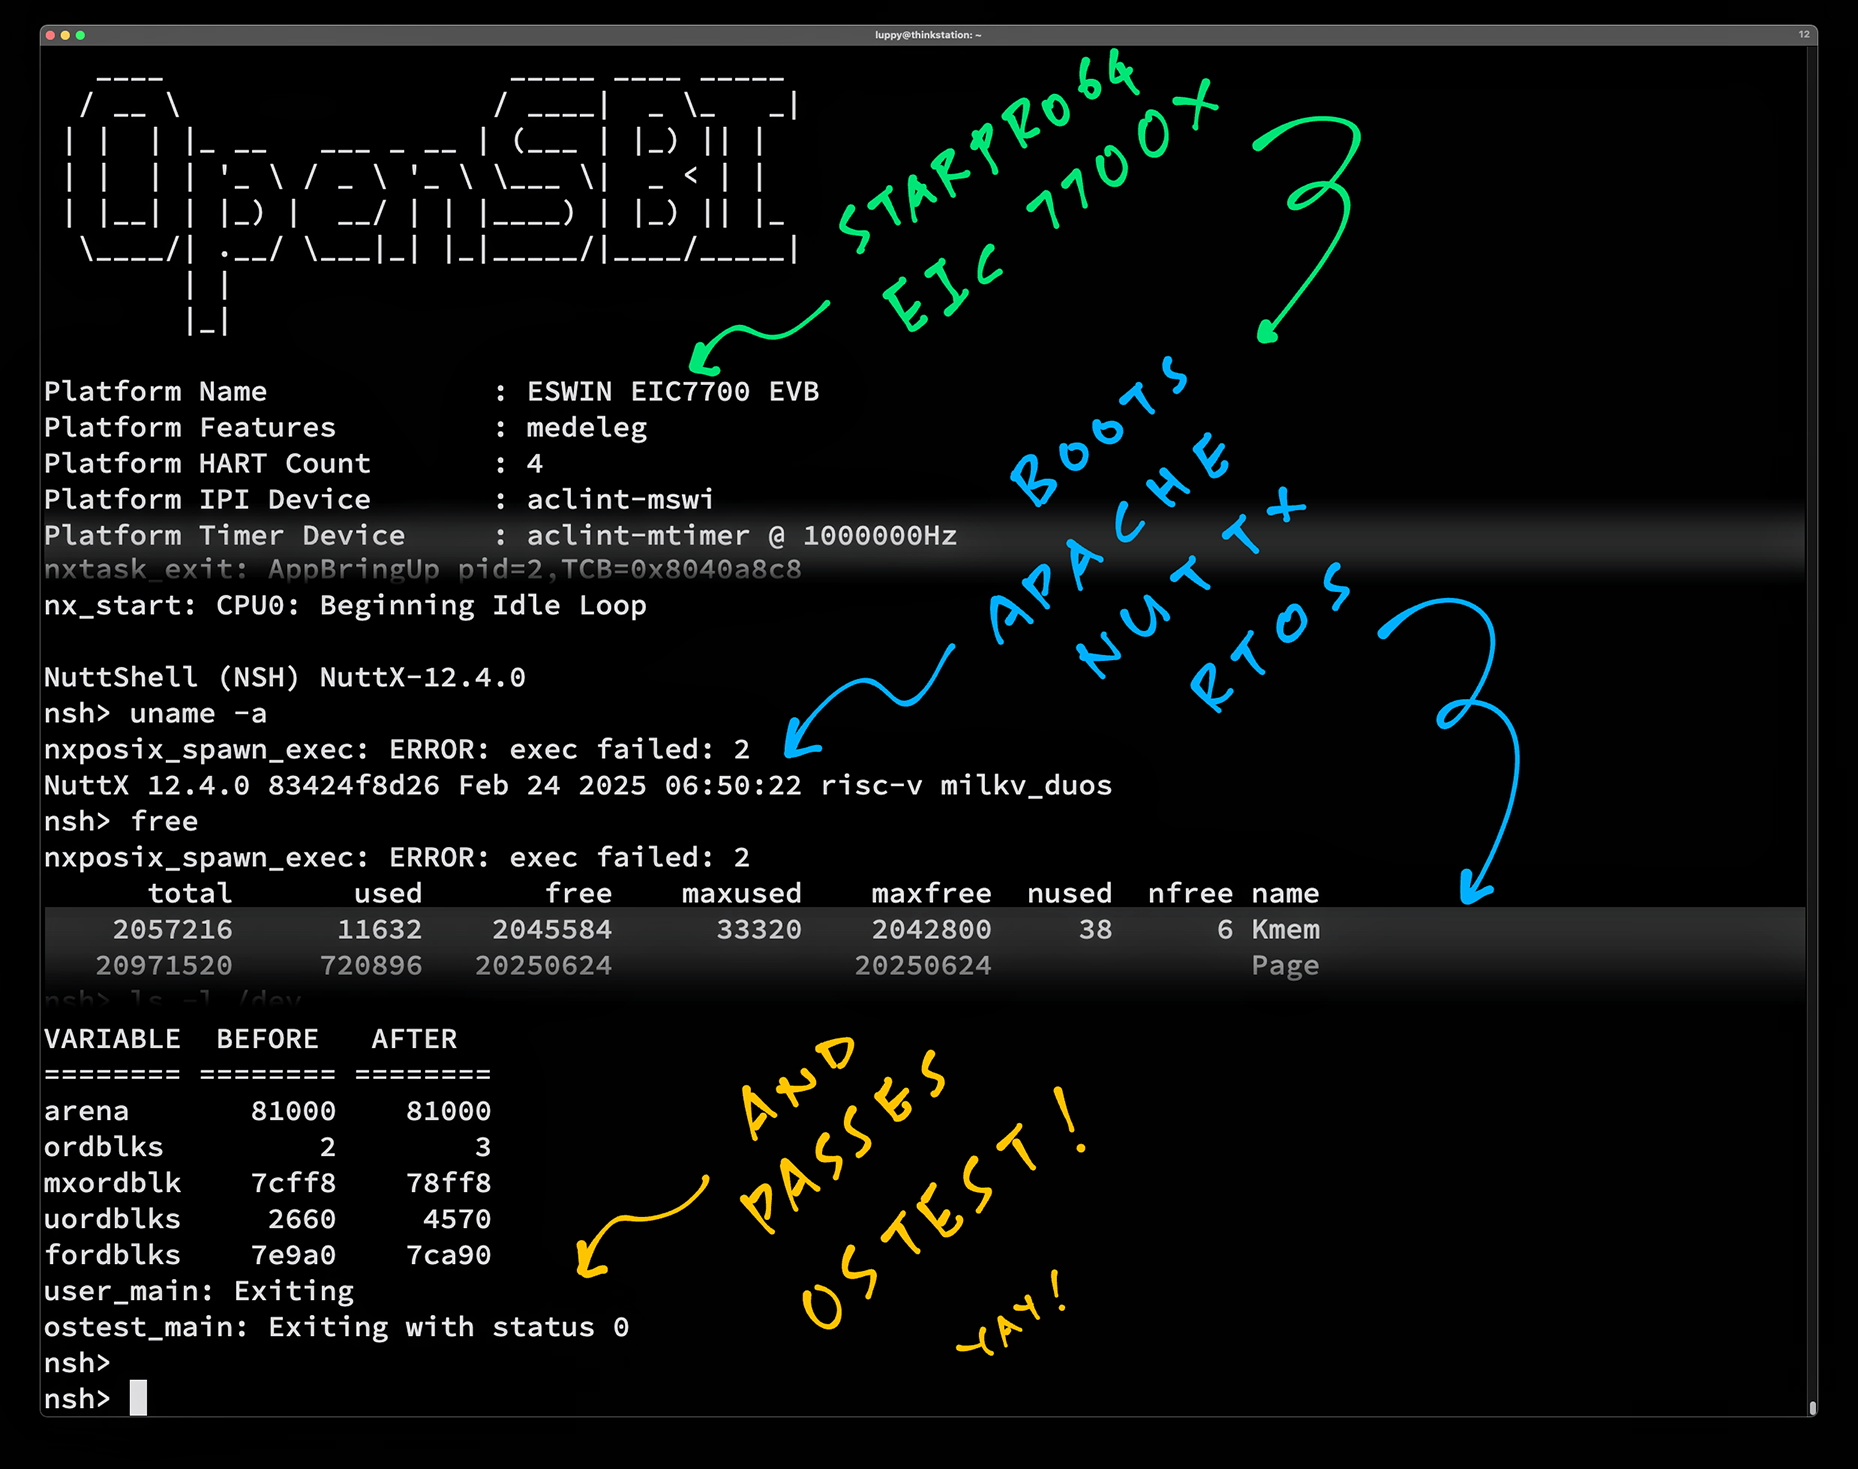
NuttX boots OK on StarPro64 and passes OSTest yay! (Pic below)
NuttShell (NSH) NuttX-12.4.0
nsh> uname -a
NuttX 12.4.0 83424f8d26 Feb 24 2025 06:50:22 risc-v starpro64

nsh> hello
Hello, World!!

nsh> getprime
getprime took 148 msec

nsh> ostest
ostest_main: Exiting with status 0How did we port NuttX to StarPro64? Check the details here…
We type these commands EVERY TIME we boot?
We can automate: Just do this once, and NuttX will Auto-Boot whenever we power up…
## Add the Boot Command for TFTP
setenv bootcmd_tftp 'dhcp ${kernel_addr_r} ${tftp_server}:Image-starpro64 ; tftpboot ${fdt_addr_r} ${tftp_server}:eic7700-evb.dtb ; fdt addr ${fdt_addr_r} ; booti ${kernel_addr_r} - ${fdt_addr_r}'

## Save it for future reboots
saveenv

## Test the Boot Command for TFTP, then reboot
run bootcmd_tftp

## Remember the Original Boot Command: `bootflow scan -lb`
setenv orig_bootcmd "$bootcmd"

## Prepend TFTP to the Boot Command: `run bootcmd_tftp ; bootflow scan -lb`
setenv bootcmd "run bootcmd_tftp ; $bootcmd"

## Save it for future reboots
saveenv
Next comes the fun part that turns StarPro64 into a totally different beast from Star64…
(U-Boot dropping chars? Try iTerm > Edit > Paste Special > Paste Slowly)
Oh really? Large Language Model on Single-Board Computer? (Eyes roll)
Hear me out…
20 TOPS INT8: That’s the spec of the speedy Neural Processing Unit (NPU) inside StarPro64. (20 Trillion Ops Per Second for 8-bit Integers)
Yeah an Offline Disconnected LLM will run (somewhat) OK on any CPU. But this NPU is designed for such LLMs. (Goodbye “TensorFlow Lite”)
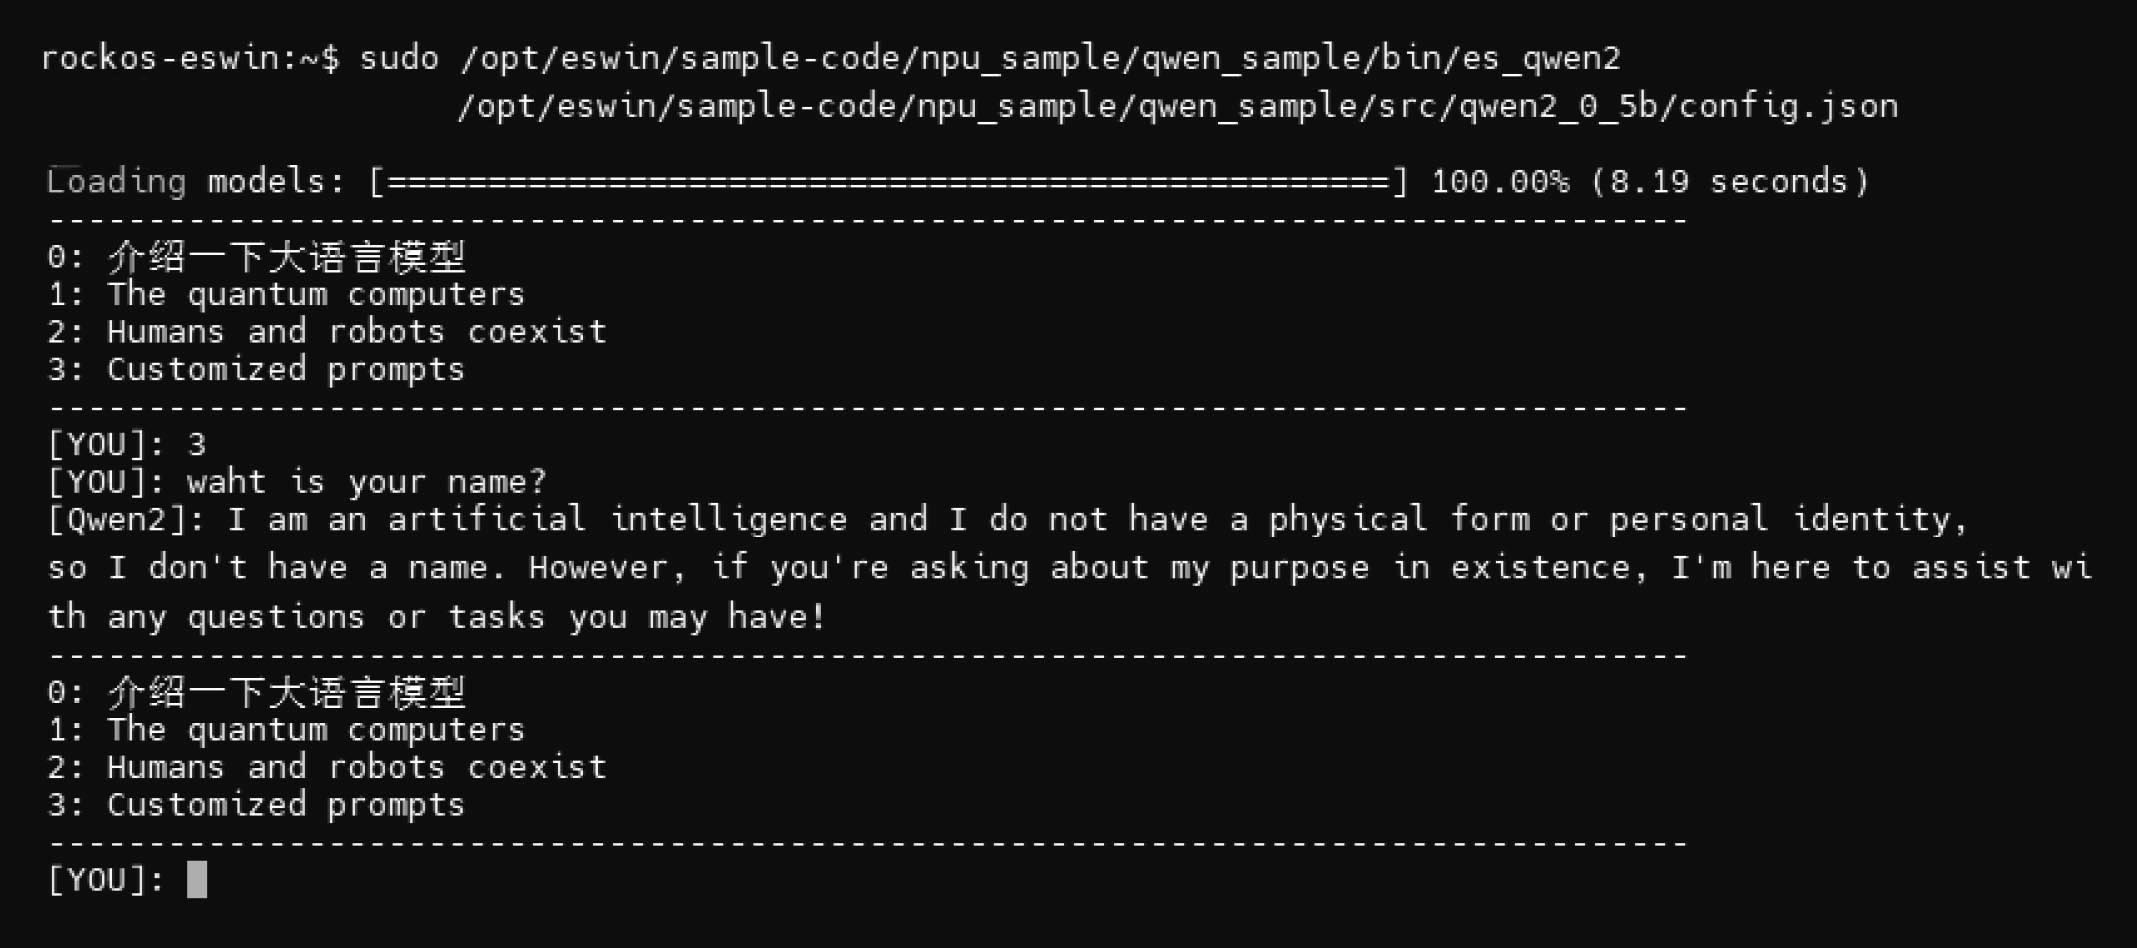
Qwen LLM runs locally on EIC7700X NPU today. Probably Next: Llama LLM and DeepSeek LLM?
(Qwen 2 with 0.5 Billion Parameters, pic below)
Offline Disconnected LLM on SBC might be useful for Smart Home Security…
“Hi LLM: Please connect my Home Security System to this Doorbell Camera and my IKEA Zigbee Lights and Xiaomi Motion Sensor and Samsung TV”
Creature Sensor Maybe? A Remote Sensor that uses Cameras to identify Rainforest Critters and Underwater Creatures. But everything it sees becomes ultra-compressed into 16 bytes of text…
“DUCK!” “OCTOPUS!” (Pic below)
EIC7700X NPU Driver is Dual-Licensed: BSD and GPL. Which means we can run it on all kinds of software platforms and create interesting apps.
Will it be Expensive? We hear that StarPro64 will be priced super affordably. Works with a Touchscreen too. (Pic above)
This is the right time to experiment with an Offline Disconnected LLM!
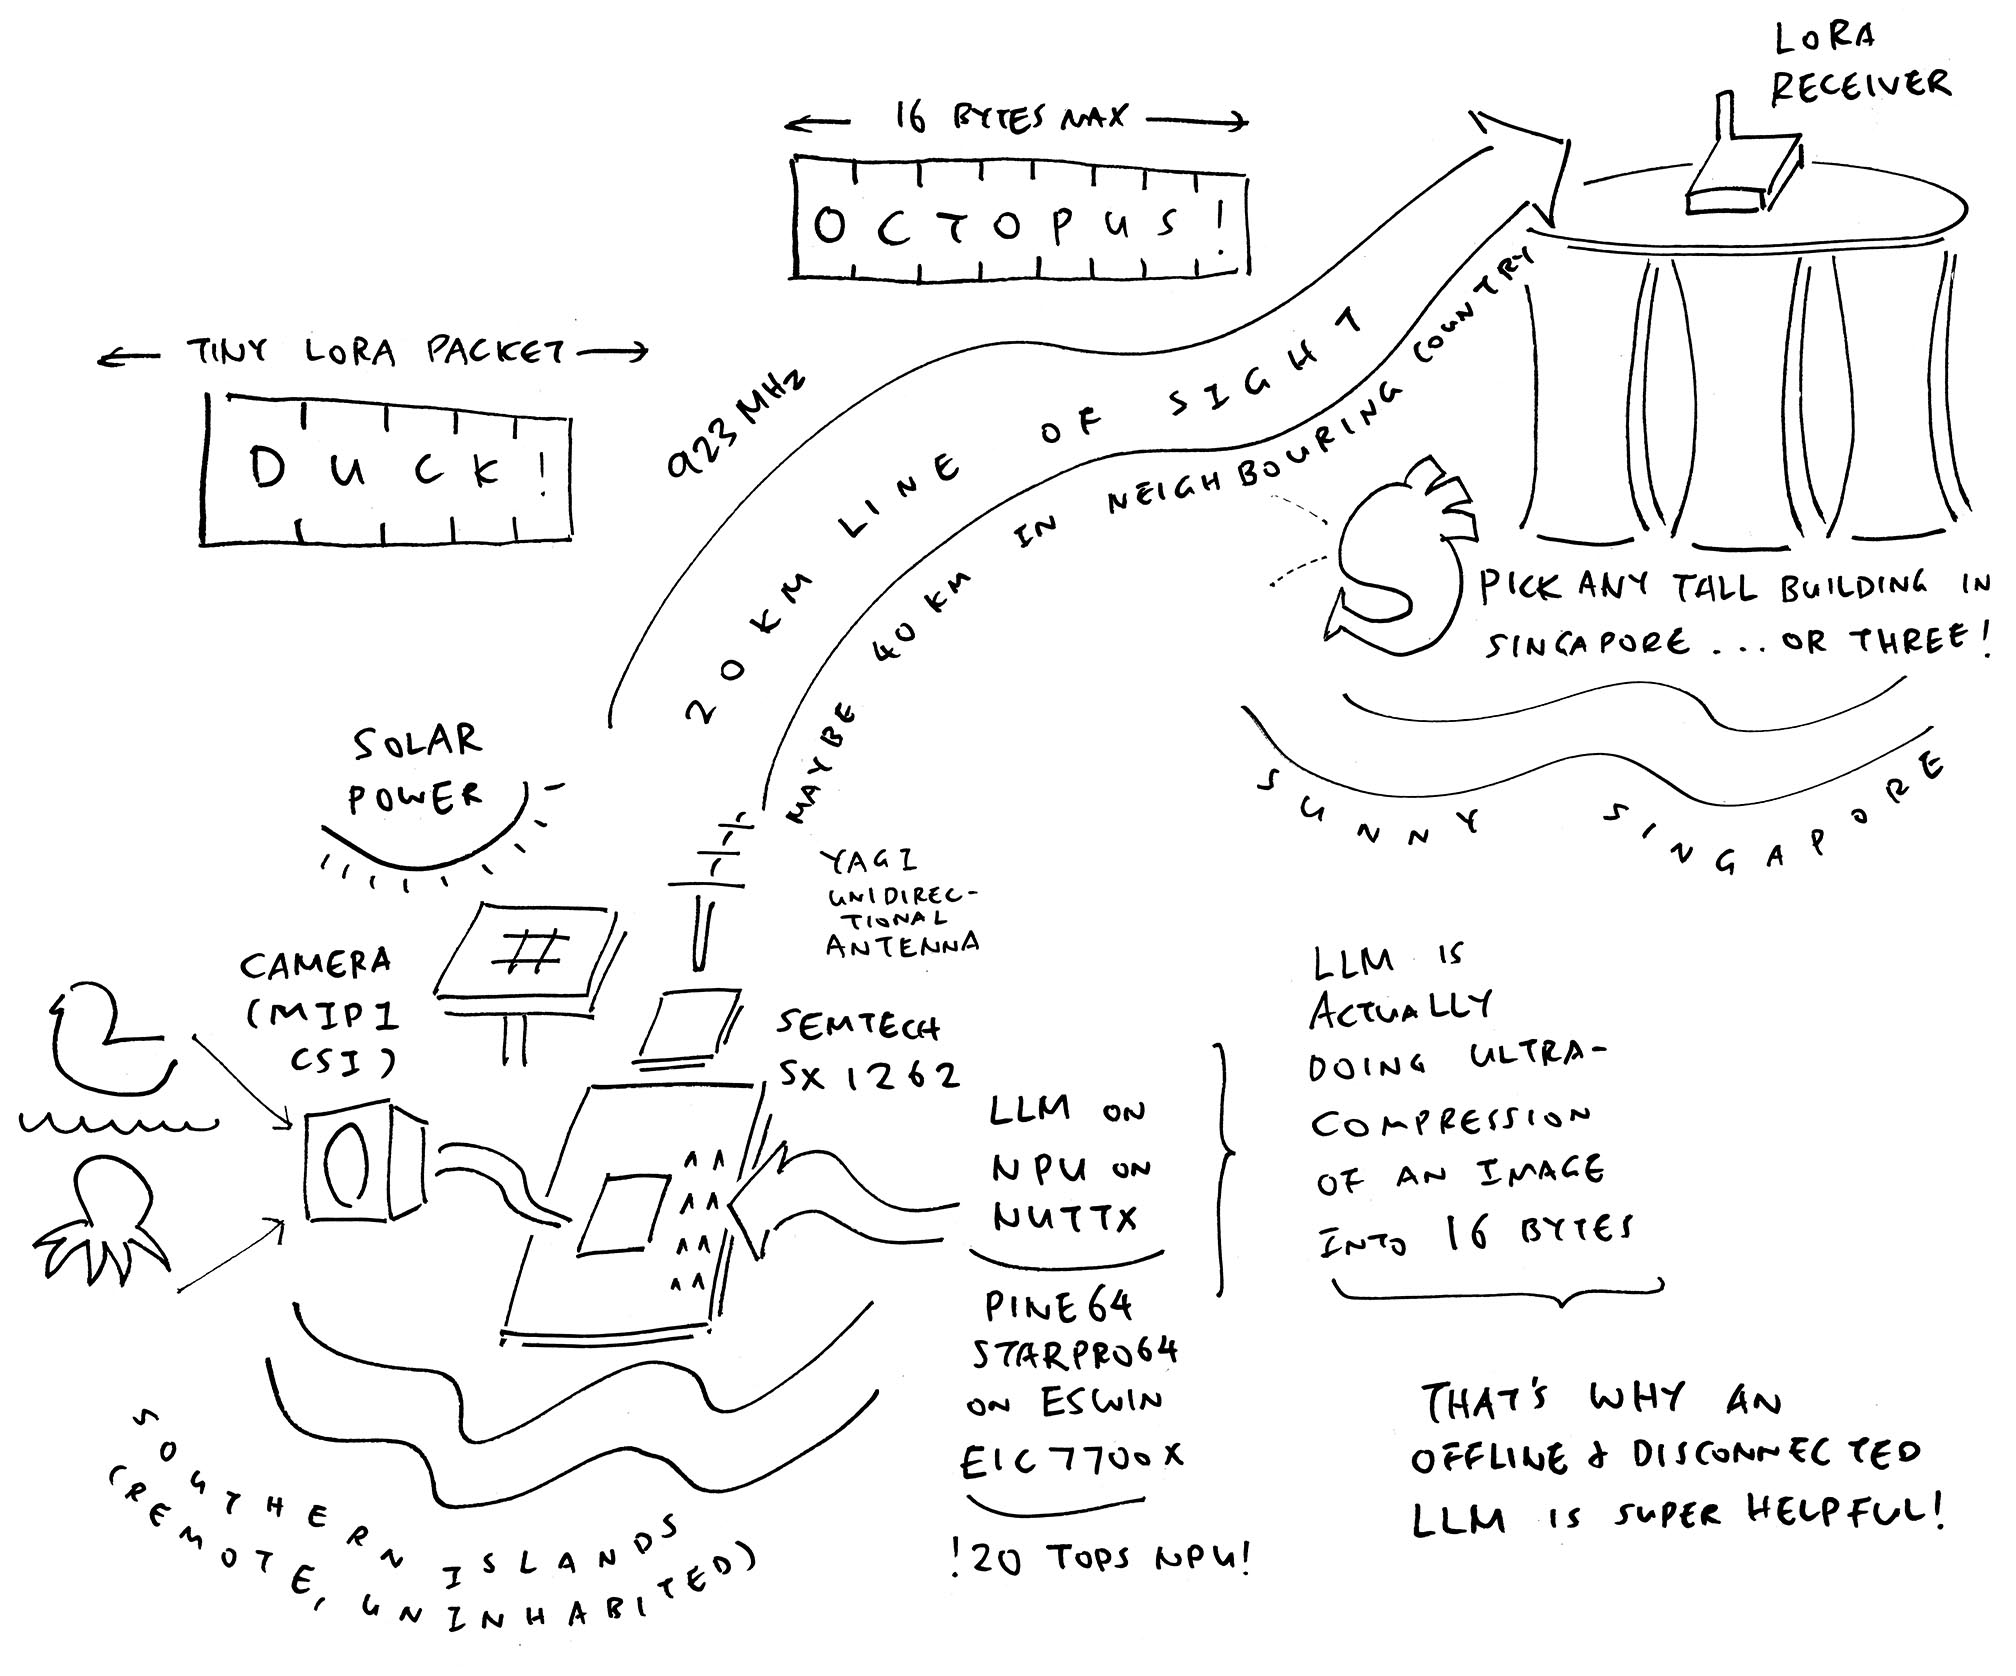
(Here’s an idea for Sci-Fi Horror: We install an LLM Sensor in a Remote Uninhabited Island. One day we receive sinister words from our LLM Sensor: “EVIL!”, “DEATH!”, “DOOM!”…)
Isn’t Linux a little wonky on StarPro64?
Ah here’s our opportunity to create a “Power Efficient” (?) LLM with NuttX…
We port the EIC7700X NPU Driver to NuttX. (Dual-Licensed: BSD and GPL)
To Execute the LLM Models: We’ll need llama.cpp (C++) or ollama (GoLang)
Odd name innit: Qwen?
Qwen will sound confusing to Bilingual Folks…
It’s NOT supposed to rhyme with Gwen Stefani / Gwen Stacy
Instead it’s pronounced “Q Wen”
And it confuses me: “Q = Question” and “Wen = 问 = Question”, thus contracting to “QQ”, which means “Bouncy”
Thankfully “Q Wen” actually means something: “千问” (Ask a Thousand Questions, “Qian1 Wen4”)
Which is short for “通义千问” (Tong1 Yi4 Qian1 Wen4), meaning “通情,达义”
Flipping StarPro64 on and off. Again and again. Must be an easier way?
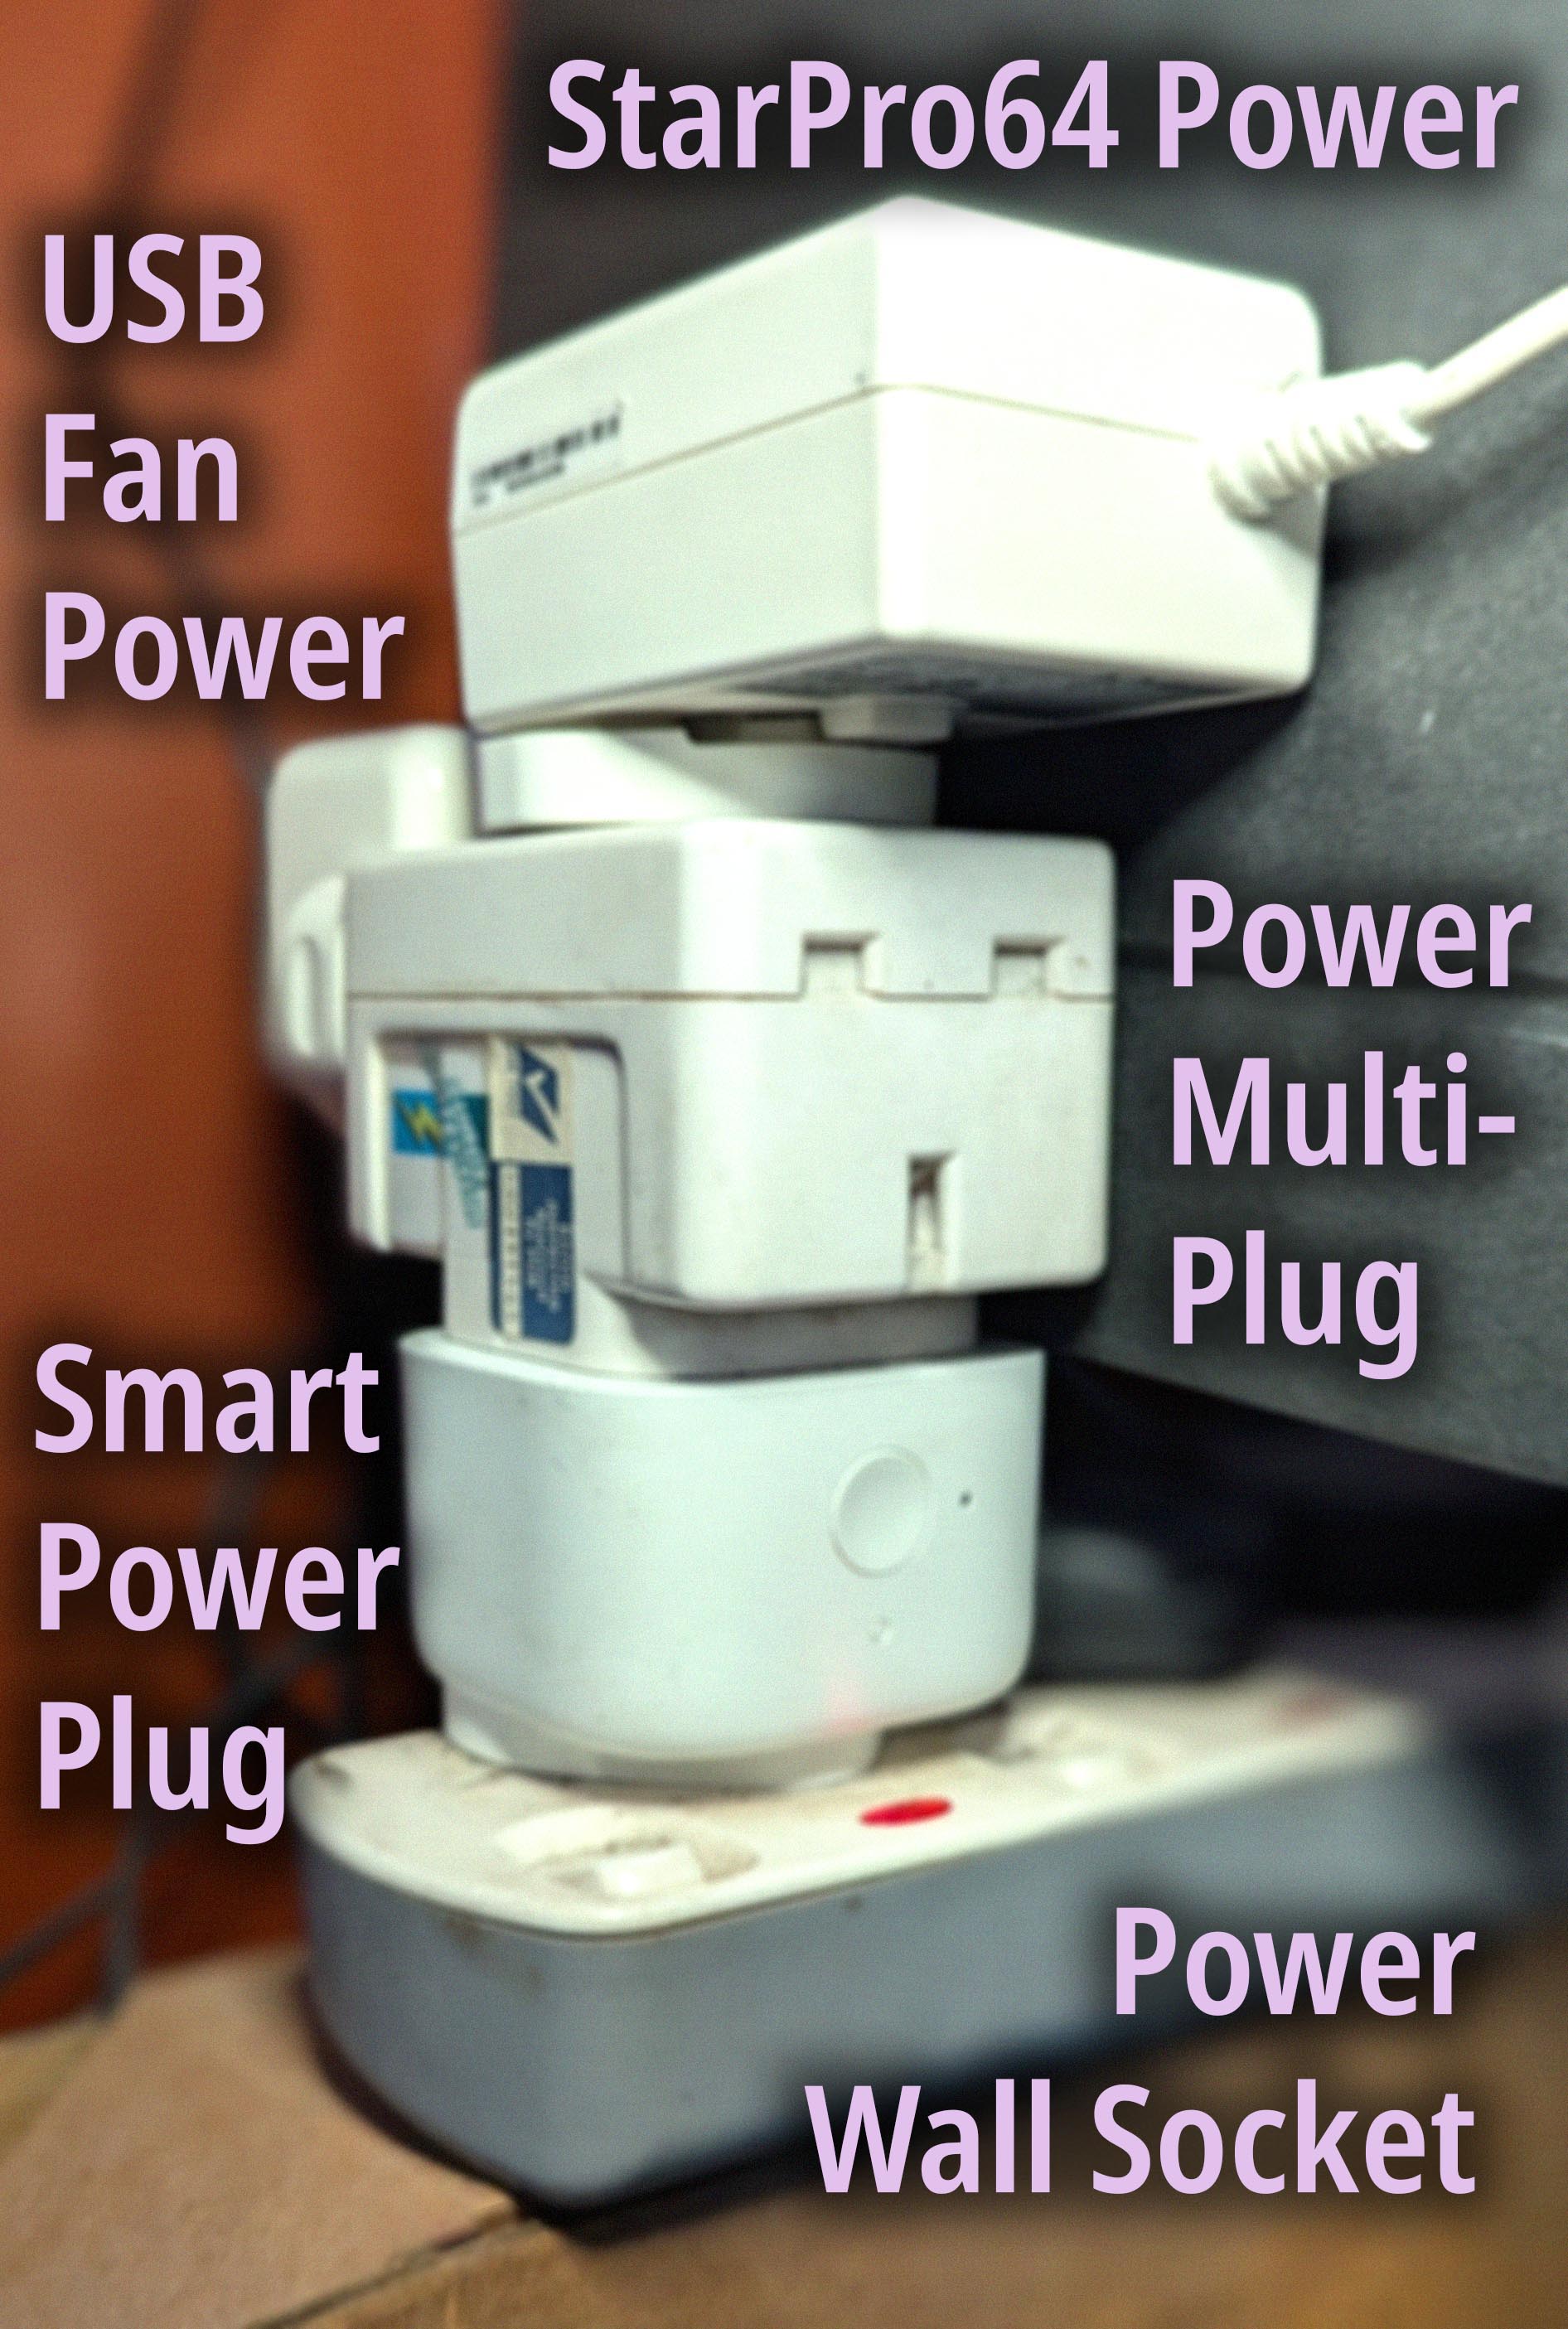
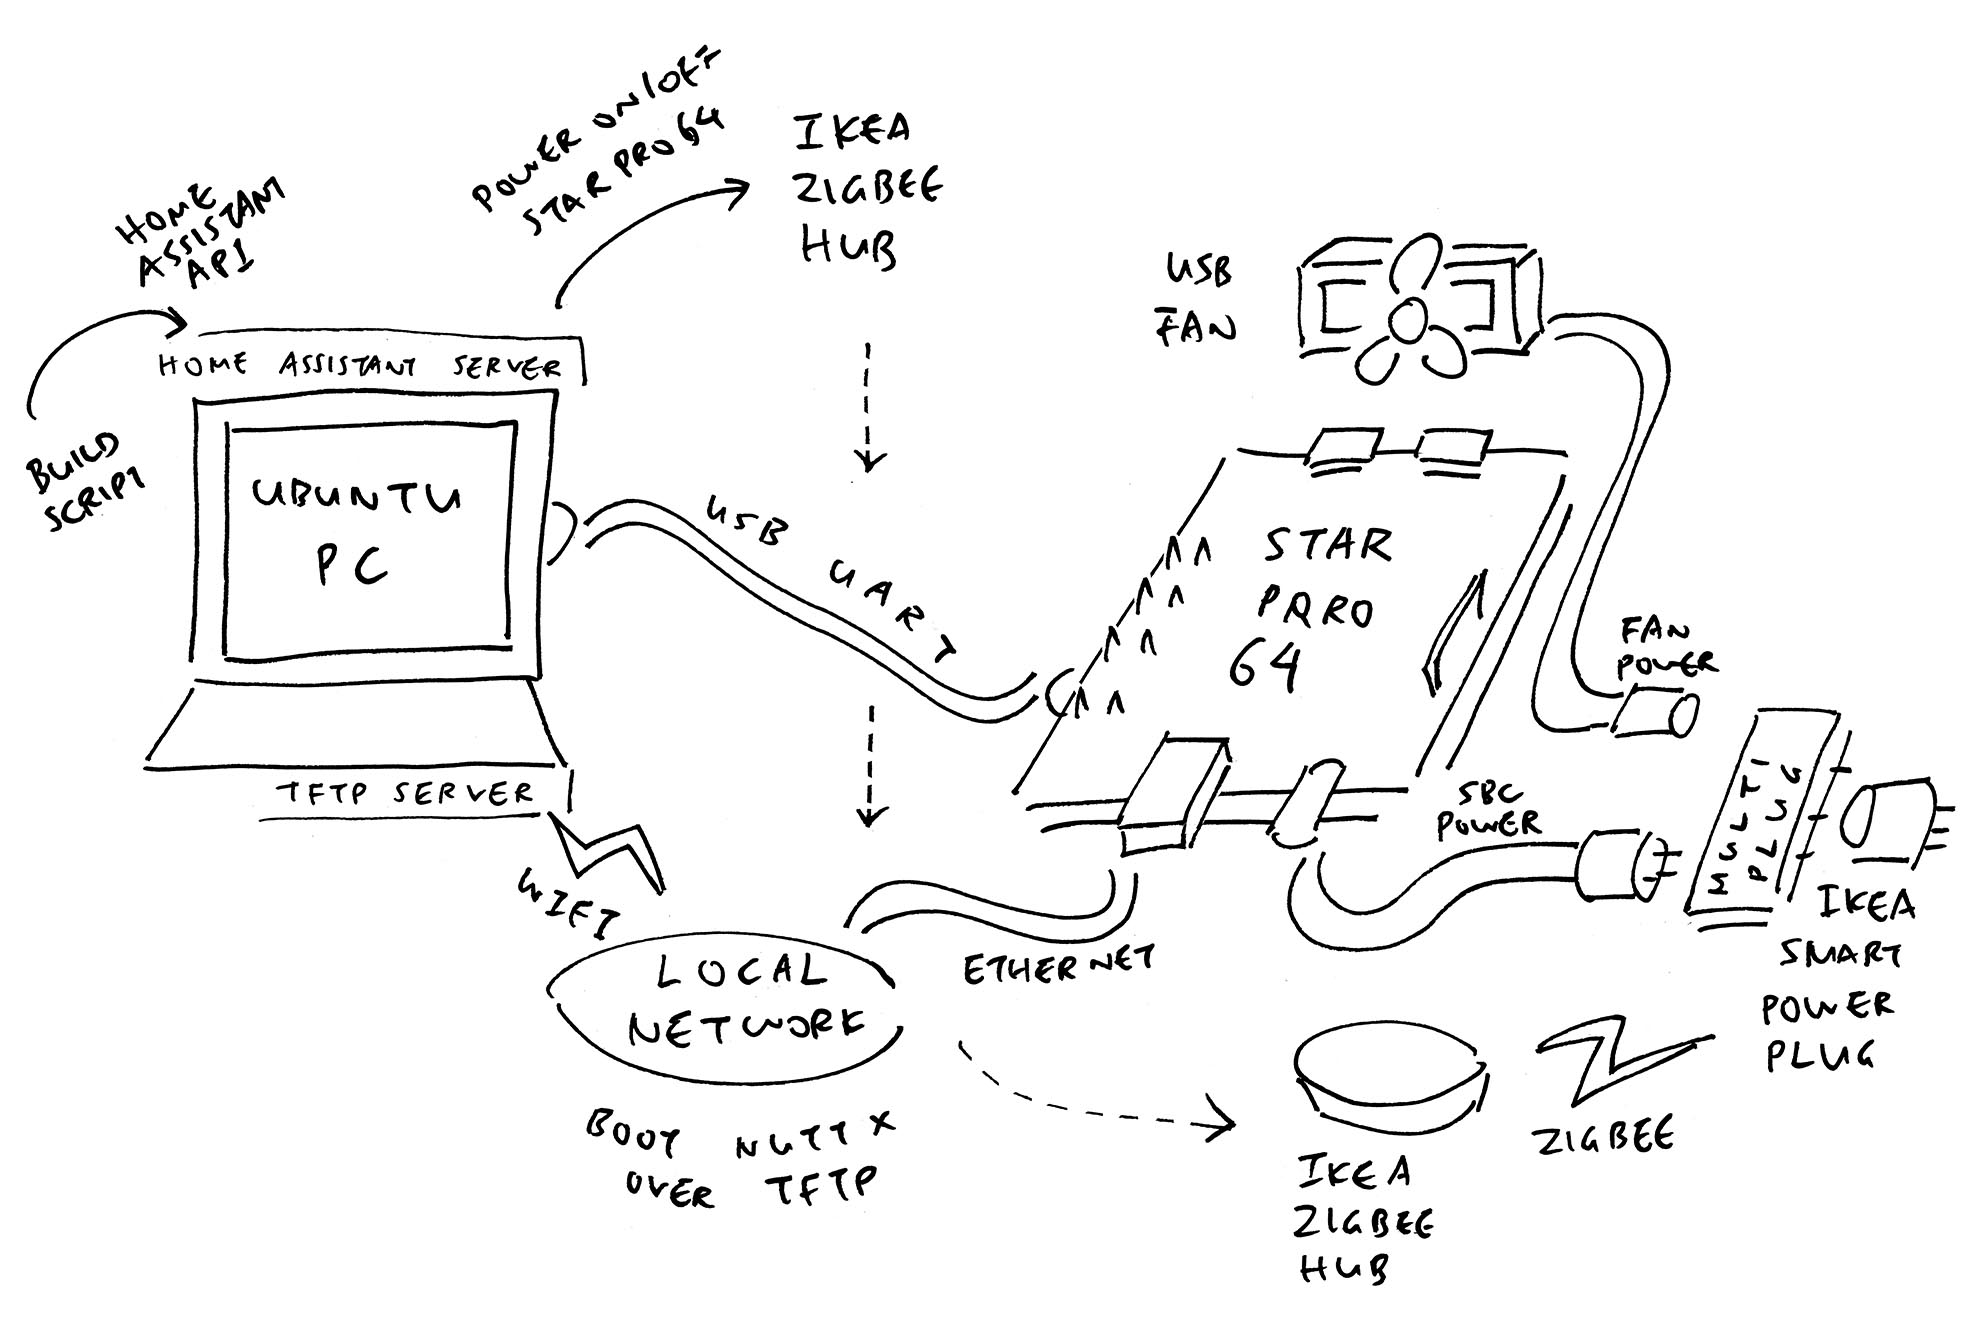
Try a Smart Power Plug (pic above), integrated with our Build Script.
In our Demo Video: Skip to 00:35 and watch our Build Script auto-power up StarPro64…
Our Script will build the NuttX Image and copy to TFTP Server
Power StarPro64 Off then On
Wait Manually for Testing to Complete (“Press Enter”)
And Power Off StarPro64
How it works? Here’s our Build Script: run.sh
## Omitted: Build the NuttX Image and copy to TFTP Server
## make -j ...

## Get the Home Assistant Token, copied from http://localhost:8123/profile/security
## export token=xxxx
. $HOME/home-assistant-token.sh

## Power Off the SBC
curl \
  -X POST \
  -H "Authorization: Bearer $token" \
  -H "Content-Type: application/json" \
  -d '{"entity_id": "automation.starpro64_off"}' \
  http://localhost:8123/api/services/automation/trigger

## Power On the SBC
curl \
  -X POST \
  -H "Authorization: Bearer $token" \
  -H "Content-Type: application/json" \
  -d '{"entity_id": "automation.starpro64_on"}' \
  http://localhost:8123/api/services/automation/trigger

## Wait Manually for SBC Testing to complete
## Don't wait too long, it will overheat!
echo Press Enter to Power Off
read

## Power Off the SBC, because it will overheat!
## Excessive Heatiness needs Oldenlandia Cooling Water?
curl \
  -X POST \
  -H "Authorization: Bearer $token" \
  -H "Content-Type: application/json" \
  -d '{"entity_id": "automation.starpro64_off"}' \
  http://localhost:8123/api/services/automation/trigger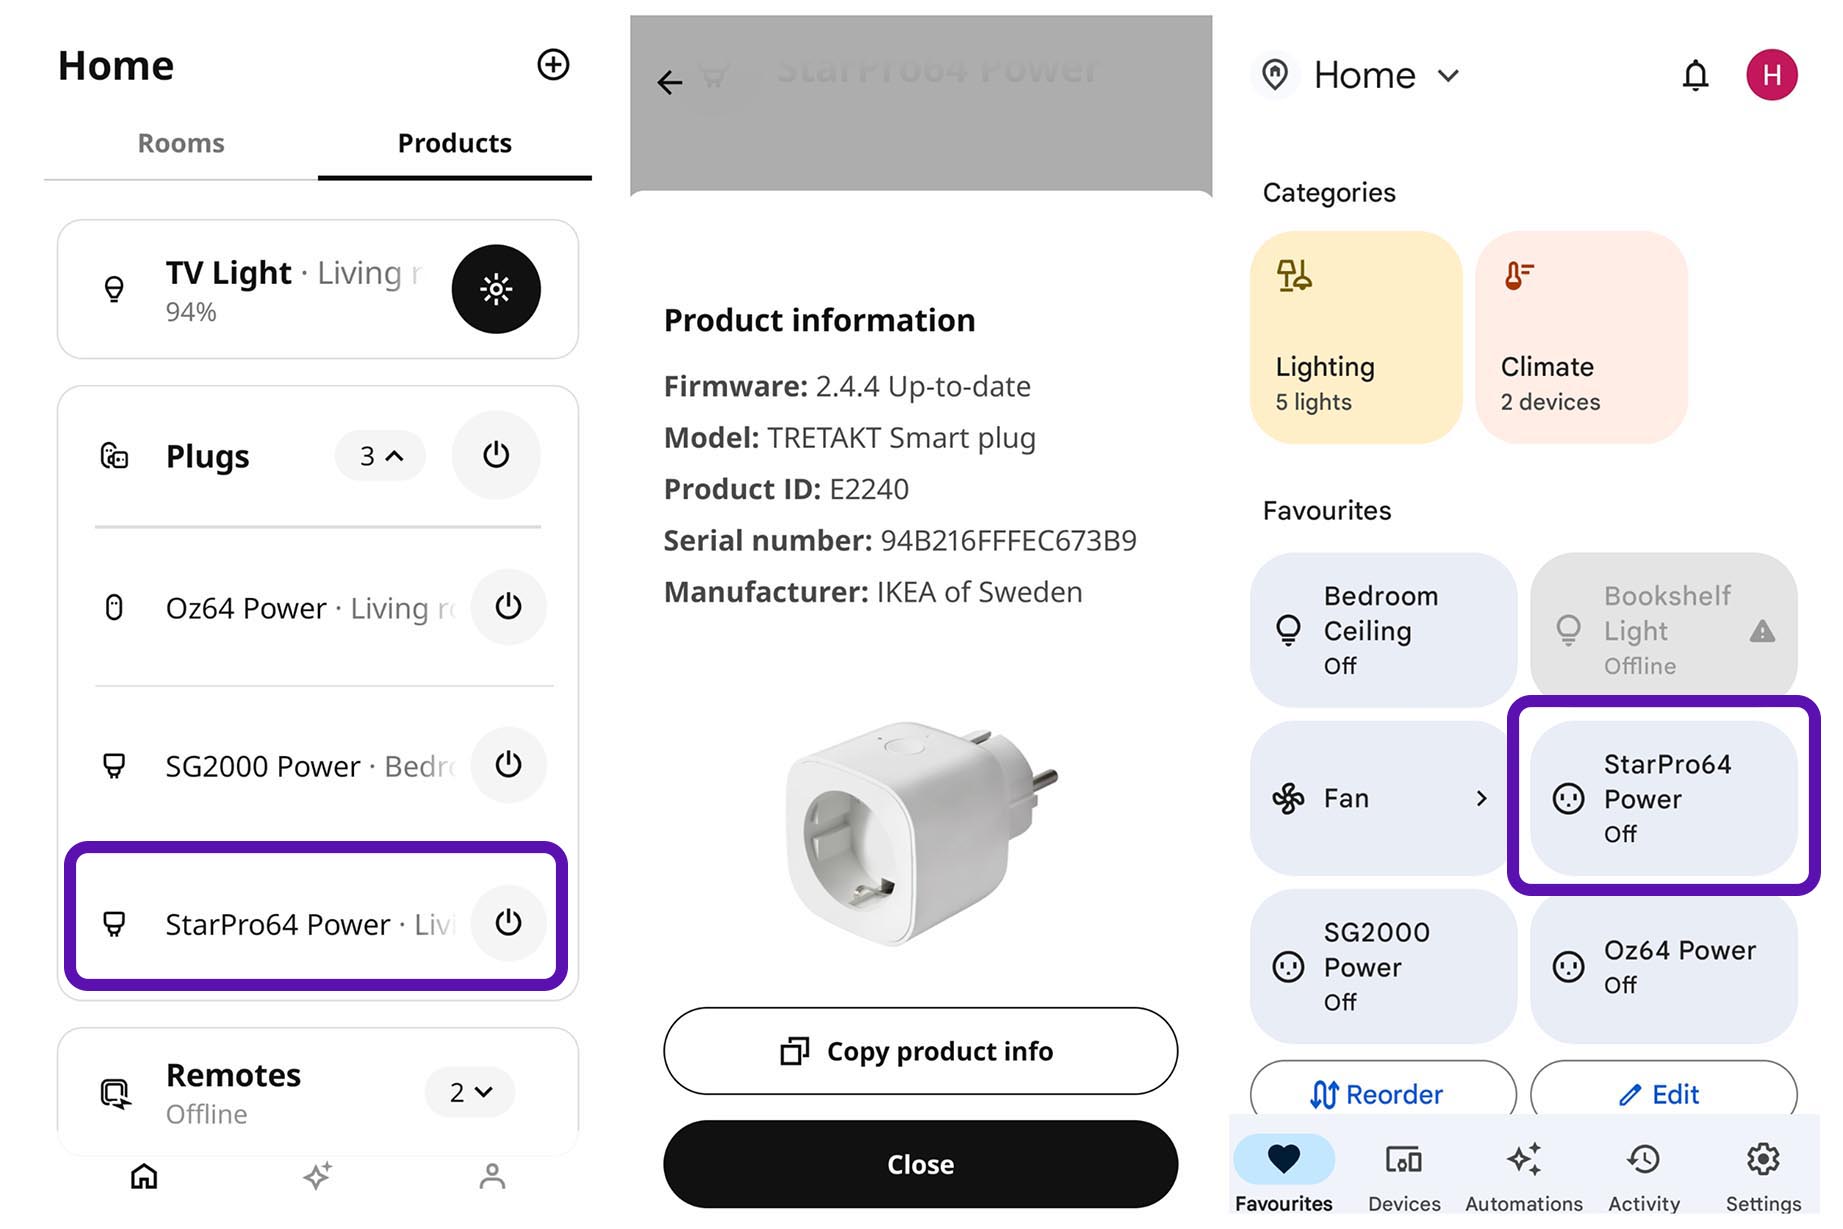
This script assumes that we have…
Installed a Home Assistant Server
(Works fine with Docker)
Added the Smart Power Plug to Google Assistant
“StarPro64 Power” (pic above)
Installed the Google Assistant SDK for Home Assistant
(So we don’t need Zigbee programming)
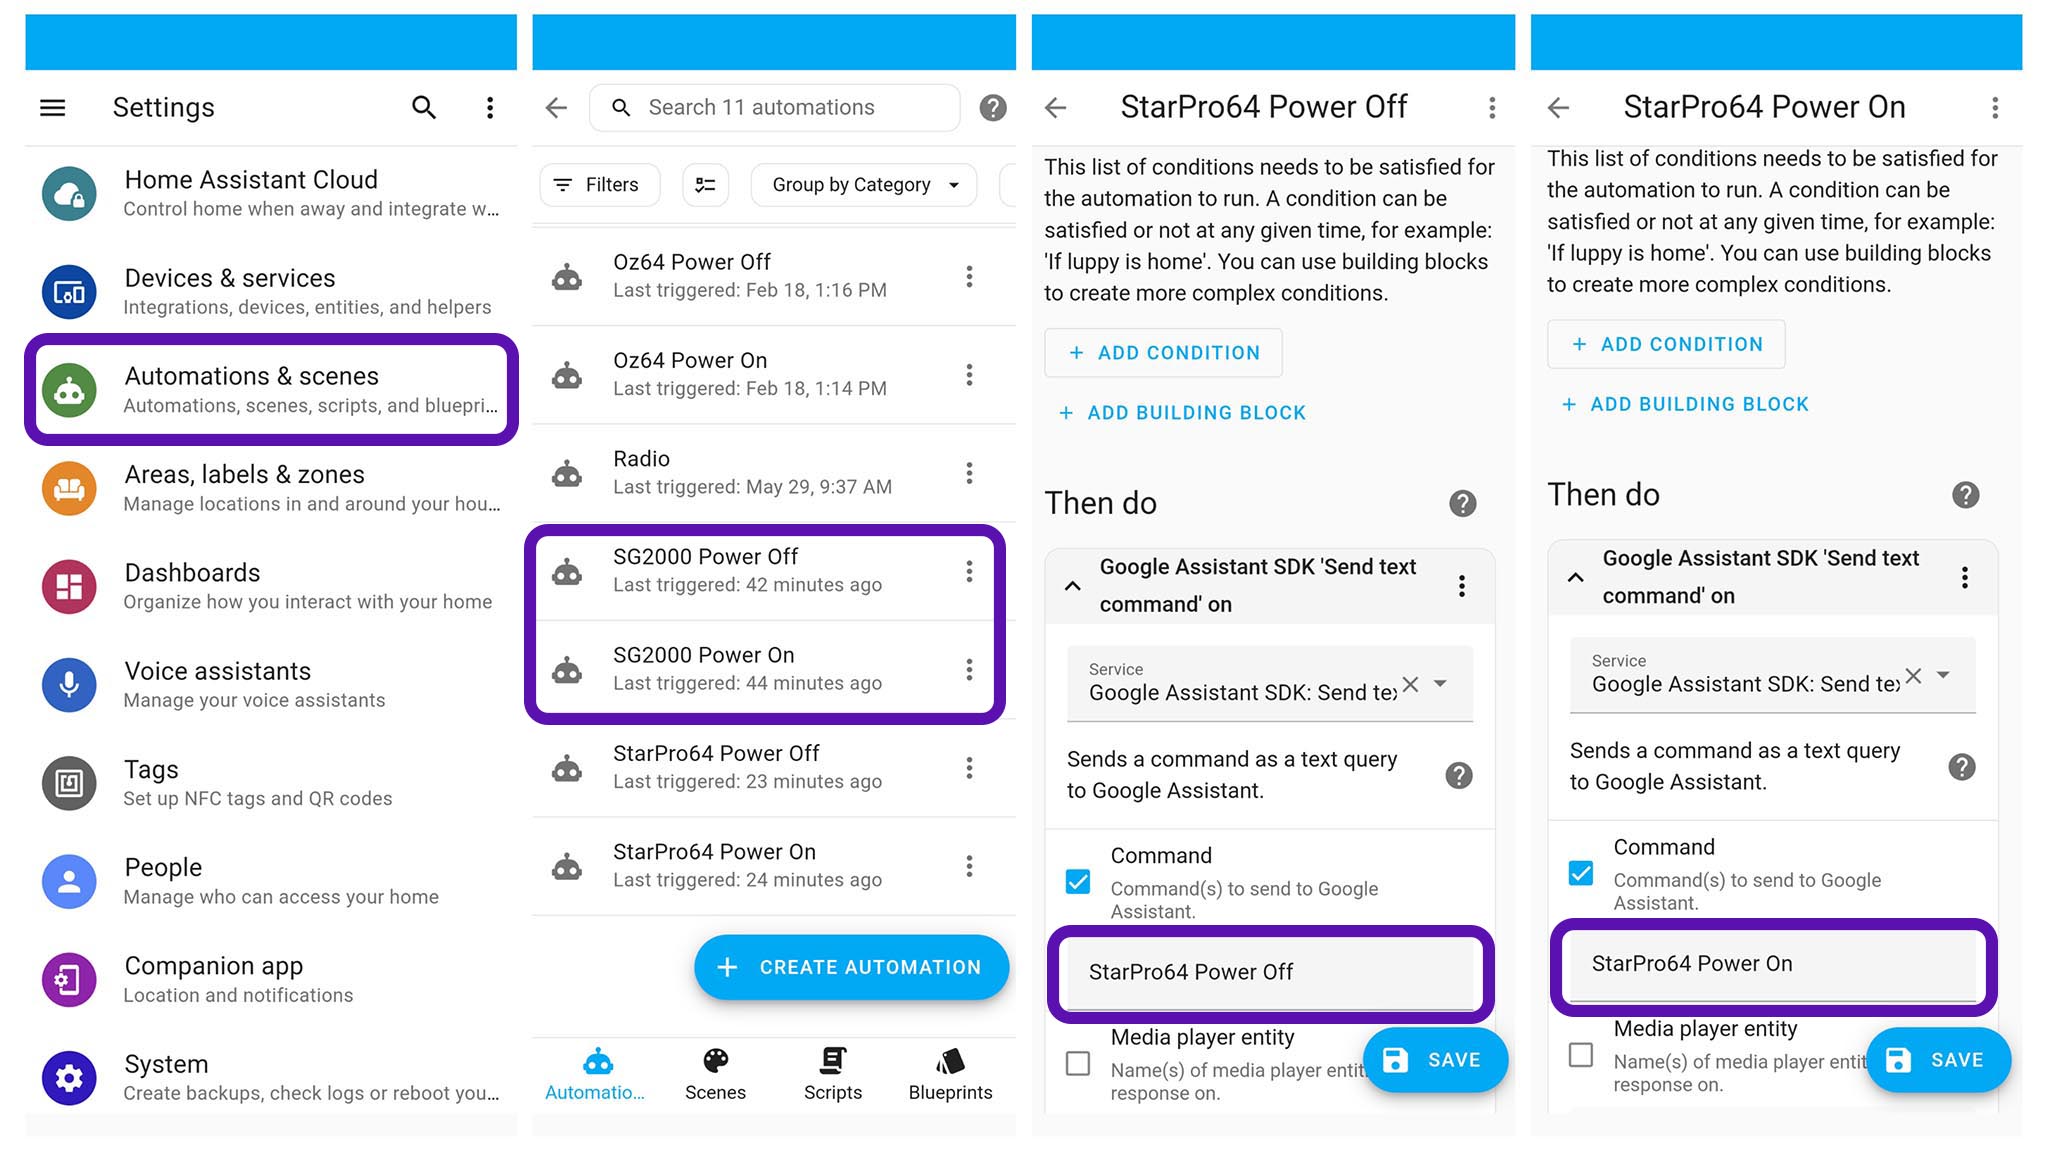
Created the Power Automation in Home Assistant
“StarPro64 Power On” and “StarPro64 Power Off” (pic below)
Smart Power Plug might disconnect USB UART sometimes?
To work around this: We run a loop for the UART Terminal…
## First Time Only
echo "defscrollback 1000000" >> ~/.screenrc

## On Power Off: USB Serial might disconnect
## So we reconnect forever
set -x
for (( ; ; )) do
  screen /dev/ttyUSB* 115200
  sleep 5
done
How to save the Entire Console Log from screen?
Inside screen: Press this Magic Konami Sequence…
Ctrl-a [
g <Space>
G <Enter>
Ctrl-a :writebuf
Everything gets saved into /tmp/screen-exchange
(We could actually allow a Remote Developer to boot and test NuttX on StarPro64… From anywhere in the world!)
Remember our USB Fan? It goes into our Smart Power Plug as a Power Jenga like so…
We’re seeking volunteers to build NuttX Drivers for StarPro64 (GPIO, SPI, I2C, MIPI CSI / DSI, Ethernet, WiFi, NPU, …) Please lemme know!
StarPro64 is now officially supported by NuttX Mainline…
Maybe we’ll create a TinyEMU Emulator for StarPro64? 🤔
Special Thanks to My Sponsors for supporting my writing. Your support means so much to me 🙏
Got a question, comment or suggestion? Create an Issue or submit a Pull Request here…
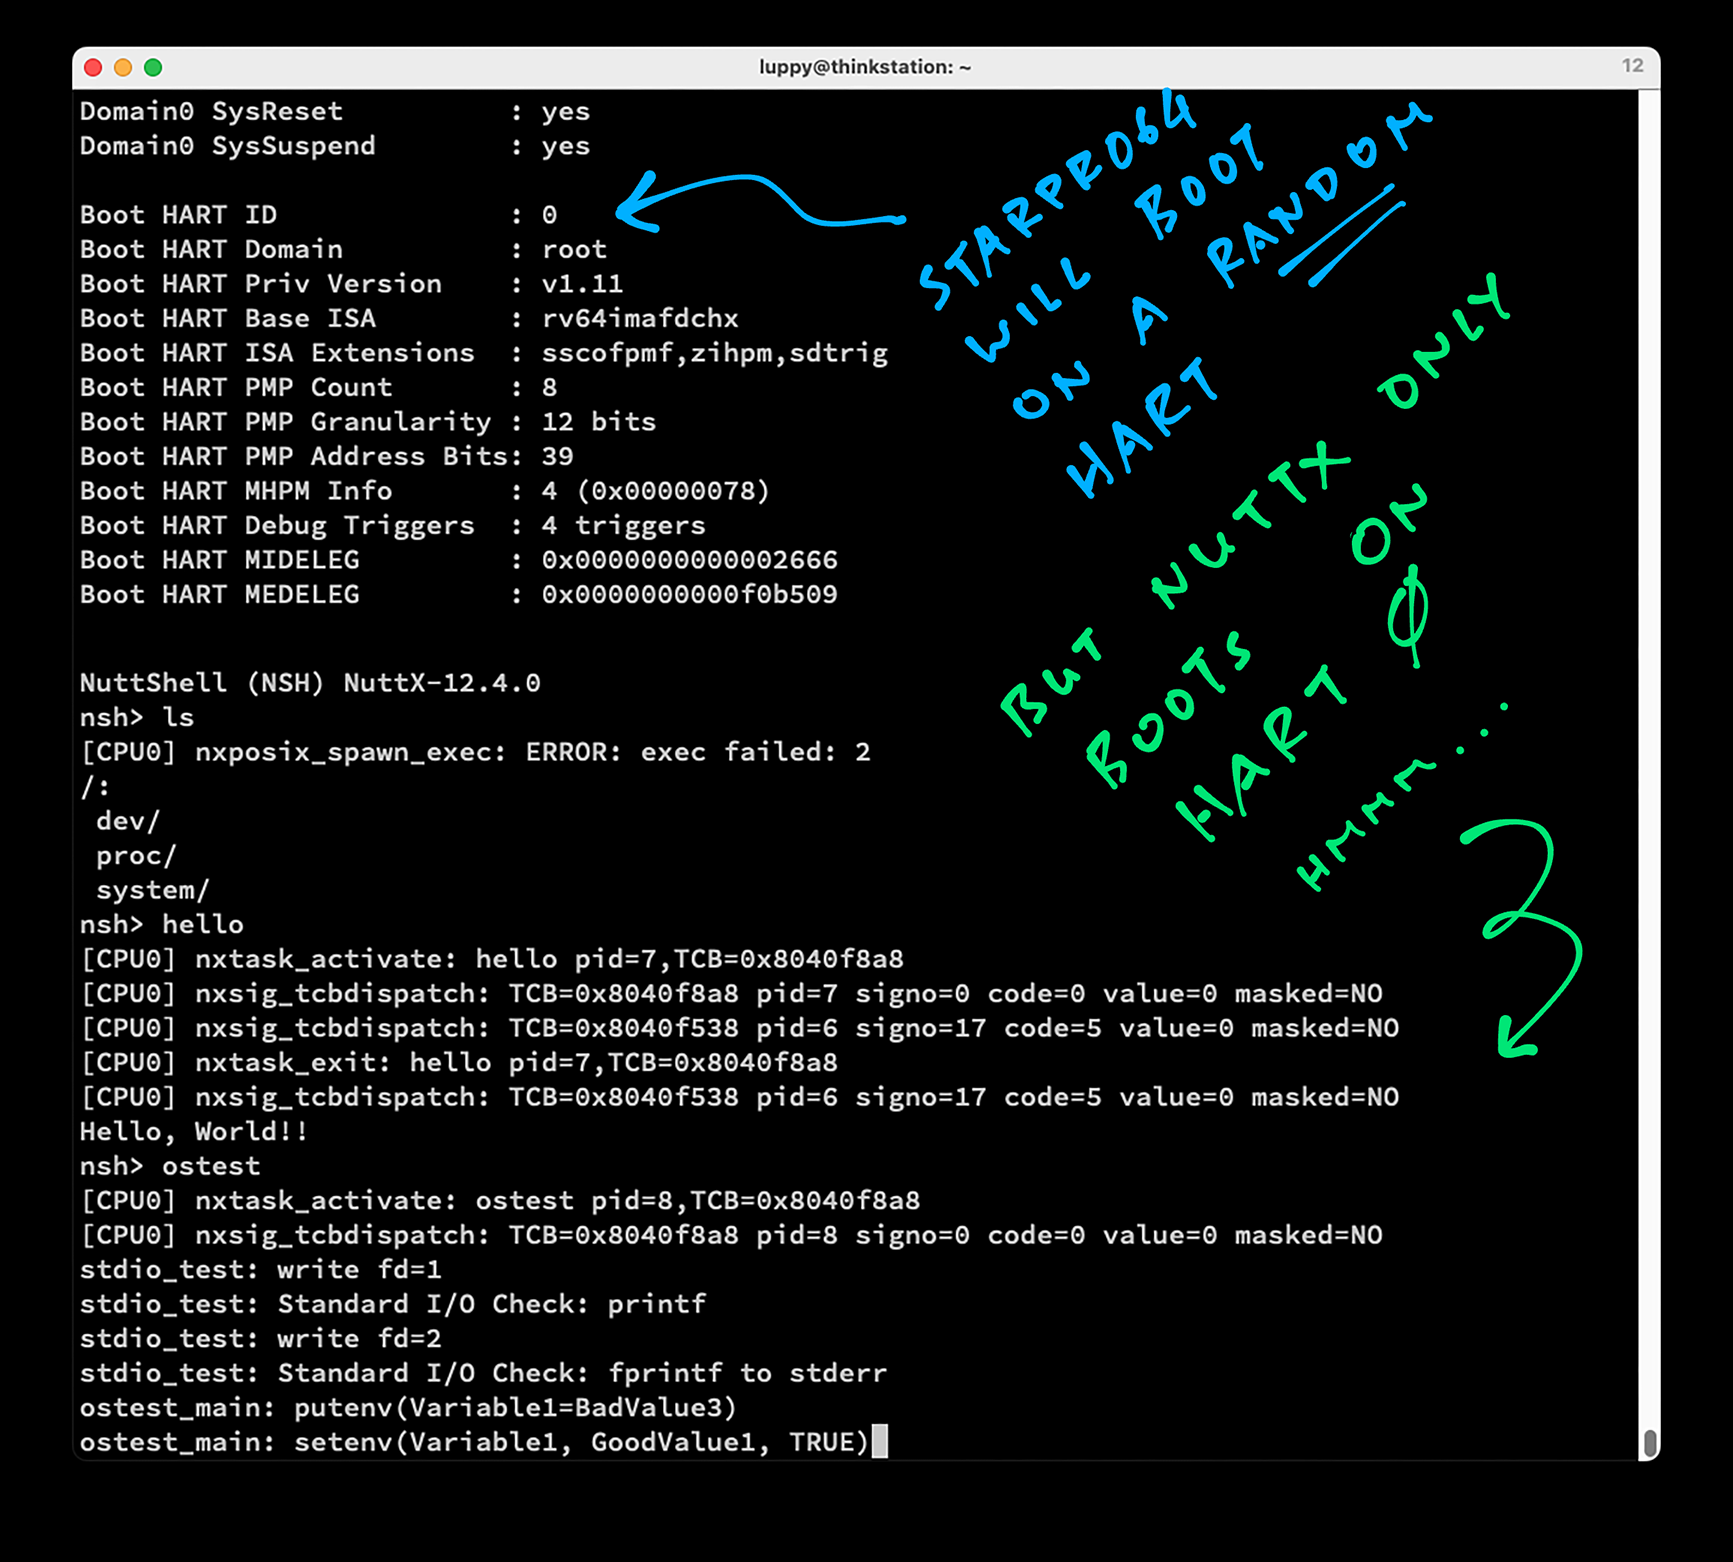
Multiple Harts are problematic. Why?
Inside EIC7700X SoC: We have Four Harts (RISC-V CPU Cores) numbered 0 to 3.
This SoC will boot OpenSBI on Any Random Hart, 0 to 3! Which means U-Boot and NuttX will subsequently boot on the Same Random Hart.
What’s the problem?
NuttX assumes that it always Boots on Hart 0. (Pic above)
When NuttX boots on Harts 1 to 3: Our RISC-V Boot Code calls riscv_set_inital_sp. Which will fail: riscv_macros.S
## Set inital sp for riscv core. This function should be only called when initing.
## TODO: Support Non-Zero Boot Hart.
.macro riscv_set_inital_sp base, size, hartid
  la      t0, \base
  li      t1, \size
  mul     t1, \hartid, t1
  add     t0, t0, t1

  ## Ensure the last XCPTCONTEXT_SIZE is reserved for non boot CPU
  bnez \hartid, 998f
  li   t1, STACK_ALIGN_DOWN(\size)
  j    999f
998:
  li   t1, STACK_ALIGN_DOWN(\size - XCPTCONTEXT_SIZE)
999:
  add  t0, t0, t1
  mv   sp, t0
.endm
How to fix this?
Our workaround is to Always Reboot NuttX on Hart 0…
If Boot Hart is Not 0:
Restart NuttX with Hart 0
If Boot Hart is 0:
Continue Starting NuttX
Harts vs CPUs: What’s the difference?
NuttX insists on booting with CPU 0. Otherwise it fails with this nx_start Error…
[CPU2] dump_assert_info:
Assertion failed up_cpu_index() == 0:
at file: init/nx_start.c:745 task(CPU2):
CPU2 IDLE process: Kernel 0x802019a6
That’s why we Renumber the CPUs: Boot Hart is always CPU 0. Other Harts become CPUs 1 to 3. For Example: If boot_hart=2 then…
Can’t we use One Hart and ignore the Other Harts?
OK Mister Cold-Harted: We tried Enabling One Hart Only (CPU 0). But OSTest hangs at sem_test…
## OSTest hangs for StarPro64 when we enable One Hart only...
user_main: semaphore test
sem_test: Initializing semaphore to 0
sem_test: Starting waiter thread 1
sem_test: Set thread 1 priority to 191
## Oops: Thread 1 is NOT started!

sem_test: Starting waiter thread 2
sem_test: Set thread 2 priority to 128
waiter_func: Thread 2 Started

## Oops: Semaphore Value should be -1!
waiter_func: Thread 2 initial semaphore value = 0
waiter_func: Thread 2 waiting on semaphore
## Hangs here
Compare the above with SG2000 sem_test…
## OSTest runs OK for SG2000...
user_main: semaphore test
sem_test: Initializing semaphore to 0
sem_test: Starting waiter thread 1
sem_test: Set thread 1 priority to 191
## Yep Thread 1 is started
waiter_func: Thread 1 Started

sem_test: Starting waiter thread 2
waiter_func: Thread 1 initial semaphore value = 0
sem_test: Set thread 2 priority to 128
waiter_func: Thread 1 waiting on semaphore
waiter_func: Thread 2 Started

## Yep Semaphore Value is -1
waiter_func: Thread 2 initial semaphore value = -1
waiter_func: Thread 2 waiting on semaphore
sem_test: Starting poster thread 3
## Completes successfully
Here’s the problem: sem_test calls nx_pthread_create to create Thread #1…
int nx_pthread_create(...) { ...
#ifdef CONFIG_SMP
  // pthread_setup_scheduler() will set the affinity mask by inheriting the
  // setting from the parent task.  We need to override this setting
  // with the value from the pthread attributes unless that value is
  // zero:  Zero is the default value and simply means to inherit the
  // parent thread's affinity mask.
  if (attr->affinity != 0) {
    ptcb->cmn.affinity = attr->affinity;
  }
#endif
But…
Our New Thread defaults to No CPU Affinity
Thus it Lacks Affinity for CPU 0
So it gets allocated to Another CPU
Which never runs!
Hence sem_test loops forever waiting for the Semaphore Value to change.
In Future: How to enable Multiple Harts?
To Enable Multiple Harts in future, we undo these changes…
Remember to update the StarPro64 defconfig…
## Enable SMP with 4 CPUs
CONFIG_SMP=y
CONFIG_SMP_NCPUS=4
And remember to fix riscv_set_inital_sp. Meanwhile let’s run everything on Hart 0…
Earlier we booted Image-starpro64 over TFTP. How to get the file?
Download the file Image from below and rename it Image-starpro64…
If we prefer to build NuttX ourselves…
Install the Build Prerequisites, skip the RISC-V Toolchain…
Download the RISC-V Toolchain for riscv-none-elf (xPack)…
Download and Build NuttX for StarPro64…
git clone https://github.com/apache/nuttx
git clone https://github.com/apache/nuttx-apps apps
cd nuttx
tools/configure.sh starpro64:nsh

## Build the NuttX Kernel and Apps
make -j
make -j export
pushd ../apps
./tools/mkimport.sh -z -x ../nuttx/nuttx-export-*.tar.gz
make -j import
popd

## Generate Initial RAM Disk
## Prepare a Padding with 64 KB of zeroes
## Append Padding and Initial RAM Disk to NuttX Kernel
genromfs -f initrd -d ../apps/bin -V "NuttXBootVol"
head -c 65536 /dev/zero >/tmp/nuttx.pad
cat nuttx.bin /tmp/nuttx.pad initrd \
  >Image

## Copy the NuttX Image and Device Tree to TFTP Server
wget https://github.com/lupyuen/nuttx-starpro64/raw/refs/heads/main/eic7700-evb.dtb
scp Image tftpserver:/tftpboot/Image-starpro64
scp eic7700-evb.dtb tftpserver:/tftpboot/
ssh tftpserver ls -l /tftpboot

## In U-Boot: Boot NuttX over TFTP
## setenv tftp_server 192.168.31.10 ; dhcp ${kernel_addr_r} ${tftp_server}:Image-starpro64 ; tftpboot ${fdt_addr_r} ${tftp_server}:eic7700-evb.dtb ; fdt addr ${fdt_addr_r} ; booti ${kernel_addr_r} - ${fdt_addr_r}The steps above assume that we’ve installed our TFTP Server, according to the instructions here
Then follow these steps to boot NuttX on StarPro64…
Powering StarPro64 on and off can get tiresome. Try a Smart Power Plug, integrated with our Build Script…
How did we port NuttX to StarPro64? Check the details here…
Why the RAM Disk? Isn’t NuttX an RTOS?
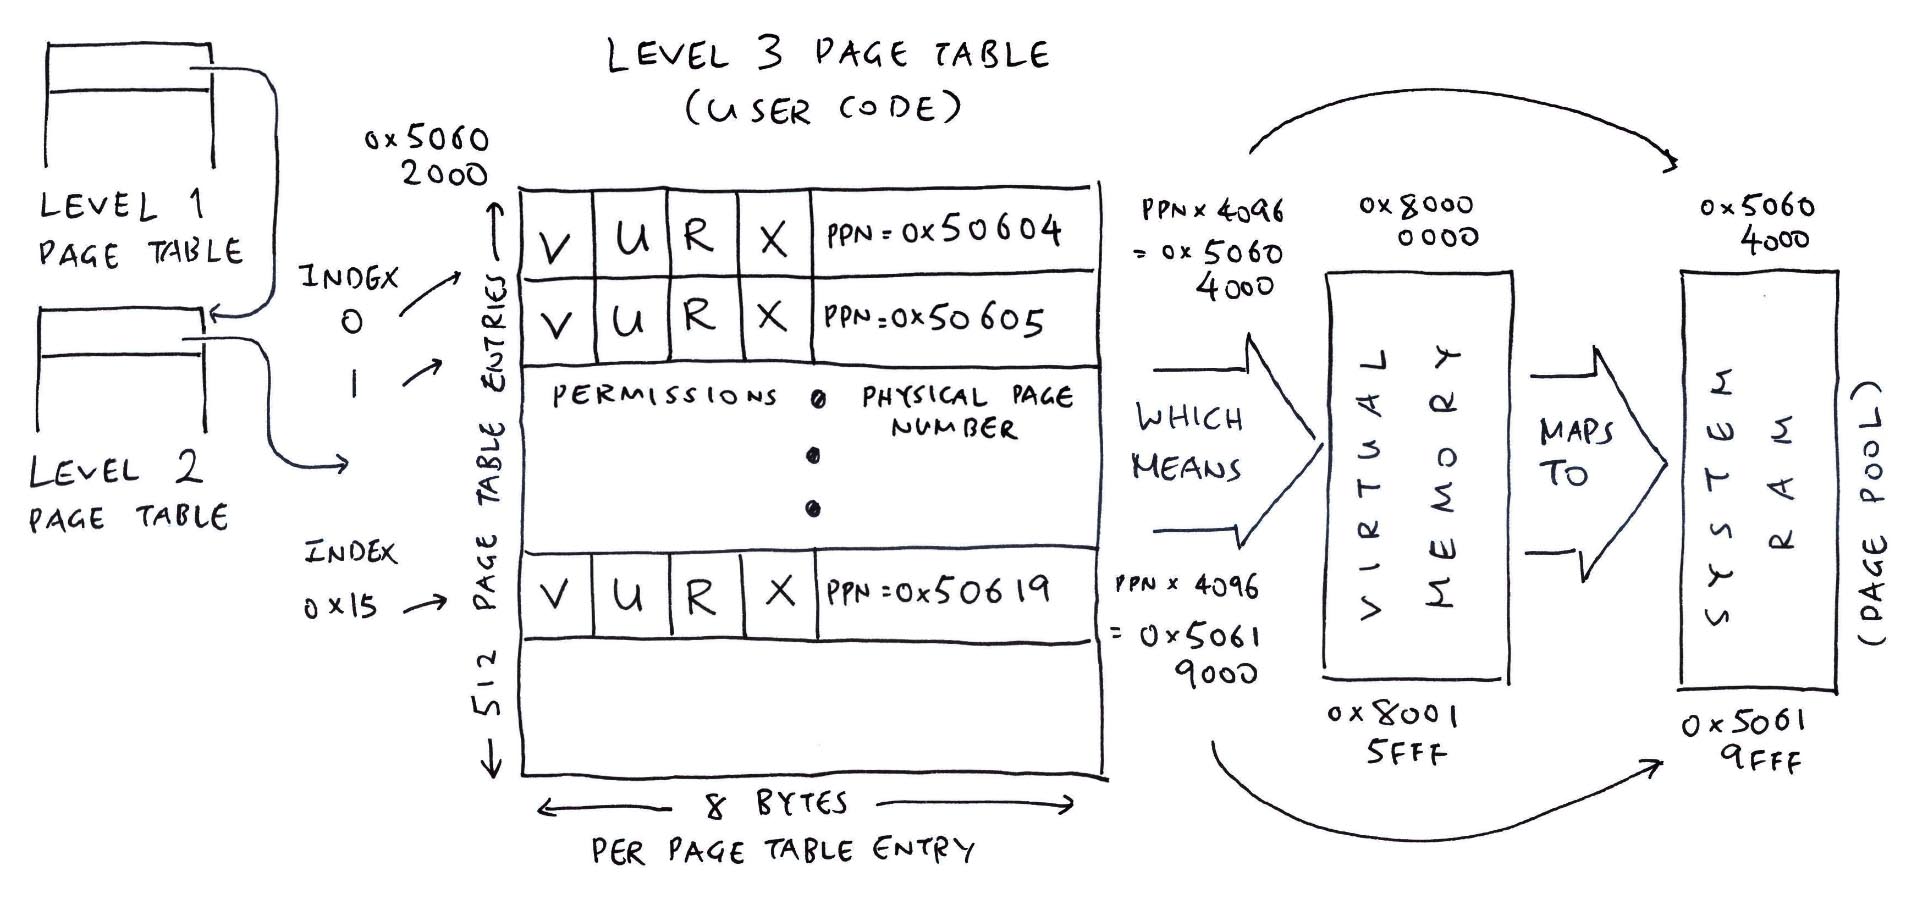
StarPro64 uses a RAM Disk because it runs in NuttX Kernel Mode (instead of the typical Flat Mode). This means we can do Memory Protection and Virtual Memory for Apps. (Pic above)
But it also means we need to bundle the NuttX Apps as ELF Files, hence the RAM Disk…
Most of the NuttX Platforms run on NuttX Flat Mode, which has NuttX Apps Statically-Linked into the NuttX Kernel.
NuttX Flat Mode works well for Small Microcontrollers. But StarPro64 and other SoCs will need the more sophisticated NuttX Kernel Mode…
How did we port NuttX to StarPro64? In under One Week?
We took the NuttX Port of Milk-V Duo S (Oz64 SG2000) and tweaked it for StarPro64 EIC7700X, with these minor modifications…
Here’s what we changed…
arch/risc-v/src/eic7700x/eic7700x_head.S
This is the RISC-V Boot Code that runs first when U-Boot Bootloader starts NuttX.
In the Linux Kernel Header: We modified the Kernel Size based on U-Boot (fdt_addr_r - kernel_addr_r)
This ensures that the Entire NuttX Image (including Initial RAM Disk) will be copied correctly from kernel_addr_r (0x8400_0000) to loadaddr (0x8020_0000)
/* Linux Kernel Header*/
__start:
  ...
  .quad  0x4000000  /* Kernel size (fdt_addr_r-kernel_addr_r) */
The Original Code assumes that we always Boot at Hart 0. But EIC7700X will Boot From Any Hart. (0 to 3)
This modification allows NuttX to Boot from any Hart…
  /* TODO SMP: Enable this for SMP
  /* If a0 (hartid) >= t1 (the number of CPUs), stop here
  blt  a0, t1, 3f
  csrw CSR_SIE, zero
  wfi
  */

3:
  /* Set stack pointer to the idle thread stack. Assume Hart 0. */
  li a2, 0
  riscv_set_inital_sp EIC7700X_IDLESTACK_BASE, SMP_STACK_SIZE, a2

  /* TODO SMP: Enable this for SMP
  riscv_set_inital_sp EIC7700X_IDLESTACK_BASE, SMP_STACK_SIZE, a0
*/Right now we support One Single Hart for EIC7700X. “TODO SMP” flags the code that will be modified (in future) to support Multiple Harts for EIC7700X.
arch/risc-v/src/eic7700x/eic7700x_start.c
NuttX boots here, called by the RISC-V Boot Code (from above). We made these changes to allow Booting from Any Hart…
If Boot Hart is Not 0:
Restart NuttX with Hart 0
If Boot Hart is 0:
Continue Starting NuttX
// We remember the Boot Hart ID (0 to 3)
int g_eic7700x_boot_hart = -1;

// NuttX boots here, called by the RISC-V Assembly Boot Code
void eic7700x_start(int mhartid) {

  // If Boot Hart is not 0: Restart NuttX with Hart 0
  if (mhartid != 0) {

    //  Clear the BSS and Restart with Hart 0
    //  __start points to our RISC-V Assembly Start Code
    eic7700x_clear_bss();
    boot_secondary(0, (uintptr_t)&__start);

    // Let this Hart idle forever (while Hart 0 runs)
    while (true) { asm("WFI"); }
    PANIC();  // Should never come here
  }

  // Else Boot Hart is 0: We have successfully booted NuttX on Hart 0!
  if (g_eic7700x_boot_hart < 0) {

    // Init the globals once only. Remember the Boot Hart.
    // Clear the BSS
    g_eic7700x_boot_hart = mhartid;
    eic7700x_clear_bss();

    // TODO SMP: Start the Other Harts by calling OpenSBI
    // eic7700x_boot_secondary();

    // Copy the RAM Disk
    // Initialize the per CPU areas
    eic7700x_copy_ramdisk();
    riscv_percpu_add_hart(mhartid);
  }
// Omitted: Call eic7700x_start_sThe code below will be used (in future) to support Multiple Harts…
// Boot NuttX on the Hart
void eic7700x_start_s(int mhartid) {

  // Configure the FPU
  // If this is not the Boot Hart: Jump to cpux
  riscv_fpuconfig();
  if (mhartid != g_eic7700x_boot_hart) { goto cpux; }

  // Omitted: Boot Hart starts here and calls nx_start()
  ...

cpux:
  // TODO SMP: Non-Boot Hart starts here
  // We init the NuttX CPU
riscv_cpu_boot(mhartid);How to Restart NuttX on Hart 0? By calling OpenSBI, adapted from riscv_sbi.c…
// We start a Hart (0 to 3) by calling OpenSBI
// addr points to our RISC-V Assembly Start Code
static int boot_secondary(uintreg_t hartid, uintreg_t addr) {

  // Make an ECALL to OpenSBI
  sbiret_t ret = sbi_ecall(
    SBI_EXT_HSM, SBI_EXT_HSM_HART_START,
    hartid, addr, 0, 0, 0, 0
  );

  // Check for OpenSBI Errors
  if (ret.error < 0) { _err("Boot Hart %d failed\n", hartid); PANIC(); }
  return 0;
}

// Make an ECALL to OpenSBI
static sbiret_t sbi_ecall(unsigned int extid, unsigned int fid, uintreg_t parm0, uintreg_t parm1, uintreg_t parm2, uintreg_t parm3, uintreg_t parm4, uintreg_t parm5) {
  register long r0 asm("a0") = (long)(parm0);
  register long r1 asm("a1") = (long)(parm1);
  register long r2 asm("a2") = (long)(parm2);
  register long r3 asm("a3") = (long)(parm3);
  register long r4 asm("a4") = (long)(parm4);
  register long r5 asm("a5") = (long)(parm5);
  register long r6 asm("a6") = (long)(fid);
  register long r7 asm("a7") = (long)(extid);
  sbiret_t ret;

  asm volatile
    (
     "ecall"
     : "+r"(r0), "+r"(r1)
     : "r"(r2), "r"(r3), "r"(r4), "r"(r5), "r"(r6), "r"(r7)
     : "memory"
     );
  ret.error = r0;
  ret.value = (uintreg_t)r1;
  return ret;
}

// OpenSBI returns an Error Code and Result Value
struct sbiret_s {
  intreg_t    error;
  uintreg_t   value;
};
typedef struct sbiret_s sbiret_t;

// These are the Standard OpenSBI Extension Codes
#define SBI_EXT_HSM (0x0048534D)
#define SBI_EXT_HSM_HART_START (0x0)For Multiple Harts in future: We shall start the other Non-Boot Harts by calling OpenSBI…
// TODO SMP: Start the other Non-Boot Harts by calling OpenSBI
static void eic7700x_boot_secondary(void) {
  for (int i = 0; i < CONFIG_SMP_NCPUS; i++) {
    if (i == g_eic7700x_boot_hart) { continue; }
    boot_secondary(i, (uintptr_t)&__start);
  }
}For Multiple Harts in future: NuttX insists on Booting with CPU 0 Only. Thus we set Boot Hart as CPU 0, and we Renumber the Other Harts…
// TODO SMP: Convert Hart ID to CPU ID.
// Boot Hart is CPU 0. Renumber the Other Harts.
int weak_function riscv_hartid_to_cpuid(int hart) {
  if (hart == g_eic7700x_boot_hart)
    { return 0; }
  else if (hart < g_eic7700x_boot_hart)
    { return hart + 1; }
  else
    { return hart; }
}

// TODO SMP: Convert CPU ID to Hart ID.
// Boot Hart is CPU 0. Renumber the Other Harts.
int weak_function riscv_cpuid_to_hartid(int cpu) {
  if (cpu == 0)
    { return g_eic7700x_boot_hart; }
  else if (cpu < g_eic7700x_boot_hart + 1)
    { return cpu - 1; }
  else
    { return cpu; }
}For Example: If boot_hart=2 then…
arch/risc-v/include/eic7700x/irq.h
// Number of PLIC External Interrupts supported
#define EIC7700X_PLIC_IRQS 458

// Offset by RISCV_IRQ_SEXT
#define NR_IRQS (RISCV_IRQ_SEXT + EIC7700X_PLIC_IRQS)That’s because EIC7700X supports 458 External Interrupts…
| EIC7700X Tech Ref #1 | Page 374 |
|---|---|
| Max Interrupts | 458 |
arch/risc-v/src/eic7700x/hardware/eic7700x_memorymap.h
// PLIC Base Address
#define EIC7700X_PLIC_BASE 0x0C000000ulPLIC Base Address is specified here…
| EIC7700X Tech Ref #1 | Page 239 |
|---|---|
| PLIC Memory Map | 0x0C00_0000 |
arch/risc-v/src/eic7700x/hardware/eic7700x_plic.h
// PLIC Interrupt Priority: Single Global Register
#define EIC7700X_PLIC_PRIORITY (EIC7700X_PLIC_BASE + 0x000000)

// Hart 0 S-Mode Interrupt Enable and Offset Between Harts
#define EIC7700X_PLIC_ENABLE0     (EIC7700X_PLIC_BASE + 0x002080)
#define EIC7700X_PLIC_ENABLE_HART 0x100

// Hart 0 S-Mode Priority Threshold and Offset Between Harts
#define EIC7700X_PLIC_THRESHOLD0     (EIC7700X_PLIC_BASE + 0x201000)
#define EIC7700X_PLIC_THRESHOLD_HART 0x2000

// Hart 0 S-Mode Claim / Complete and Offset Between Harts
#define EIC7700X_PLIC_CLAIM0     (EIC7700X_PLIC_BASE + 0x201004)
#define EIC7700X_PLIC_CLAIM_HART 0x2000Interrupt Enable: PLIC_ENABLE_HART is 0x100 because we skip 0x100 bytes per Hart…
| EIC7700X Tech Ref #1 | Page 240 |
|---|---|
| (Skip the M-Modes) | |
| 0x0C00_2080 | Start Hart 0 S-Mode interrupt enables |
| 0x0C00_2180 | Start Hart 1 S-Mode interrupt enables |
| 0x0C00_2280 | Start Hart 2 S-Mode interrupt enables |
Priority Threshold: PLIC_THRESHOLD_HART is 0x2000 because we skip 0x2000 bytes per Hart
Claim / Complete: PLIC_CLAIM_HART is 0x2000 because we skip 0x2000 bytes per Hart
Which comes from this…
| EIC7700X Tech Ref #1 | Page 241 |
|---|---|
| (Skip the M-Modes) | |
| 0x0C20_1000 | Hart 0 S-Mode Priority Threshold |
| 0x0C20_1004 | Hart 0 S-Mode Claim / Complete |
| 0x0C20_3000 | Hart 1 S-Mode Priority Threshold |
| 0x0C20_3004 | Hart 1 S-Mode Claim / Complete |
| 0x0C20_5000 | Hart 2 S-Mode Priority Threshold |
| 0x0C20_5004 | Hart 2 S-Mode Claim / Complete |
arch/risc-v/src/eic7700x/eic7700x_irq.c
In future we shall support Multiple Harts. That’s why we extended this code to Initialize the Interrupts for Harts 0 to 3…
// Initialize the Interrupts
void up_irqinitialize(void) { ...

  // Disable all global interrupts
  for (hart = 0; hart < CONFIG_SMP_NCPUS; hart++) {
    addr = EIC7700X_PLIC_ENABLE0 + (hart * EIC7700X_PLIC_ENABLE_HART);
    for (offset = 0; offset < EIC7700X_PLIC_IRQS >> 3; offset += 4) {
      putreg32(0x0, addr + offset);
    }
  }

  // Clear pendings in PLIC
  for (hart = 0; hart < CONFIG_SMP_NCPUS; hart++) {
    addr = EIC7700X_PLIC_CLAIM0 + (hart * EIC7700X_PLIC_CLAIM_HART);
    claim = getreg32(addr);
    putreg32(claim, addr);
  }

  // Set irq threshold to 0 (permits all global interrupts)
  for (hart = 0; hart < CONFIG_SMP_NCPUS; hart++) {
    addr = EIC7700X_PLIC_THRESHOLD0 + (hart * EIC7700X_PLIC_THRESHOLD_HART);
    putreg32(0, addr);
}We do this to Disable the Interrupts for Boot Hart 0 to 3 (in future)
// Disable the Interrupt
void up_disable_irq(int irq) { ...

  // Clear enable bit for the irq
  if (0 <= extirq && extirq <= EIC7700X_PLIC_IRQS) {
    addr = EIC7700X_PLIC_ENABLE0 +
           (g_eic7700x_boot_hart * EIC7700X_PLIC_ENABLE_HART);
    modifyreg32(addr + (4 * (extirq / 32)),
                1 << (extirq % 32), 0);
}And this to Enable the Interrupts for Boot Hart 0 to 3 (in future)
// Enable the Interrupt
void up_enable_irq(int irq) { ...

  // Set enable bit for the irq
  if (0 <= extirq && extirq <= EIC7700X_PLIC_IRQS) {
    addr = EIC7700X_PLIC_ENABLE0 +
           (g_eic7700x_boot_hart * EIC7700X_PLIC_ENABLE_HART);
    modifyreg32(addr + (4 * (extirq / 32)),
                0, 1 << (extirq % 32));
}arch/risc-v/src/eic7700x/eic7700x_irq_dispatch.c
In future we shall support Multiple Harts. That’s why we extended this code to Dispatch the Interrupt for Boot Hart 0 to 3…
// Dispatch the Interrupt
void *riscv_dispatch_irq(uintptr_t vector, uintptr_t *regs) {
  int irq = (vector >> RV_IRQ_MASK) | (vector & 0xf);
  uintptr_t claim = EIC7700X_PLIC_CLAIM0 +
                    (g_eic7700x_boot_hart * EIC7700X_PLIC_CLAIM_HART);
  ...
  // Read the PLIC_CLAIM for the Boot Hart
  uintptr_t val = getreg32(claim);
  ...
  // Write PLIC_CLAIM to clear pending for Boot Hart
putreg32(irq - RISCV_IRQ_EXT, claim);arch/risc-v/src/eic7700x/eic7700x_mm_init.c
// I/O Memory Map
#define MMU_IO_BASE (0x00000000ul)
#define MMU_IO_SIZE (0x80000000ul)We derived the above from the EIC7700X Memory Map…
| EIC7700X Tech Ref #1 | Page 380 |
|---|---|
| System Memory Map | |
| System Space (Low) | 0x0000_0000 to 0x8000_0000 |
| Memory Space | 0x8000_0000 to 0x10_0000_0000 |
The rest of the Memory Map is identical to SG2000. We removed all T-Head MMU Extensions, including mmu_flush_cache.
In future we shall support Multiple Harts. This Arch Config will enable the Hart-To-CPU Mapping we saw earlier: riscv_hartid_to_cpuid, riscv_cpuid_to_hartid
config ARCH_CHIP_EIC7700X
  ## TODO SMP: Enable Hart-To-CPU Mapping
## select ARCH_RV_CPUID_MAPAlso we removed ARCH_MMU_EXT_THEAD. (T-Head MMU Extensions)
boards/risc-v/eic7700x/starpro64/configs/nsh/defconfig
We modified the NuttX Board Config for UART…
## UART0 Configuration
CONFIG_16550_REGINCR=4
CONFIG_16550_UART0_BASE=0x50900000
CONFIG_16550_UART0_CLOCK=198144000
CONFIG_16550_UART0_IRQ=12516550_REGINCR is 4 because the UART Registers are spaced 4 bytes apart…
| EIC7700X Tech Ref #4 | Page 524 |
|---|---|
| UART Register Offset | |
| 0x0 | Receive Buffer Register (RBR) |
| 0x4 | Interrupt Enable Register (IER) |
| 0x8 | Interrupt Identification Register (IIR) |
UART0 Base Address is here…
| EIC7700X Tech Ref #4 | Page 353 |
|---|---|
| Peripheral Address Space | |
| UART0 | 0x5090_0000 |
Why IRQ 125? UART0 Interrupt Number is 100, we add 25 because of RISCV_IRQ_SEXT…
| EIC7700X Tech Ref #1 | Page 366 |
|---|---|
| UART0 Interrupt Number | 100 (lsp_uart0_intr) |
16550_UART0_CLOCK was computed according to these instructions…
NuttX UART Debug Log shows:
  dlm = 0x00
  dll = 0x6c

We know that:
  dlm = 0x00 = (div >> 8)
  dll = 0x6c = (div & 0xff)

Which means:
  div = 0x6c

We know that:
  baud = 115200
  div  = (uartclk + (baud << 3)) / (baud << 4)

Therefore:
  0x6c    = (uartclk + 921600) / 1843200
  uartclk = (0x6c * 1843200) - 921600
          = 198144000
arch/risc-v/src/eic7700x/eic7700x_timerisr.c
Finally we changed the RISC-V Timer Frequency. We executed the sleep 10 command in NSH and adjusted the frequency…
// Previously for SG2000: 25000000ul
#define MTIMER_FREQ 1000000ulU-Boot Bootloader is dropping chars when we paste long lines. How now brown cow?
In iTerm: Try Edit > Paste Special > Paste Slowly
But Before That: Click Settings > Advanced > Pasteboard
“Delay in seconds between chunks when Pasting Slowly”
Set to 1 second
“Number of bytes to paste in each chunk when Pasting Slowly”
Set to 16 bytes