📝 29 Dec 2024

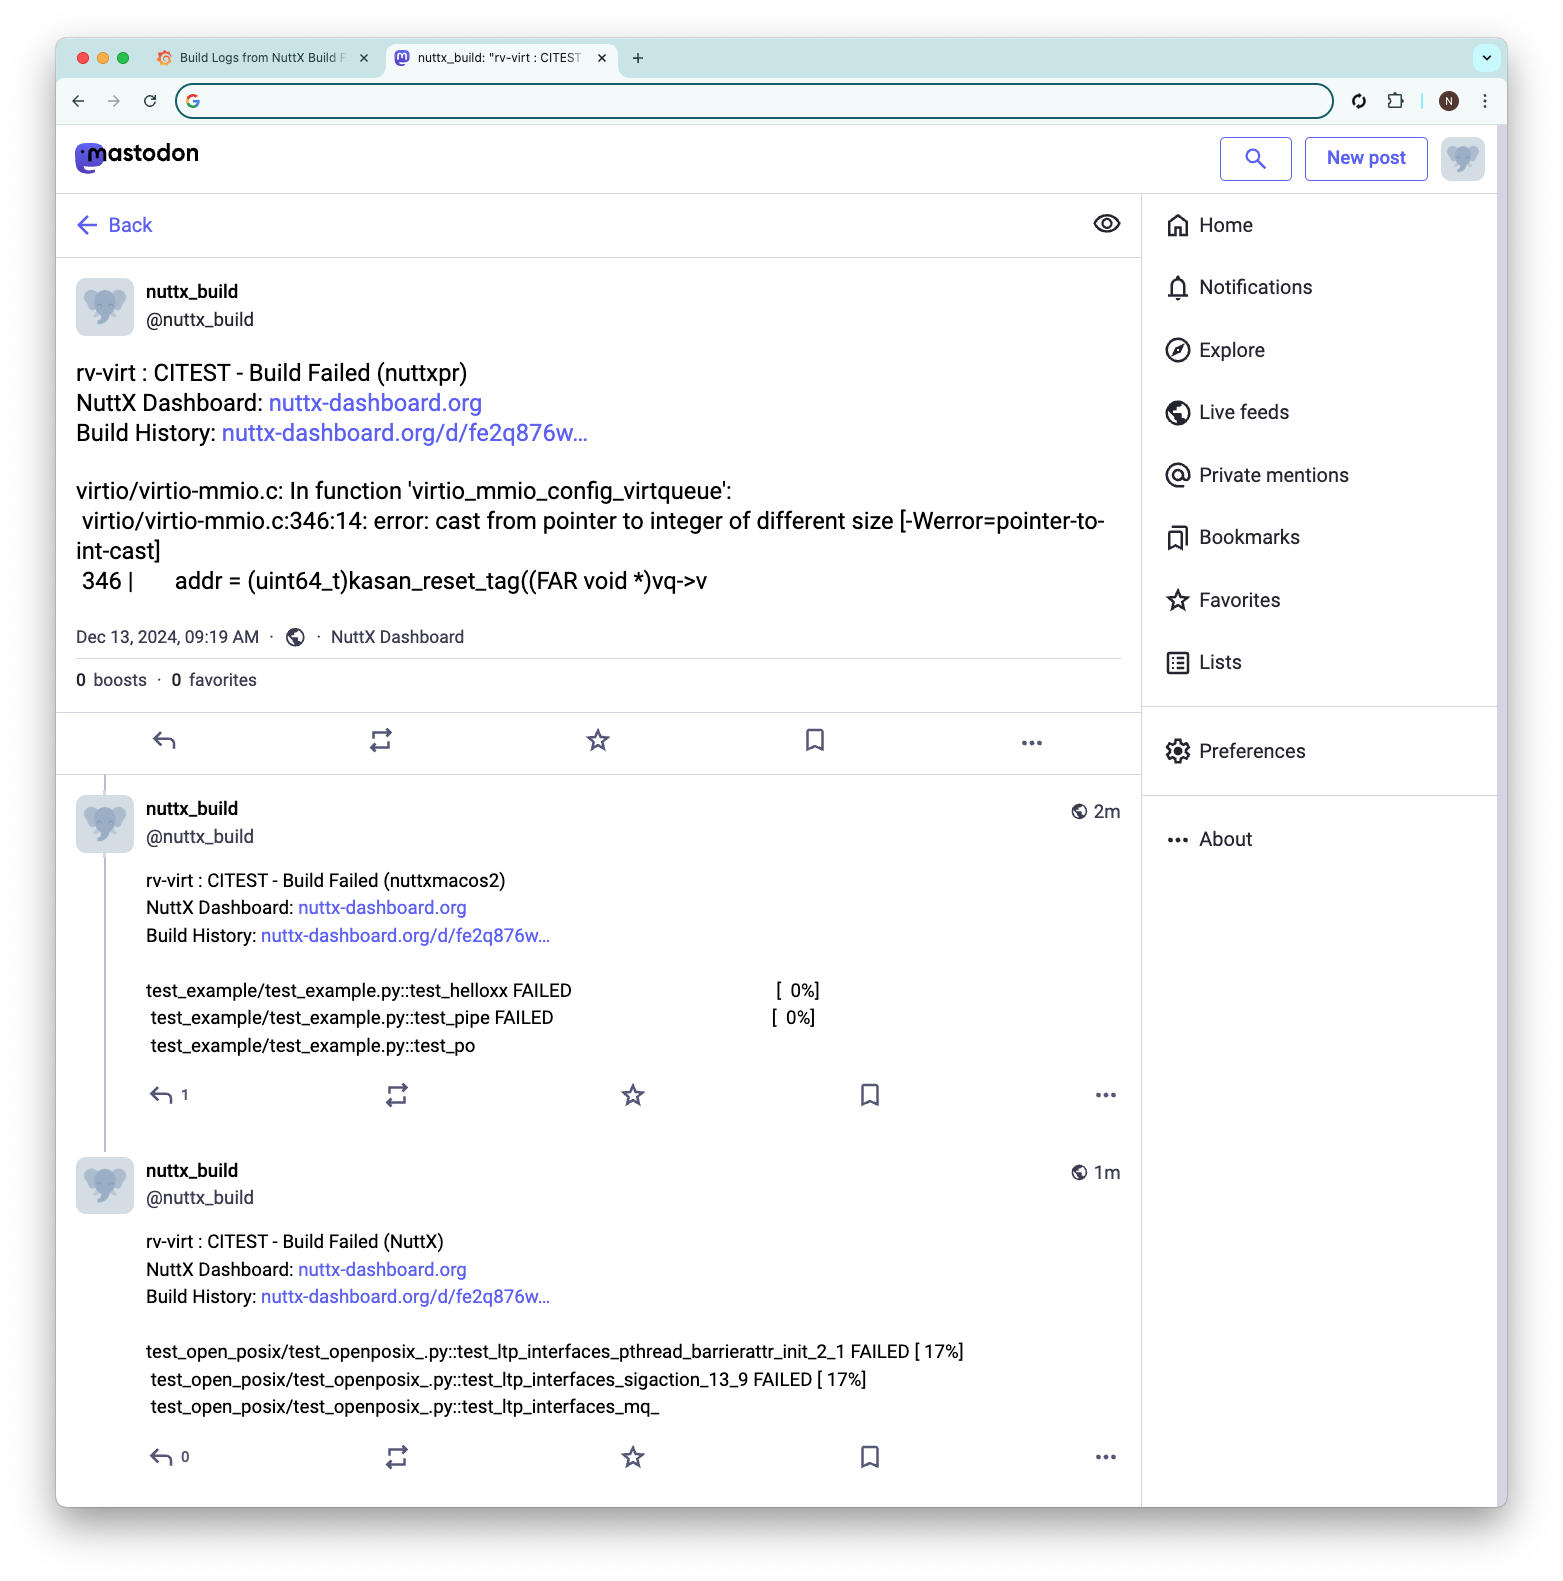
We’re out for an overnight hike, city to airport. Our Build Farm for Apache NuttX RTOS runs non-stop all day, all night. Continuously compiling over 1,000 NuttX Targets: Arm, RISC-V, Xtensa, x64, …
Can we be 100% sure that NuttX is OK? Without getting spammed by alert emails all night? (Sorry we got zero budget for “paging duty” services)
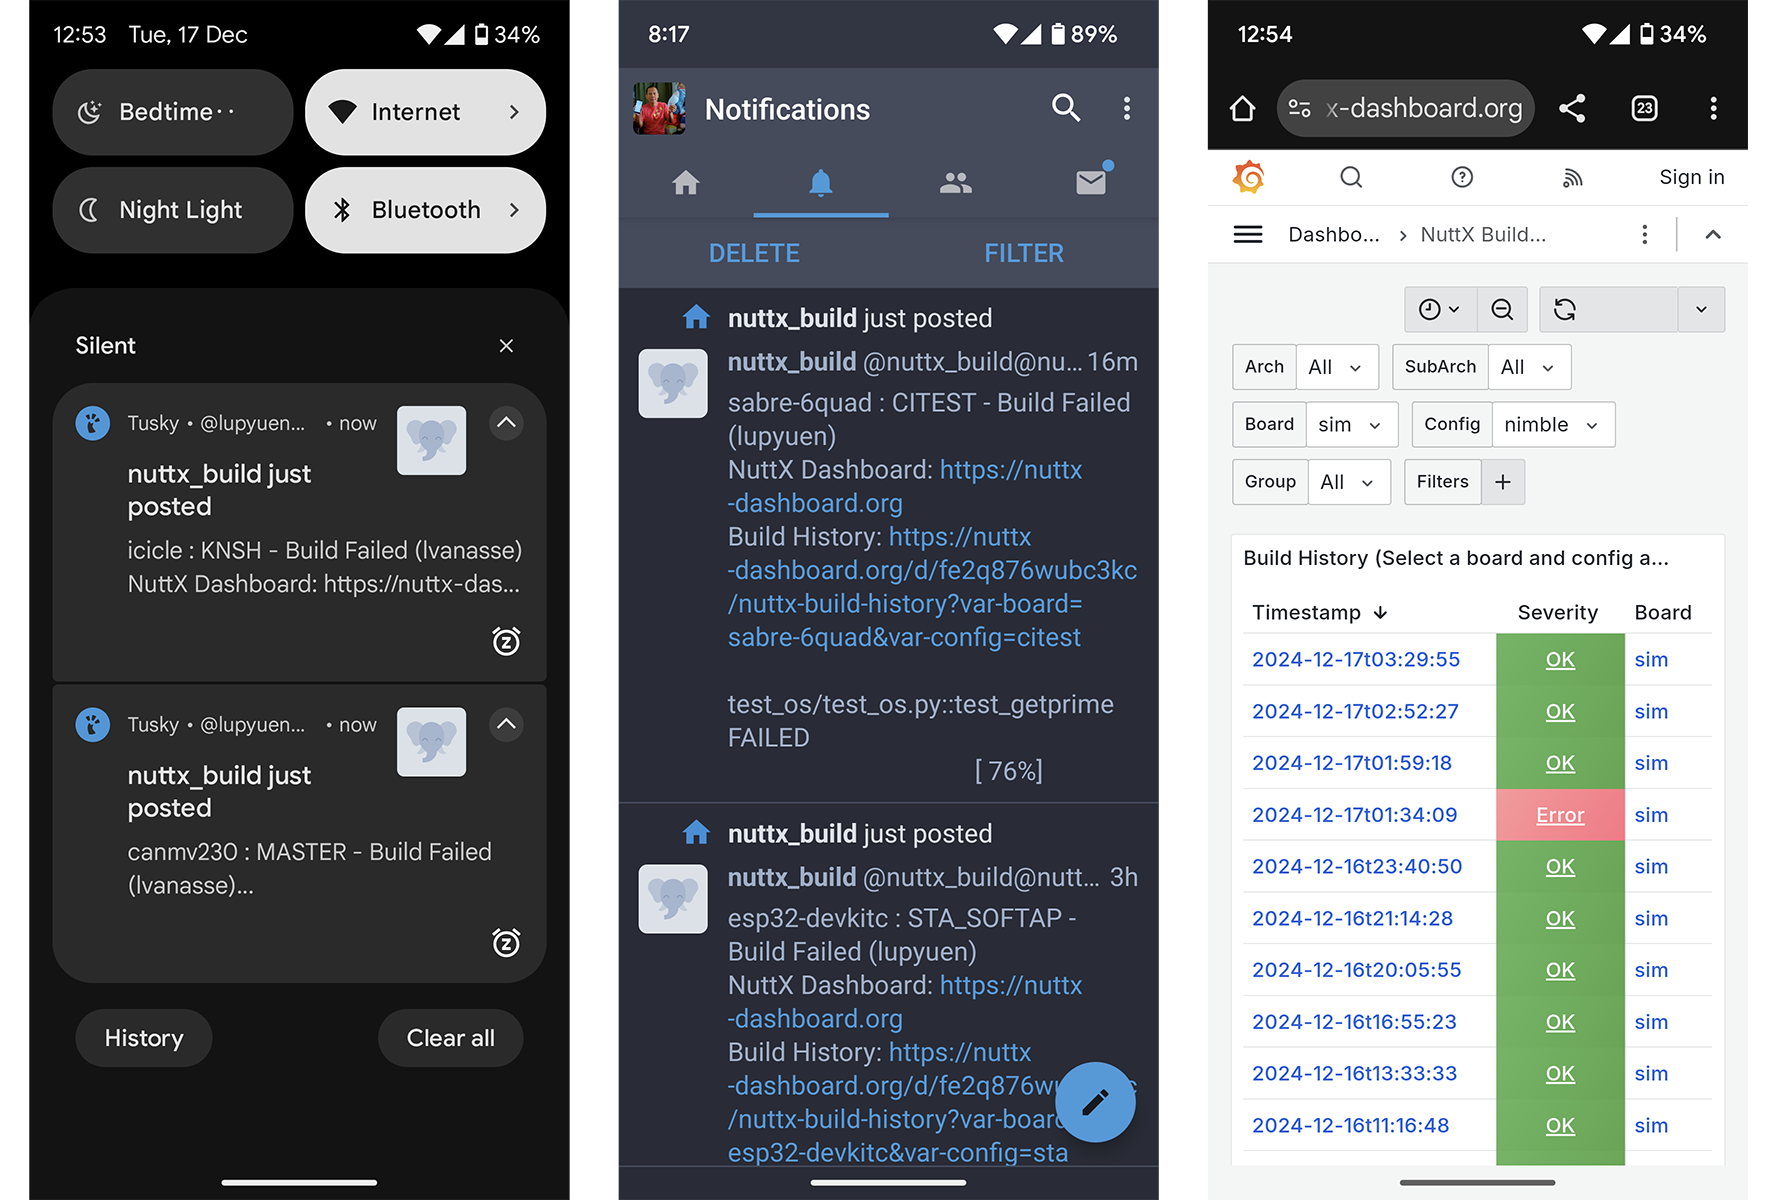
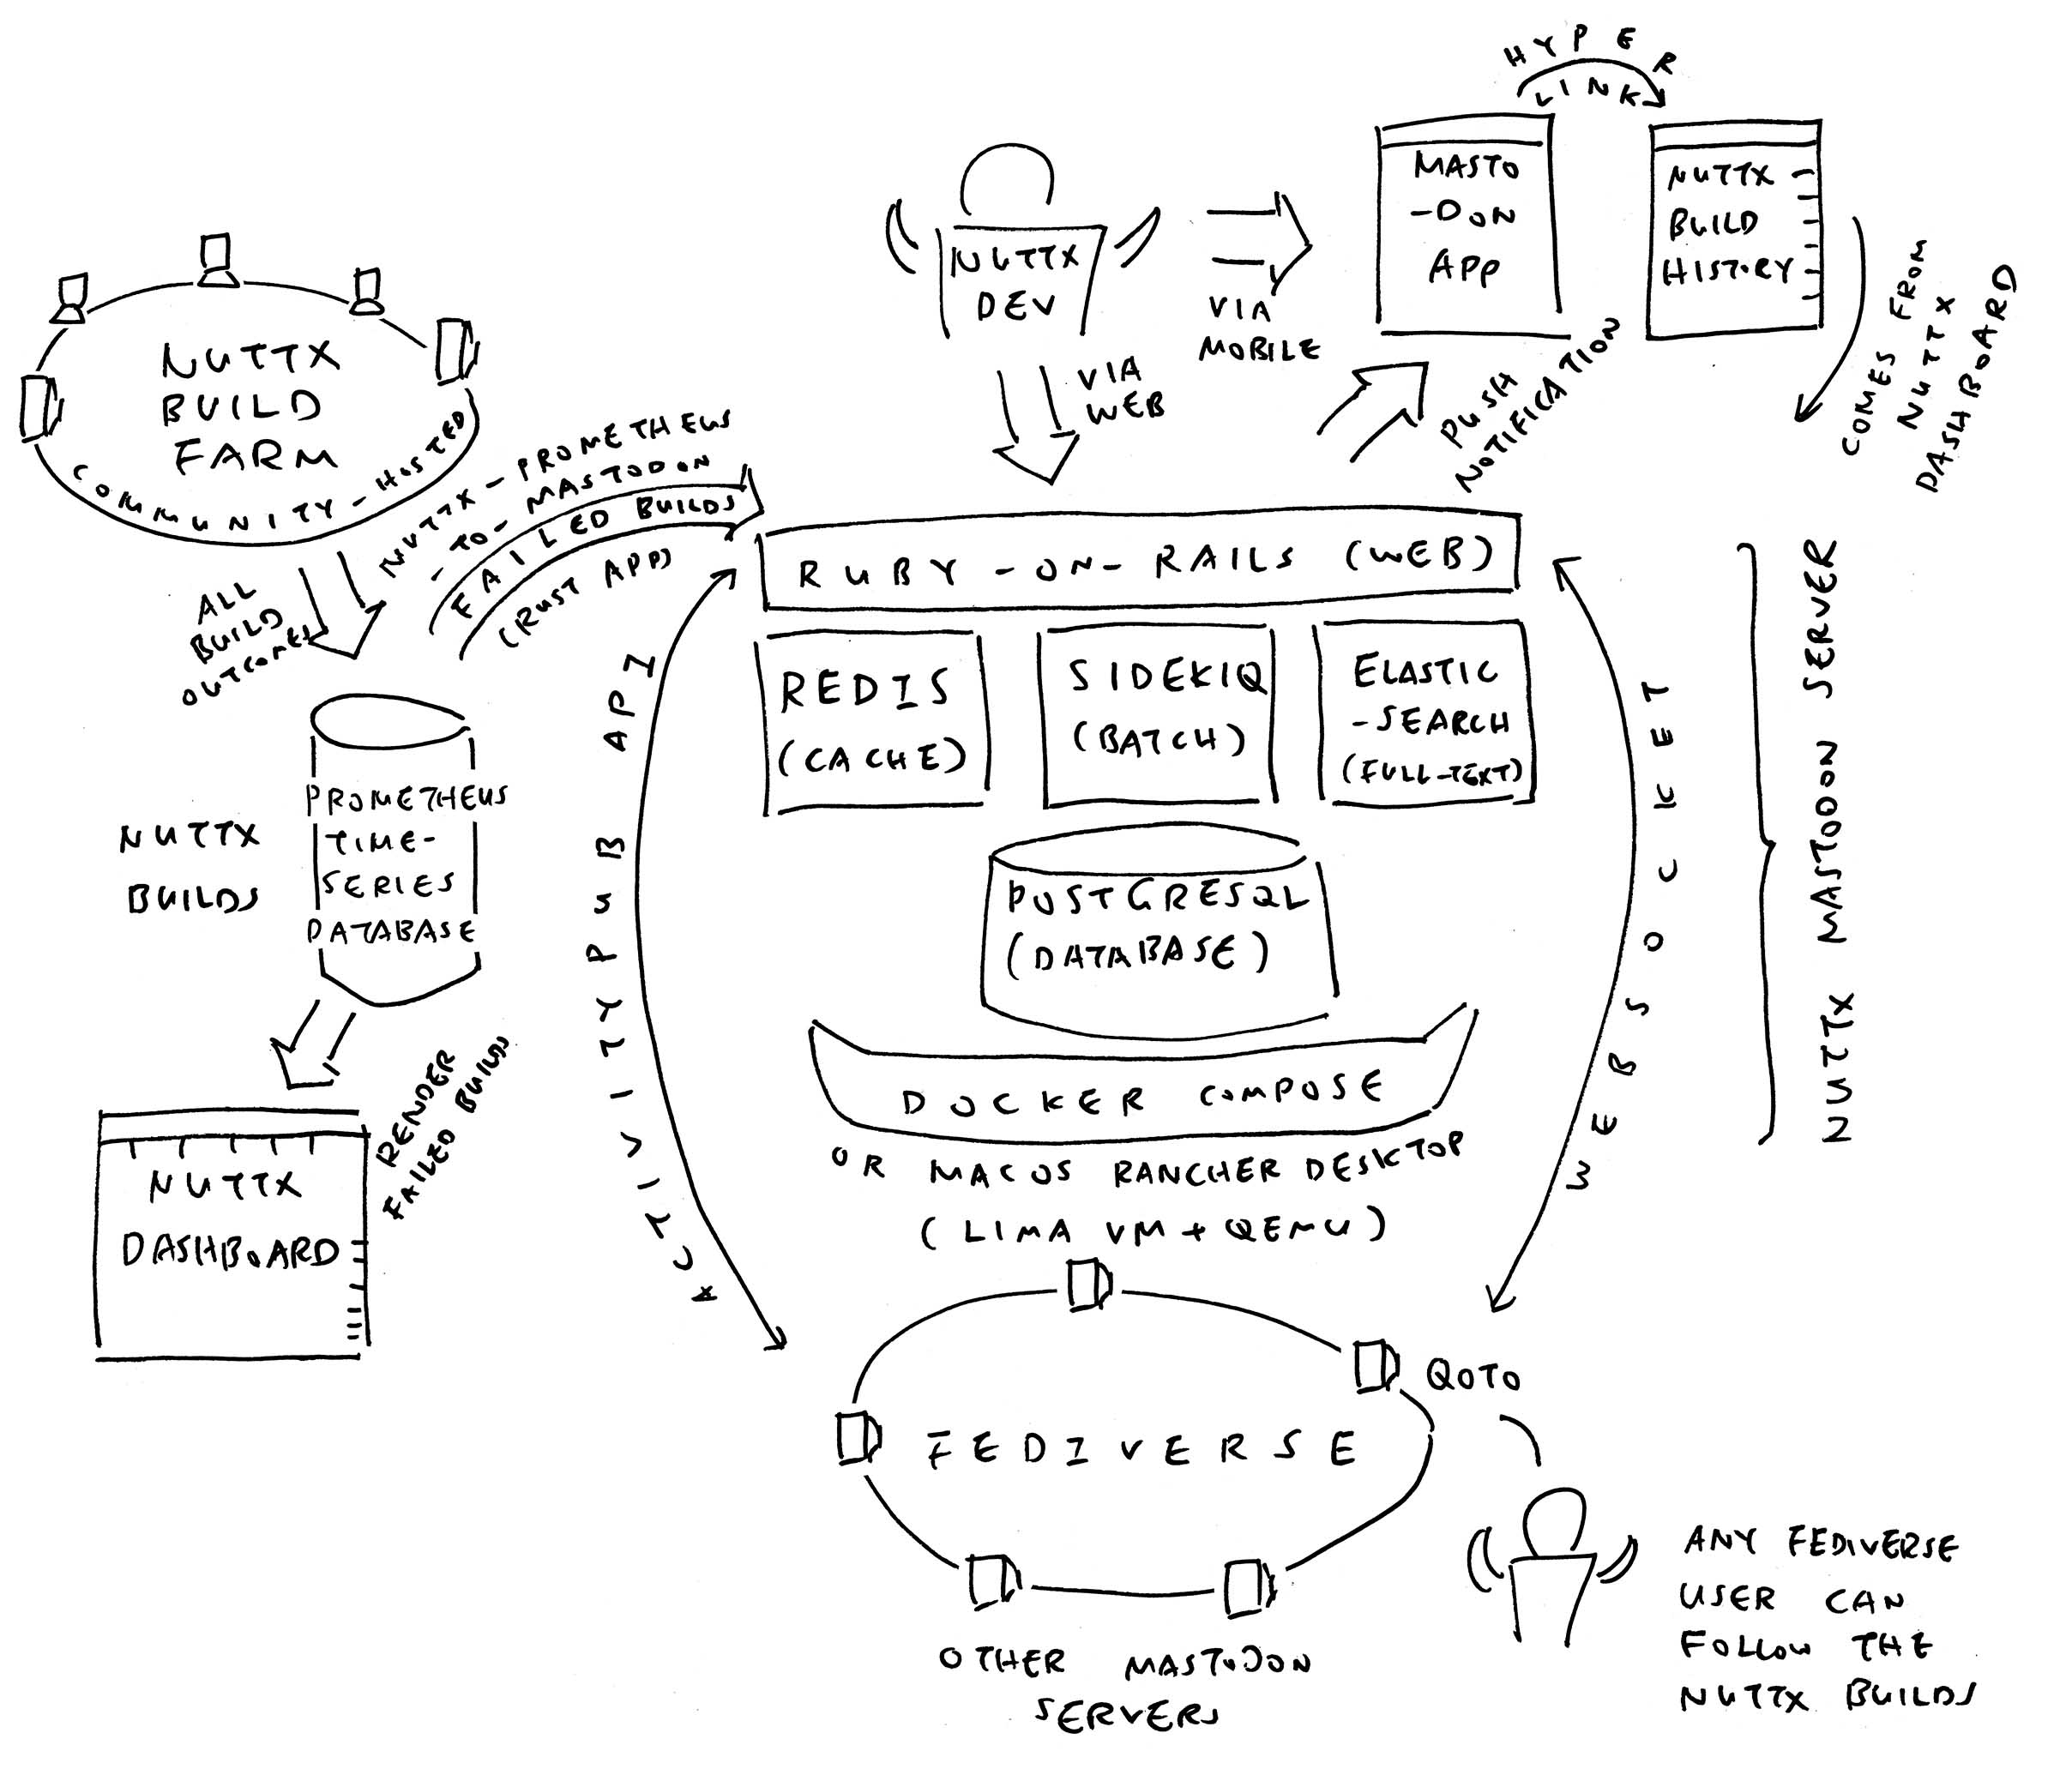
In this article: Mastodon (pic above) becomes a fun new way to broadcast NuttX Alerts in real time. We shall…
Install our Mastodon Server with Docker Compose (or Rancher Desktop)
Create a Bot User for pushing Mastodon Alerts
Which will work Without Outgoing Email
We fetch the NuttX Builds from Prometheus Database
Post the NuttX Build via Mastodon API
Our Mastodon Server will have No Local Users
But will gladly accept all Fediverse Users!
How to get Mastodon Alerts for NuttX Builds and Continuous Integration? (CI)
Register for a Mastodon Account on any Fediverse Server
(I got mine at qoto.org)
On Our Mobile Device: Install a Mastodon App and log in
(Like Tusky)
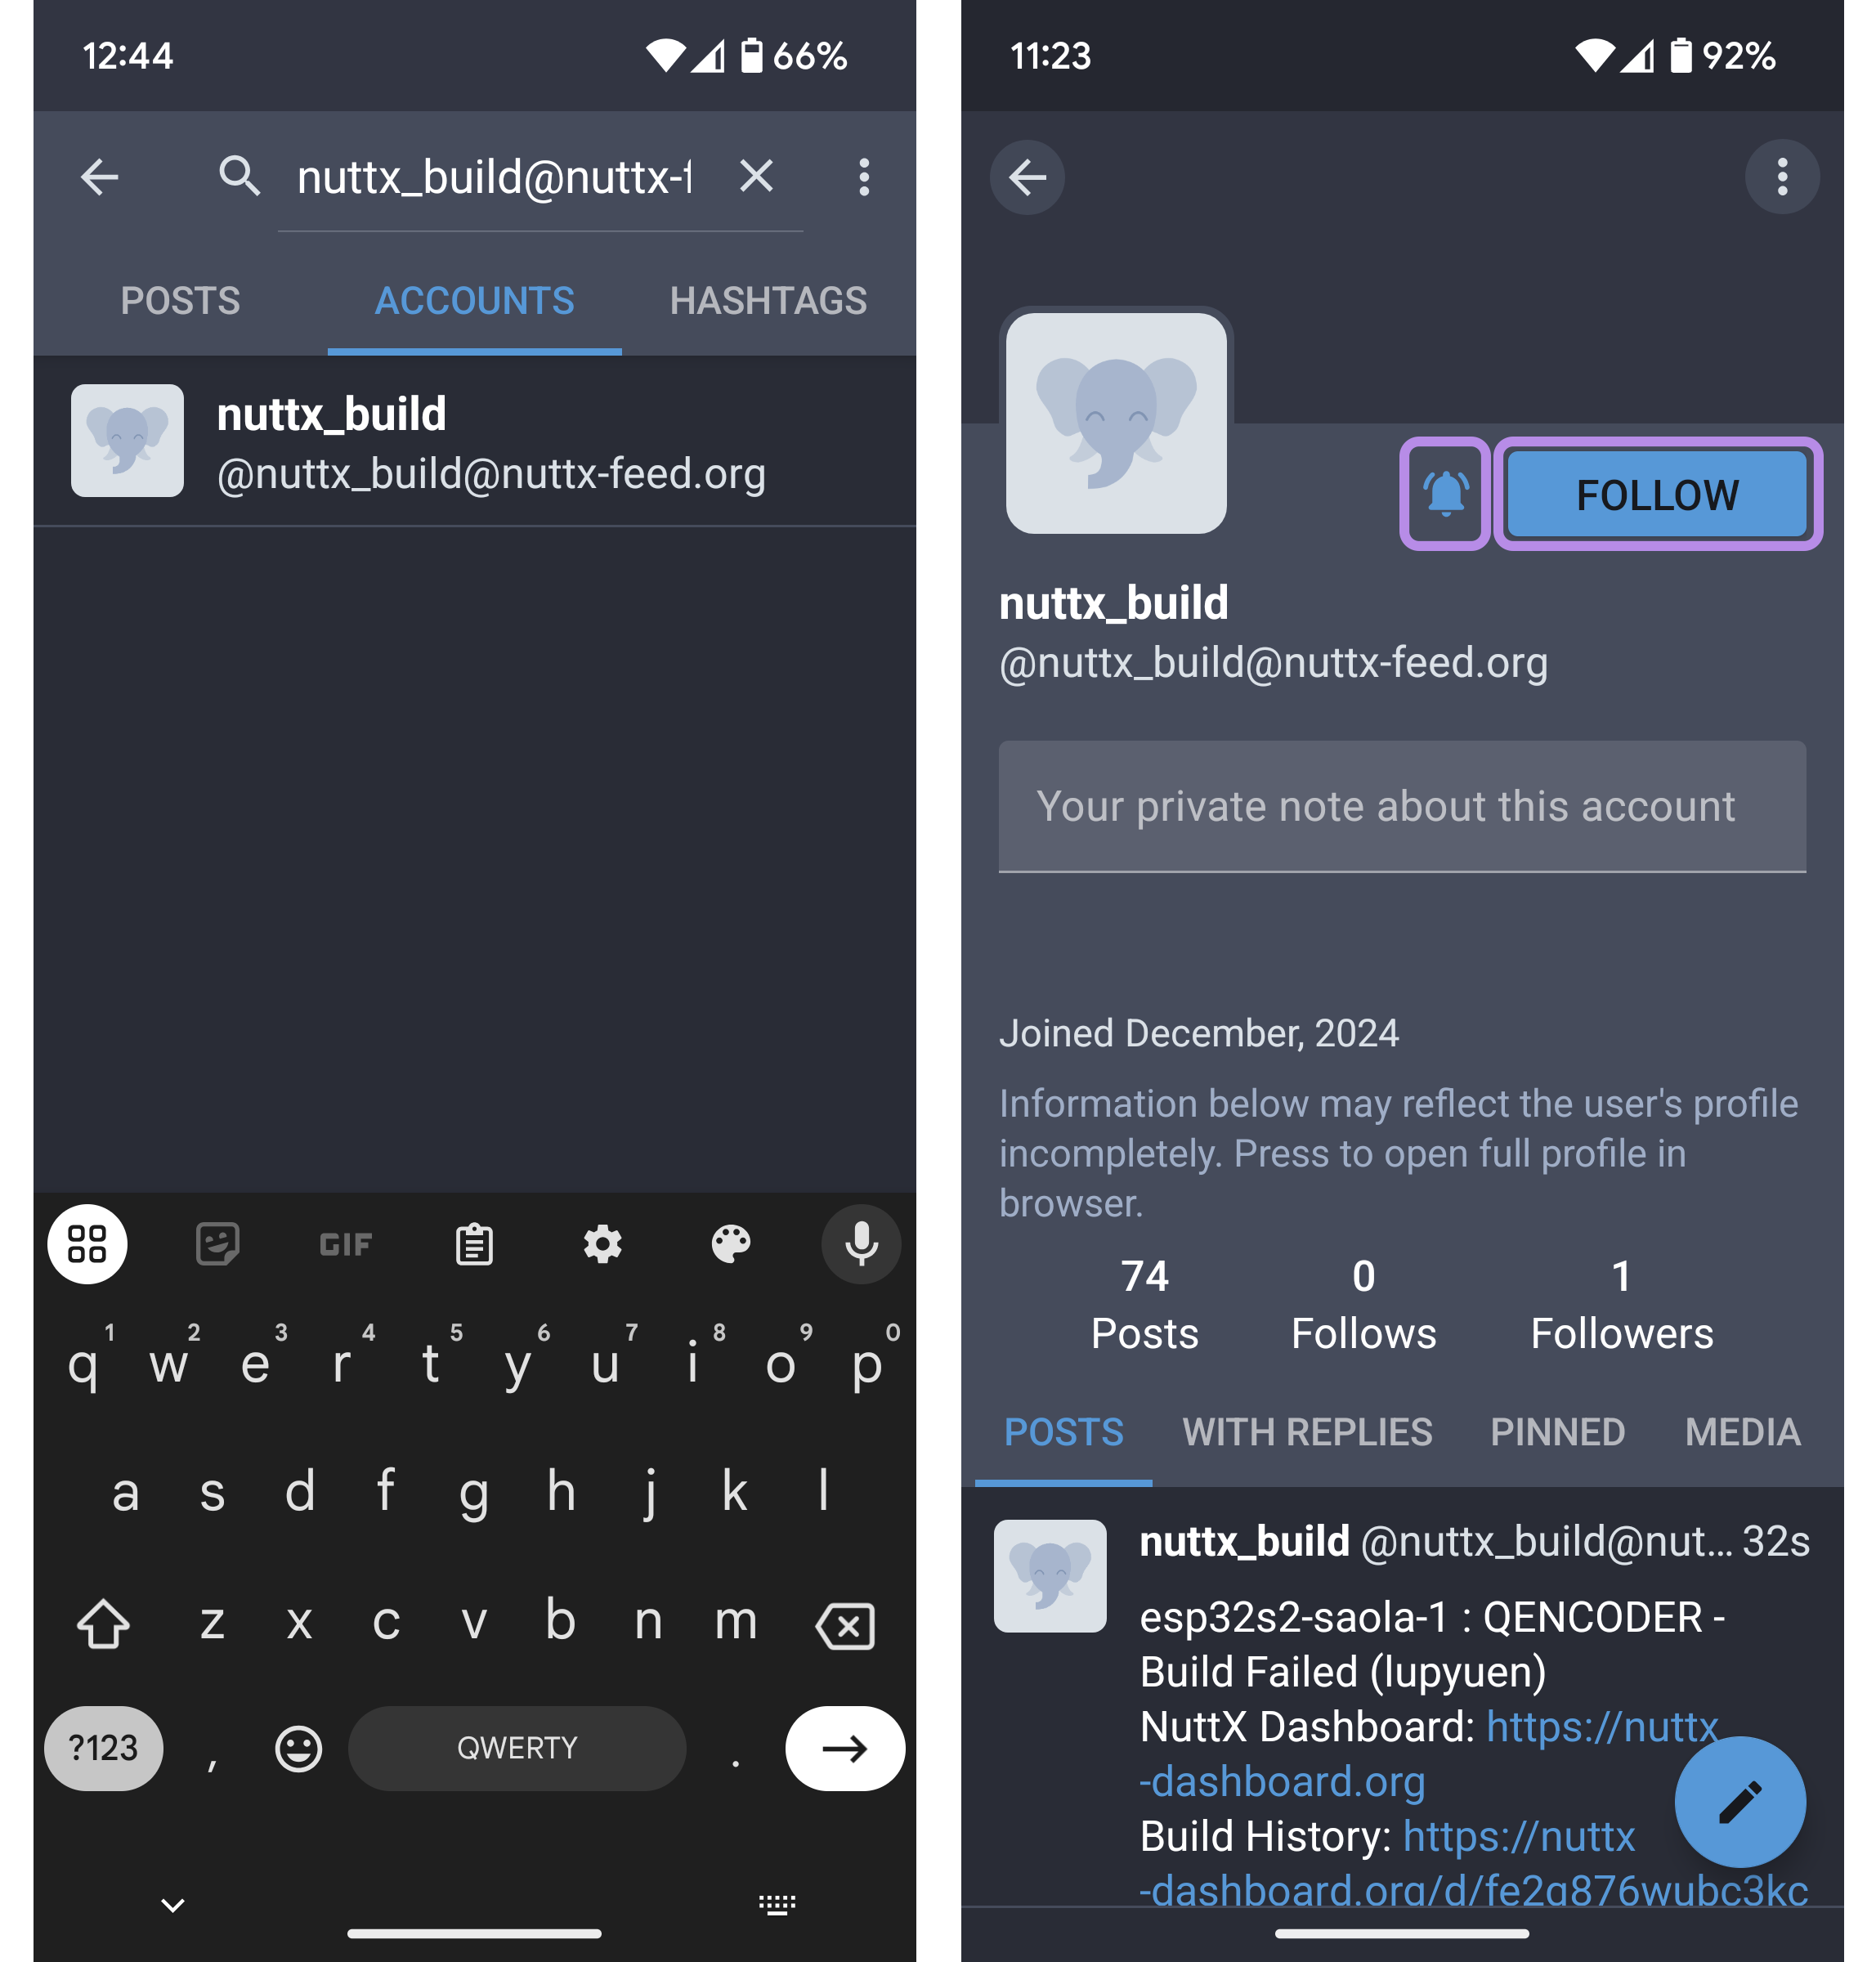
Tap the Search button. Enter…
Tap the Accounts tab. (Pic above)
Tap the NuttX Build account that appears.
Tap the Follow button. (Pic above)
And the Notify button beside it.
That’s all! When a NuttX Build Fails, we’ll see a Notification in the Mastodon App
(Which links to NuttX Build History)

How did Mastodon get the Failed Builds?
Thanks to the NuttX Community: We have a (self-hosted) NuttX Build Farm that continuously compiles All NuttX Targets. (1,600 Targets!)
Failed Builds are auto-escalated to our NuttX Dashboard. (Open-source Grafana + Prometheus)
In a while, we’ll explain how the Failed Builds are channeled from NuttX Dashboard into Mastodon Posts.
First we talk about Mastodon…
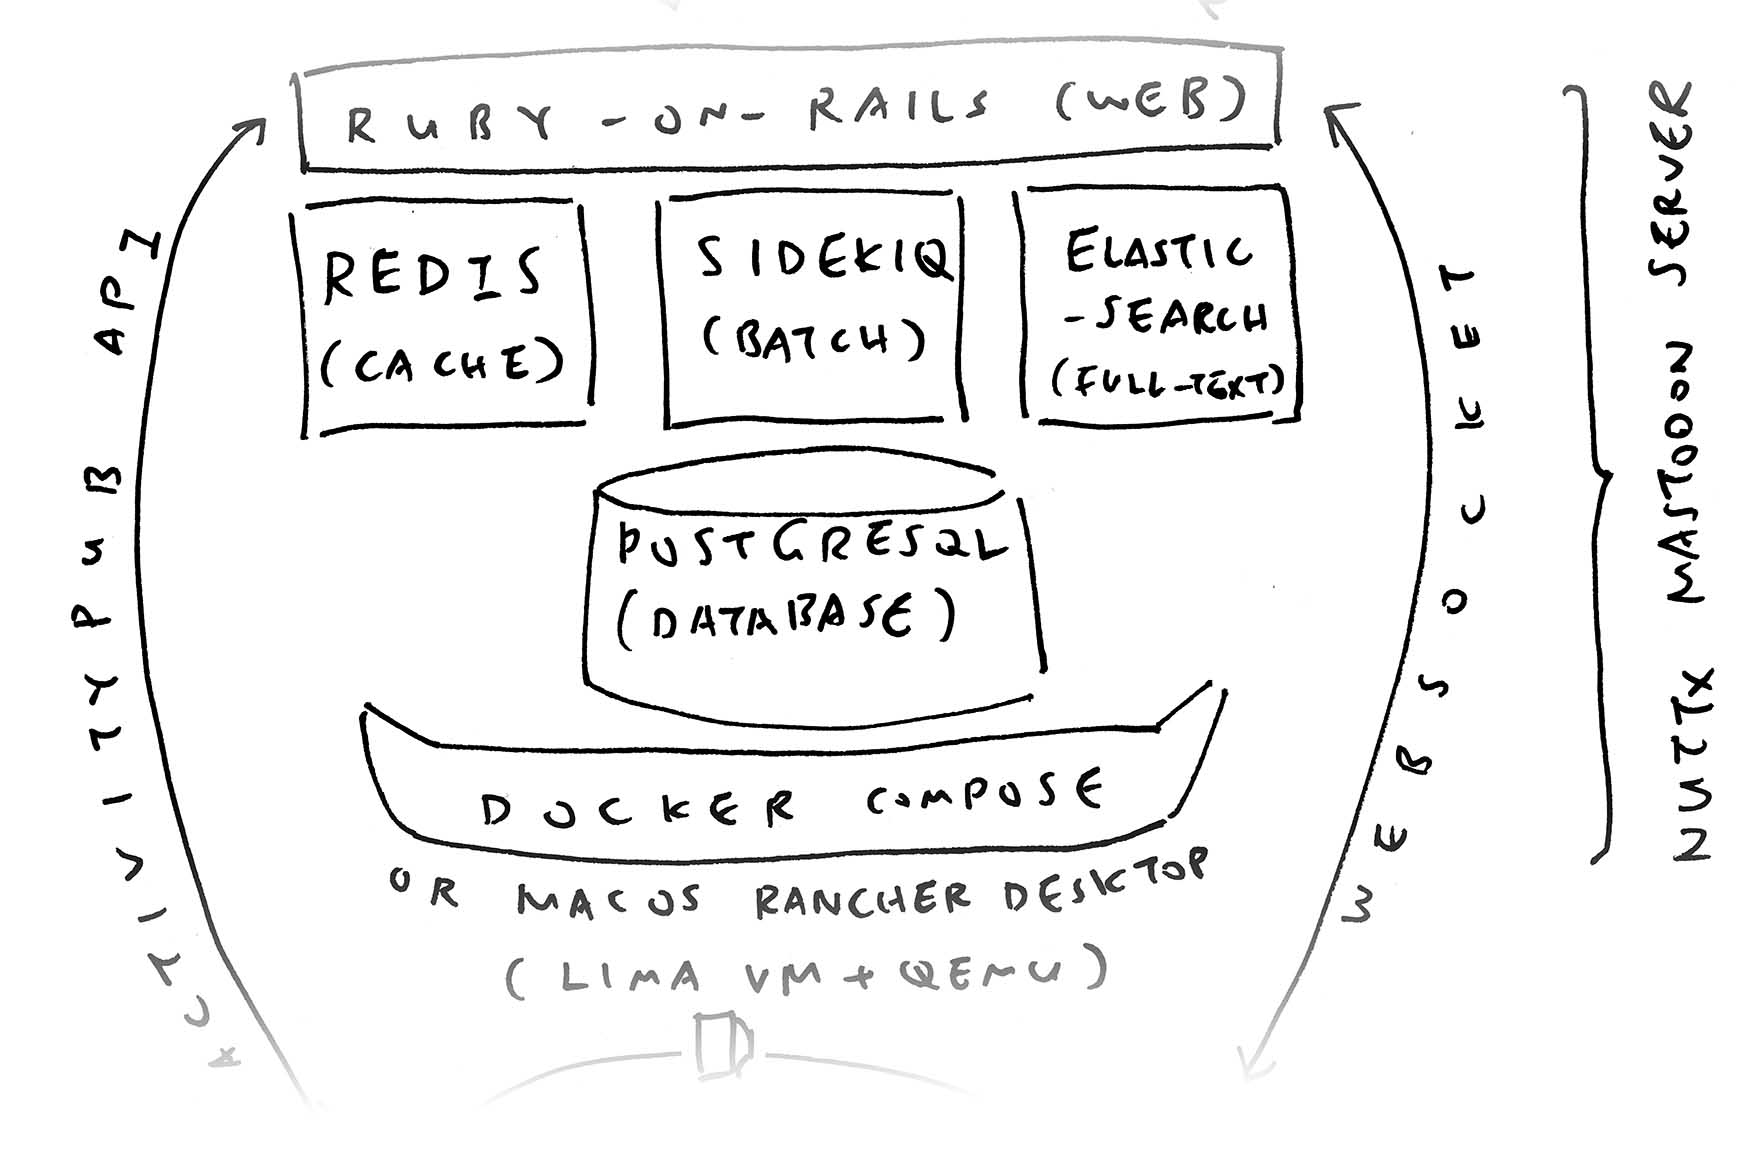
What kind of animal is Mastodon?
Think Twitter… But Open-Source and Self-Hosted! (Ruby-on-Rails + PostgreSQL + Redis + Elasticsearch) Mastodon is mostly used for Global Social Networking on The Fediverse.
Though today we’re making something unexpected, unconventional with Mastodon: Pushing Notifications of Failed NuttX Builds.
(Think: “Social Network for NuttX Maintainers”)

OK weird flex. How to get started?
We begin by installing our Mastodon Server with Docker Compose…
## Download the Mastodon Repo
git clone \
  https://github.com/mastodon/mastodon \
  --branch v4.3.2
cd mastodon
echo >.env.production

## Patch the Docker Compose Config
rm docker-compose.yml
wget https://raw.githubusercontent.com/lupyuen/mastodon/refs/heads/main/docker-compose.yml

## Bring Up the Docker Compose (Maybe twice)
sudo docker compose up
sudo docker compose up

## Omitted: sleep infinity, psql, mastodon:setup, puma, ...Based on the excellent Mastodon Docs
Right now we’re testing on (open-source) macOS Rancher Desktop. Thus we tweaked the steps a bit.
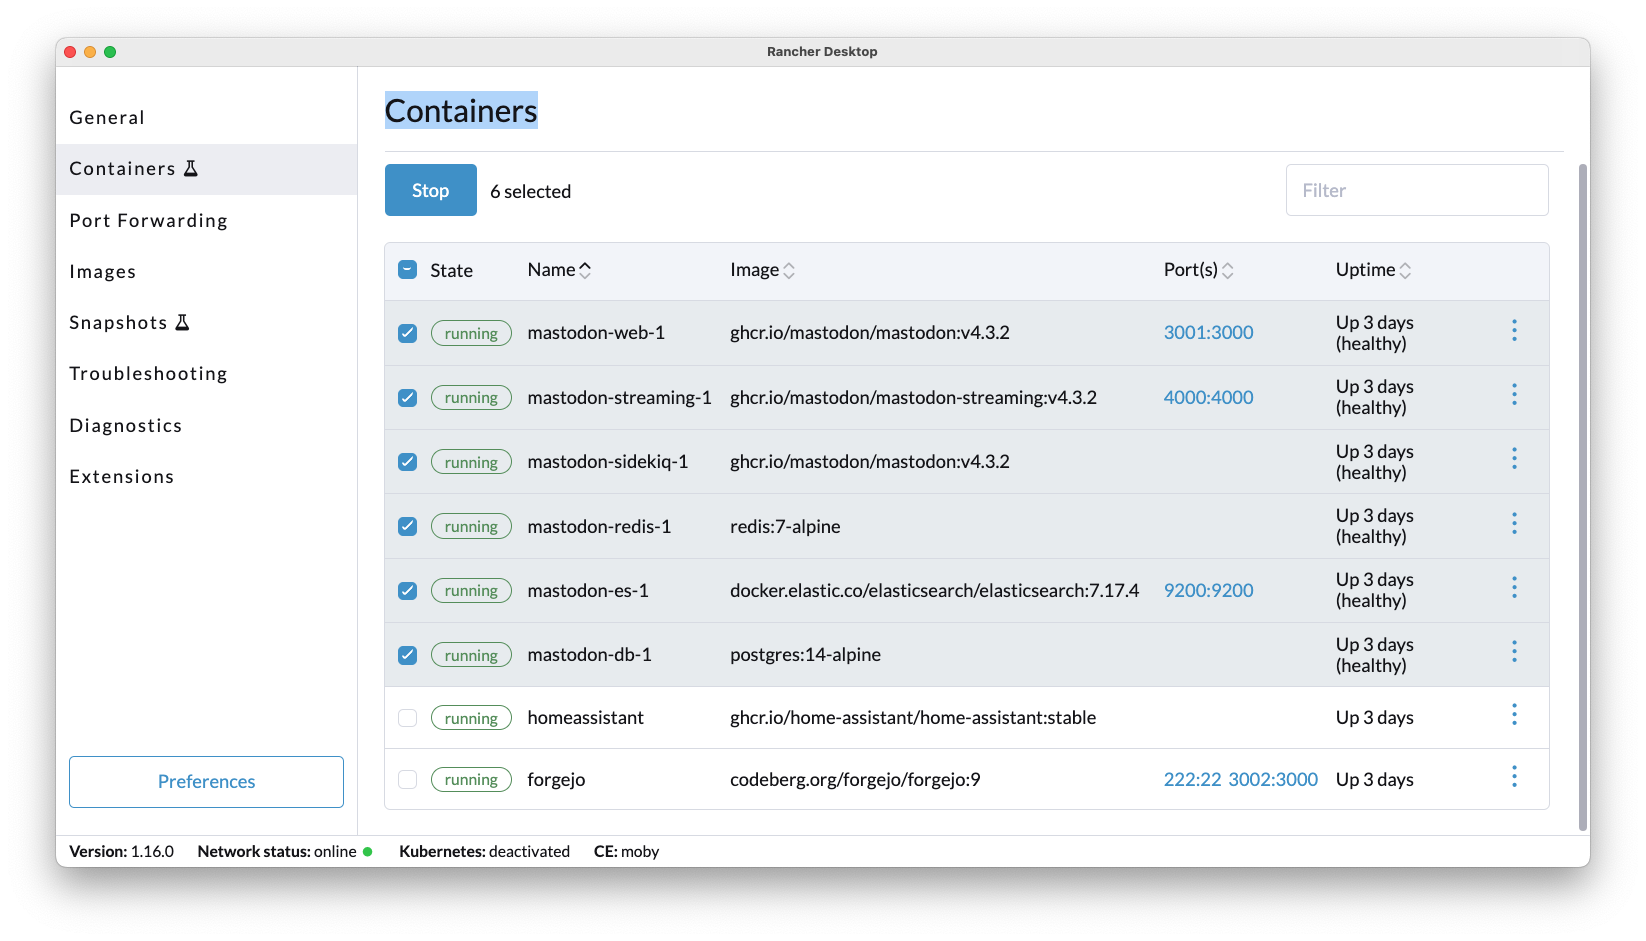
Will we have Users in our Mastodon Server?
Surprisingly, Nope! Our Mastodon Server shall be a tad Anti-Social…
We’ll make One Bot User (nuttx_build) for posting NuttX Builds
No Other Users on our server, since we’re not really a Social Network
But Users on Other Servers (like qoto.org) can Follow our Bot User!
And receive Notifications of Failed Builds through their accounts
That’s the power of Federated ActivityPub!
This is how we create our Bot User for Mastodon…
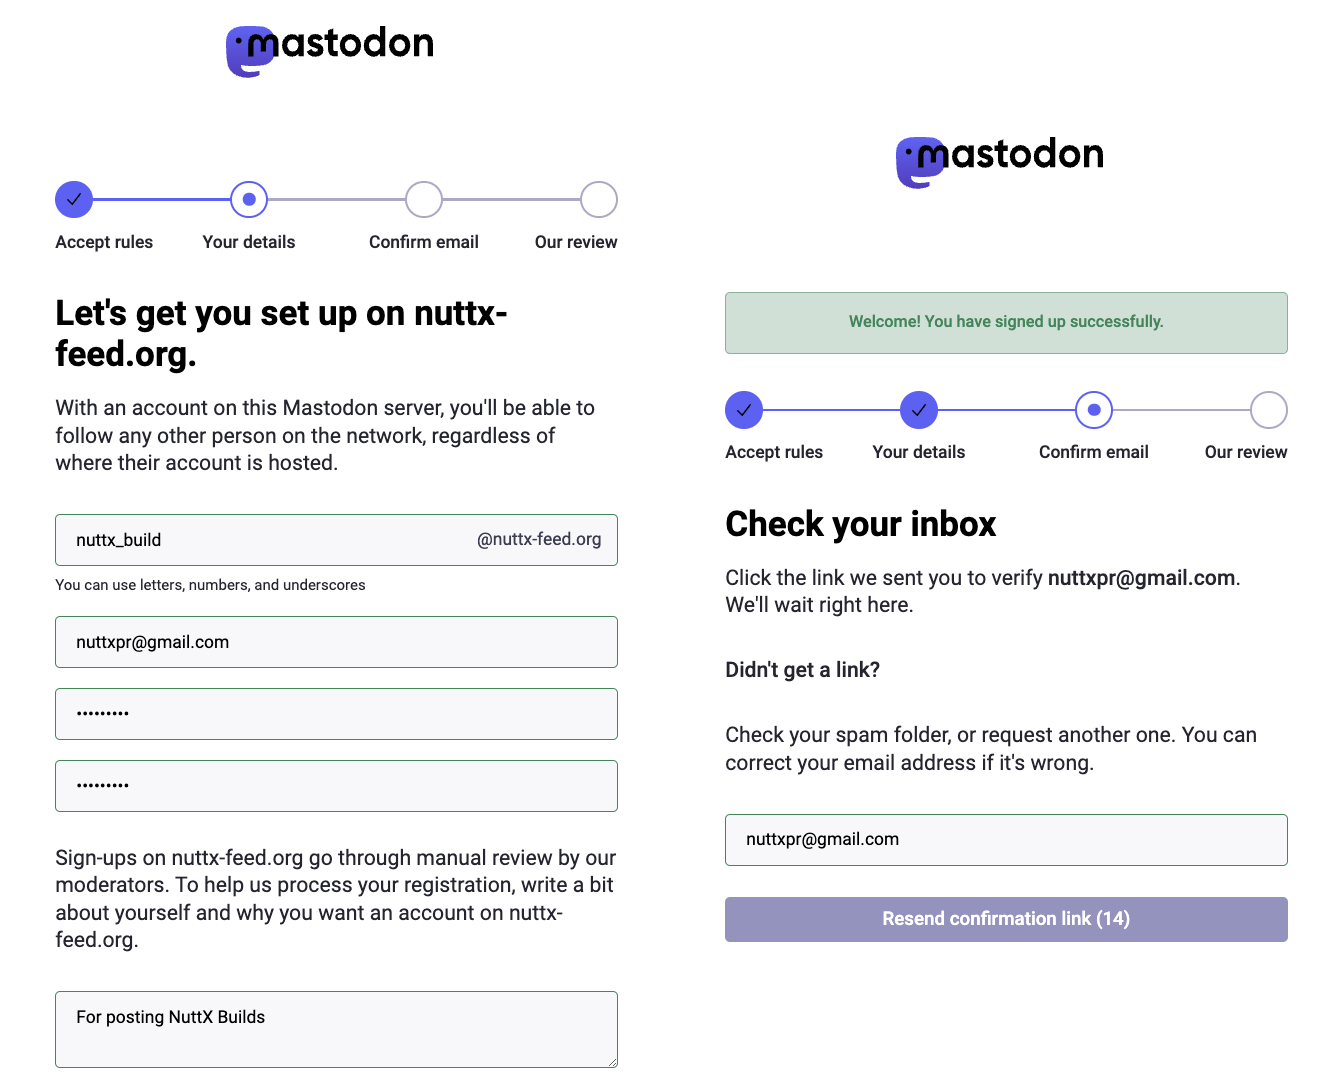
Details in the Appendix…
Things get interesting when we verify our Bot User…
How to verify the Email Address of our Bot User?
Remember our Mastodon Server has Zero Budget? This means we won’t have an Outgoing Email Server. (SMTP)
That’s perfectly OK! Mastodon provides Command-Line Tools to manage our users…
## Connect to Mastodon Web (Docker Container)
sudo docker exec \
  -it \
  mastodon-web-1 \
  /bin/bash

## Approve and Confirm the Email Address
## https://docs.joinmastodon.org/admin/tootctl/#accounts-approve
bin/tootctl accounts \
  approve nuttx_build
bin/tootctl accounts \
  modify nuttx_build \
--confirmHow will our Bot post a message to Mastodon?
With curl: Here’s how we post a Status Update to Mastodon…
## Set the Mastodon Access Token (see below)
ACCESS_TOKEN=...

## Post a message to Mastodon (Status Update)
curl -X POST \
  -H "Authorization: Bearer $ACCESS_TOKEN" \
  -F "status=Posting a status from curl" \
  https://YOUR_DOMAIN_NAME.org/api/v1/statuses
It appears like so…
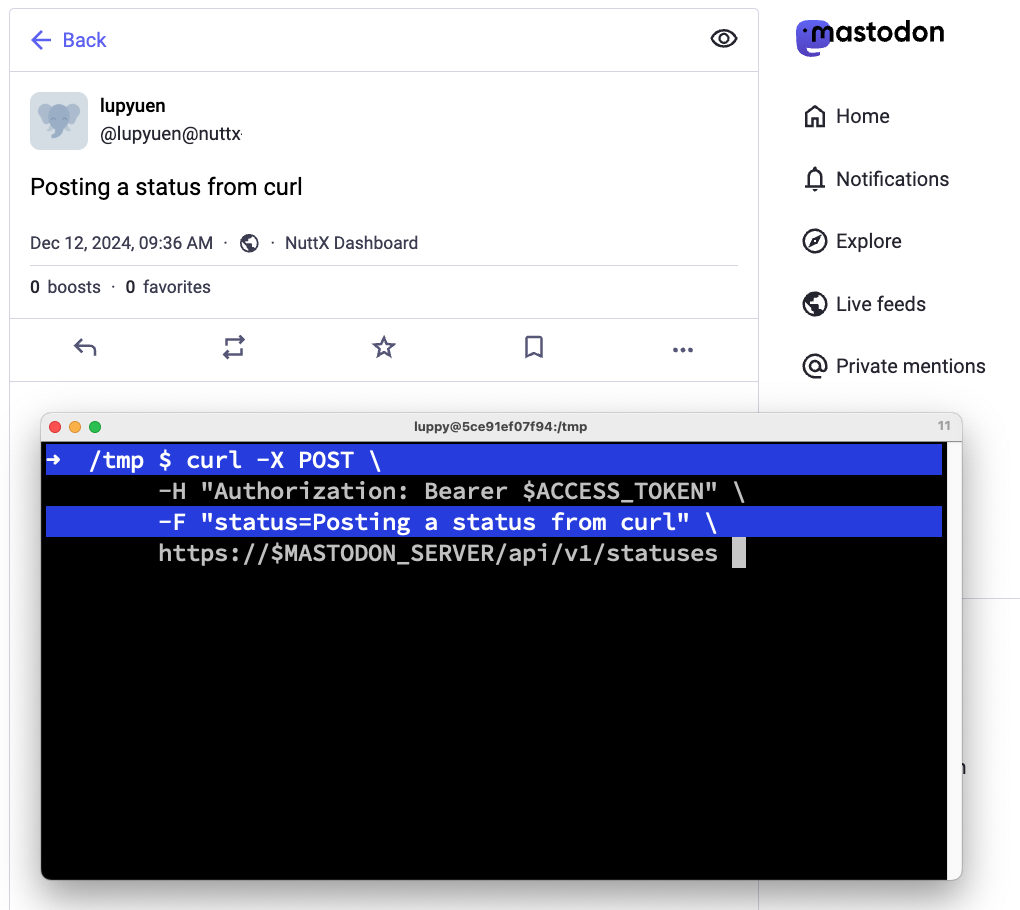
What’s this Access Token?
To Authenticate our Bot User with Mastodon API, we pass an Access Token. This is how we create the Access Token…
## Set the Client ID, Secret and Authorization Code (see below)
CLIENT_ID=...
CLIENT_SECRET=...
AUTH_CODE=...

## Create an Access Token
curl -X POST \
  -F "client_id=$CLIENT_ID" \
  -F "client_secret=$CLIENT_SECRET" \
  -F "redirect_uri=urn:ietf:wg:oauth:2.0:oob" \
  -F "grant_type=authorization_code" \
  -F "code=$AUTH_CODE" \
  -F "scope=read write push" \
https://YOUR_DOMAIN_NAME.org/oauth/tokenWhat about the Client ID, Secret and Authorization Code?
Client ID and Secret will specify the Mastodon App for our Bot User. Here’s how we create our Mastodon App for NuttX Dashboard…
## Create Our Mastodon App
curl -X POST \
  -F 'client_name=NuttX Dashboard' \
  -F 'redirect_uris=urn:ietf:wg:oauth:2.0:oob' \
  -F 'scopes=read write push' \
  -F 'website=https://nuttx-dashboard.org' \
  https://YOUR_DOMAIN_NAME.org/api/v1/apps

## Returns { "client_id" : "...", "client_secret" : "..." }
## We save the Client ID and SecretWhich we use to create the Authorization Code…
## Open a Web Browser. Browse to https://YOUR_DOMAIN_NAME.org
## Log in as Your New User (nuttx_build)
## Paste this URL into the Same Web Browser
https://YOUR_DOMAIN_NAME.org/oauth/authorize
  ?client_id=YOUR_CLIENT_ID
  &scope=read+write+push
  &redirect_uri=urn:ietf:wg:oauth:2.0:oob
  &response_type=code

## Copy the Authorization Code. It will expire soon!Now comes the tricky bit. How to transmogrify NuttX Dashboard…
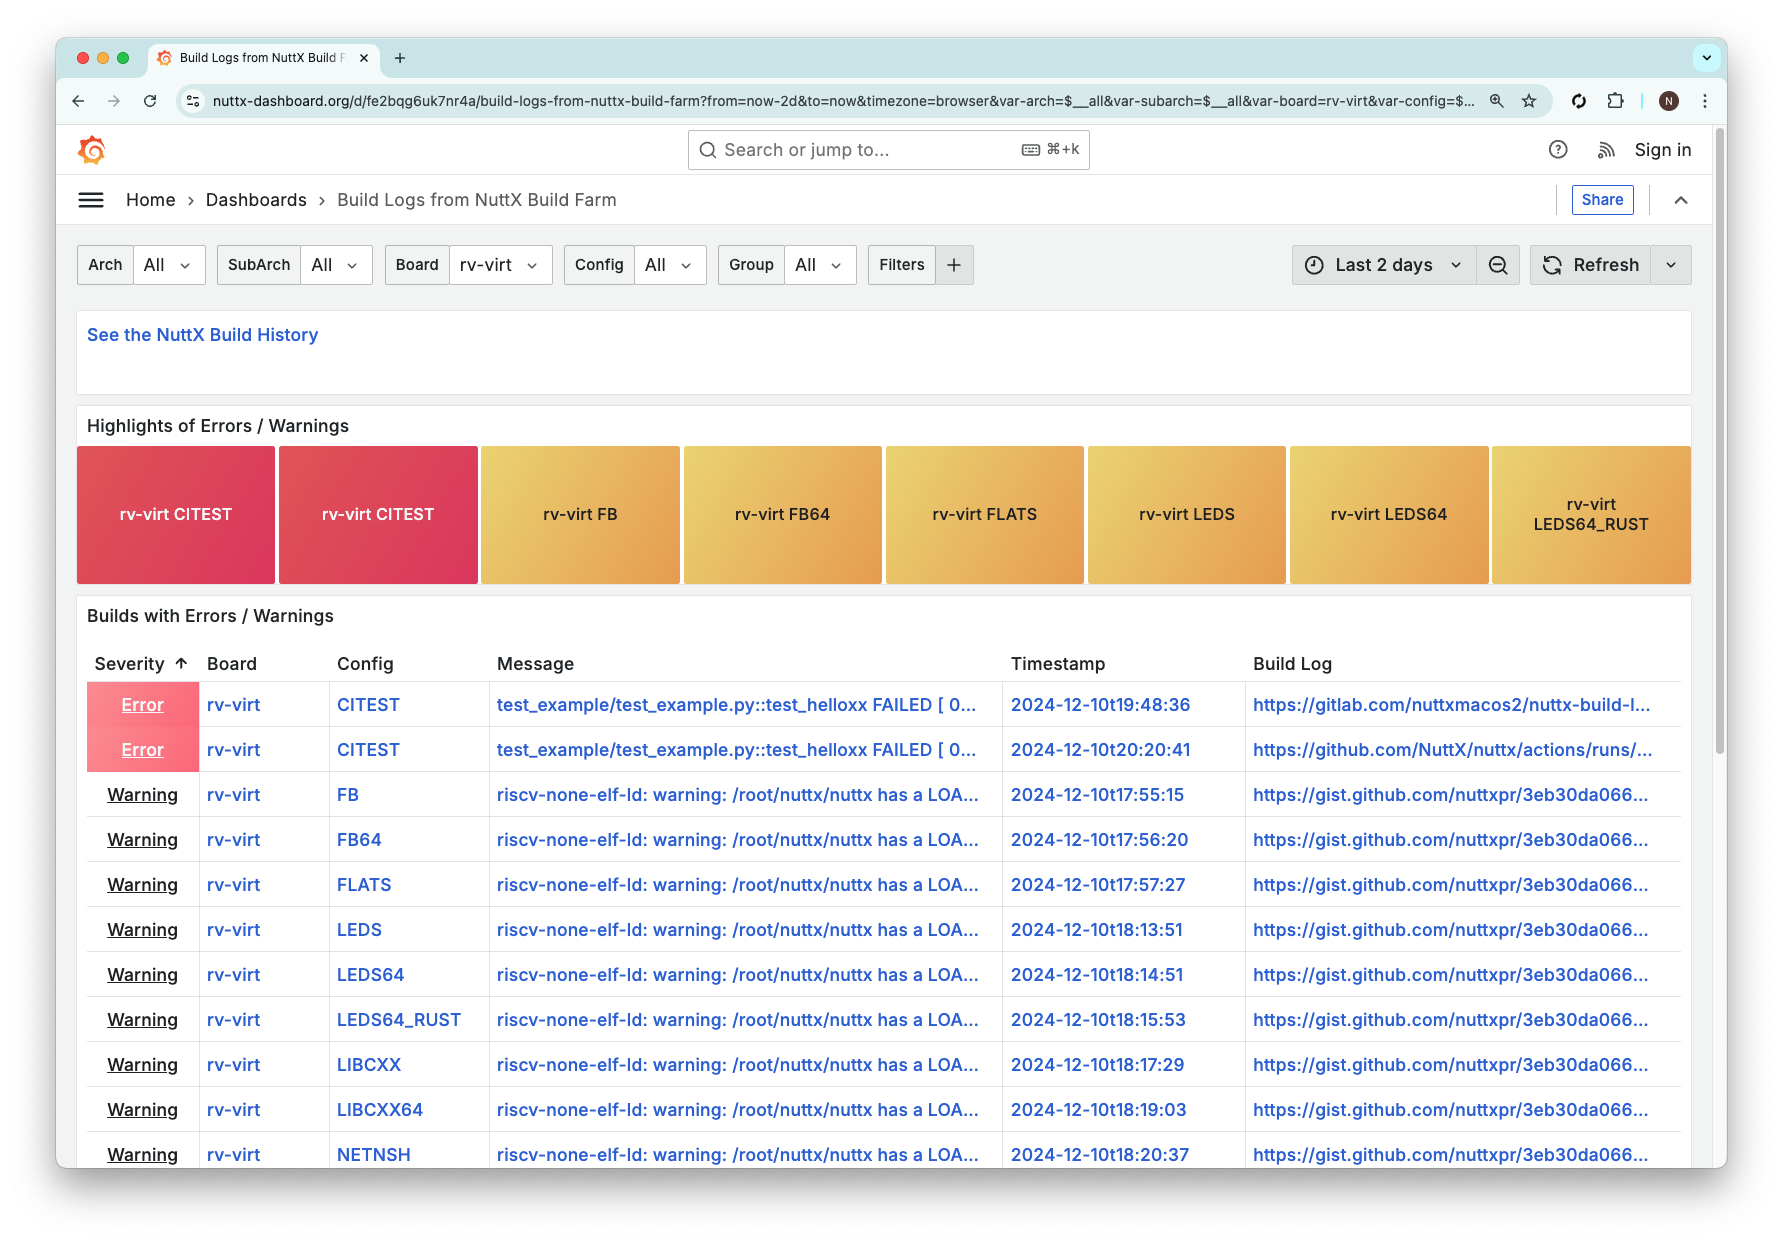
Into Mastodon Posts?

Here comes our Grand Plan…
Outcomes of NuttX Builds are already recorded…
Inside our Prometheus Time-Series Database (open-source)
Thus we Query the Failed Builds from Prometheus Database
Reformat them as Mastodon Posts
Post the Failed Builds via Mastodon API
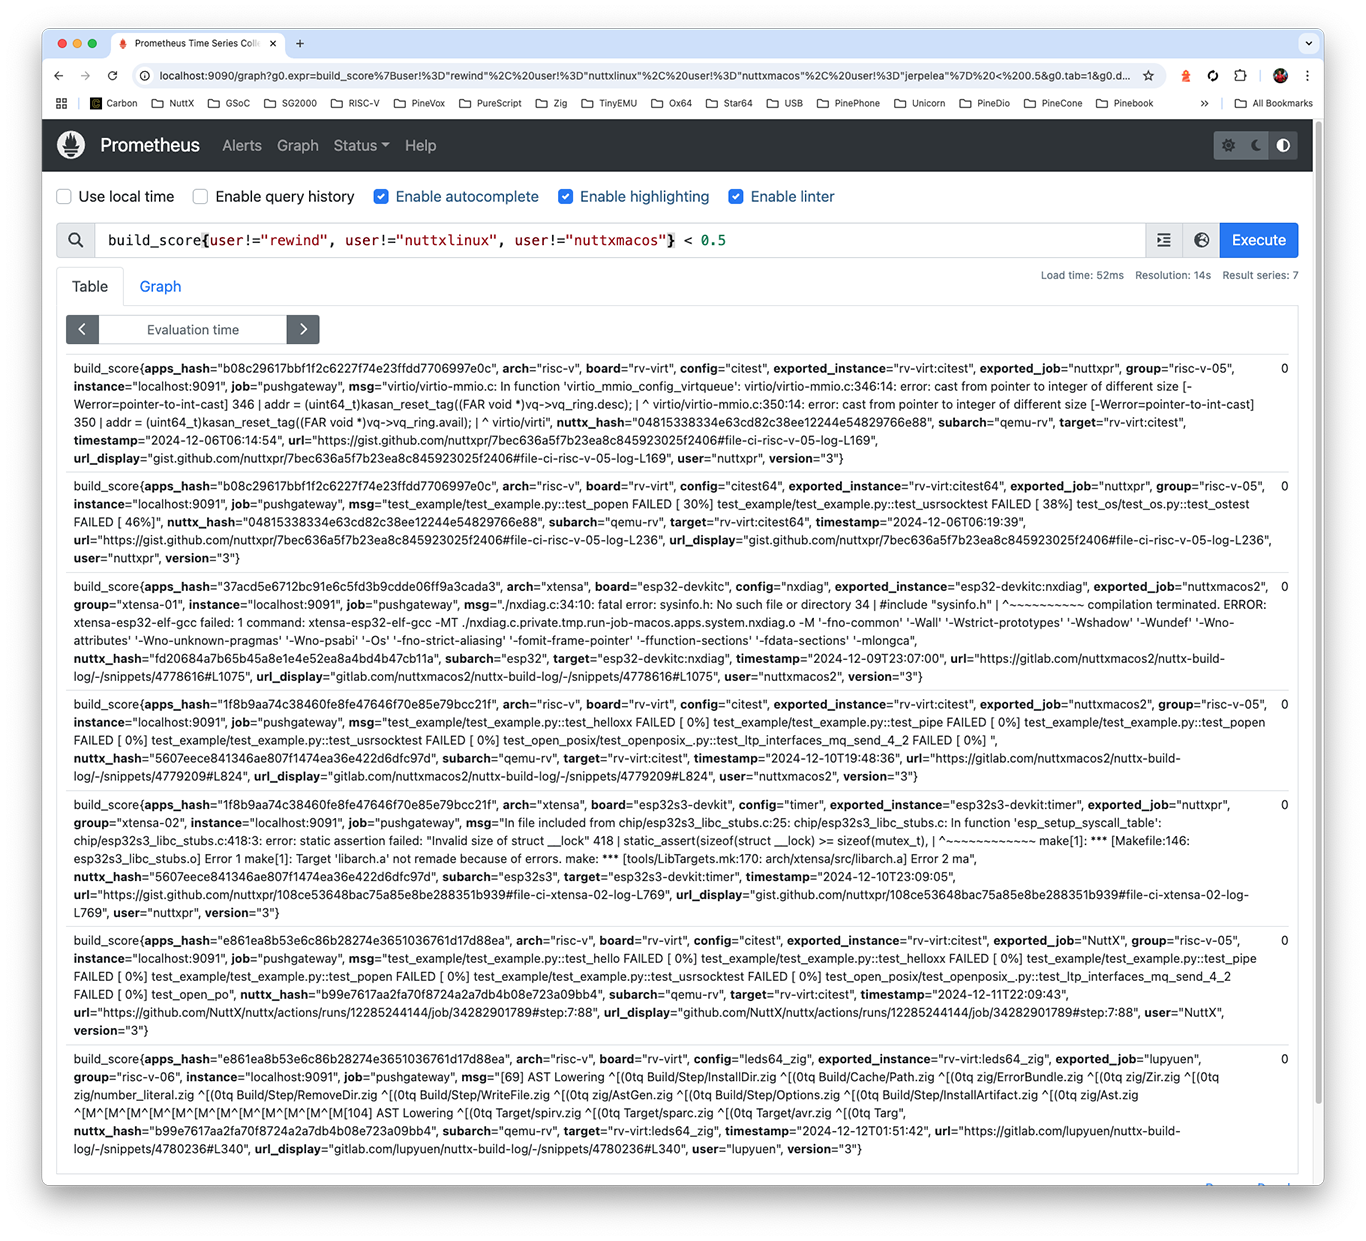
Prometheus Time-Series Database: This query will fetch the Failed Builds from Prometheus…
## Find all Build Scores < 0.5
build_score < 0.5Prometheus returns a huge bunch of fields, we’ll tweak this…
Query the Failed Builds: We repeat the above, but in Rust: main.rs
// Fetch the Failed Builds from Prometheus
let query = r##"
build_score < 0.5
"##;
let params = [("query", query)];
let client = reqwest::Client::new();
let prometheus = "http://localhost:9090/api/v1/query";
let res = client
.post(prometheus)
.form(¶ms)
.send()
.await?;
let body = res.text().await?;
let data: Value = serde_json::from_str(&body).unwrap();
let builds = &data["data"]["result"];Reformat as Mastodon Posts: We turn JSON into Plain Text: main.rs
// For Each Failed Build...
for build in builds.as_array().unwrap() {
  ...
  // Compose the Mastodon Post as...
  // rv-virt : CITEST - Build Failed (NuttX)
  // NuttX Dashboard: ...
  // Build History: ...
  // [Error Message]
  let mut status = format!(
    r##"
{board} : {config_upper} - Build Failed ({user})
NuttX Dashboard: https://nuttx-dashboard.org
Build History: https://nuttx-dashboard.org/d/fe2q876wubc3kc/nuttx-build-history?var-board={board}&var-config={config}

{msg}
    "##);
  status.truncate(512);  // Mastodon allows only 500 chars
  let mut params = Vec::new();
  params.push(("status", status));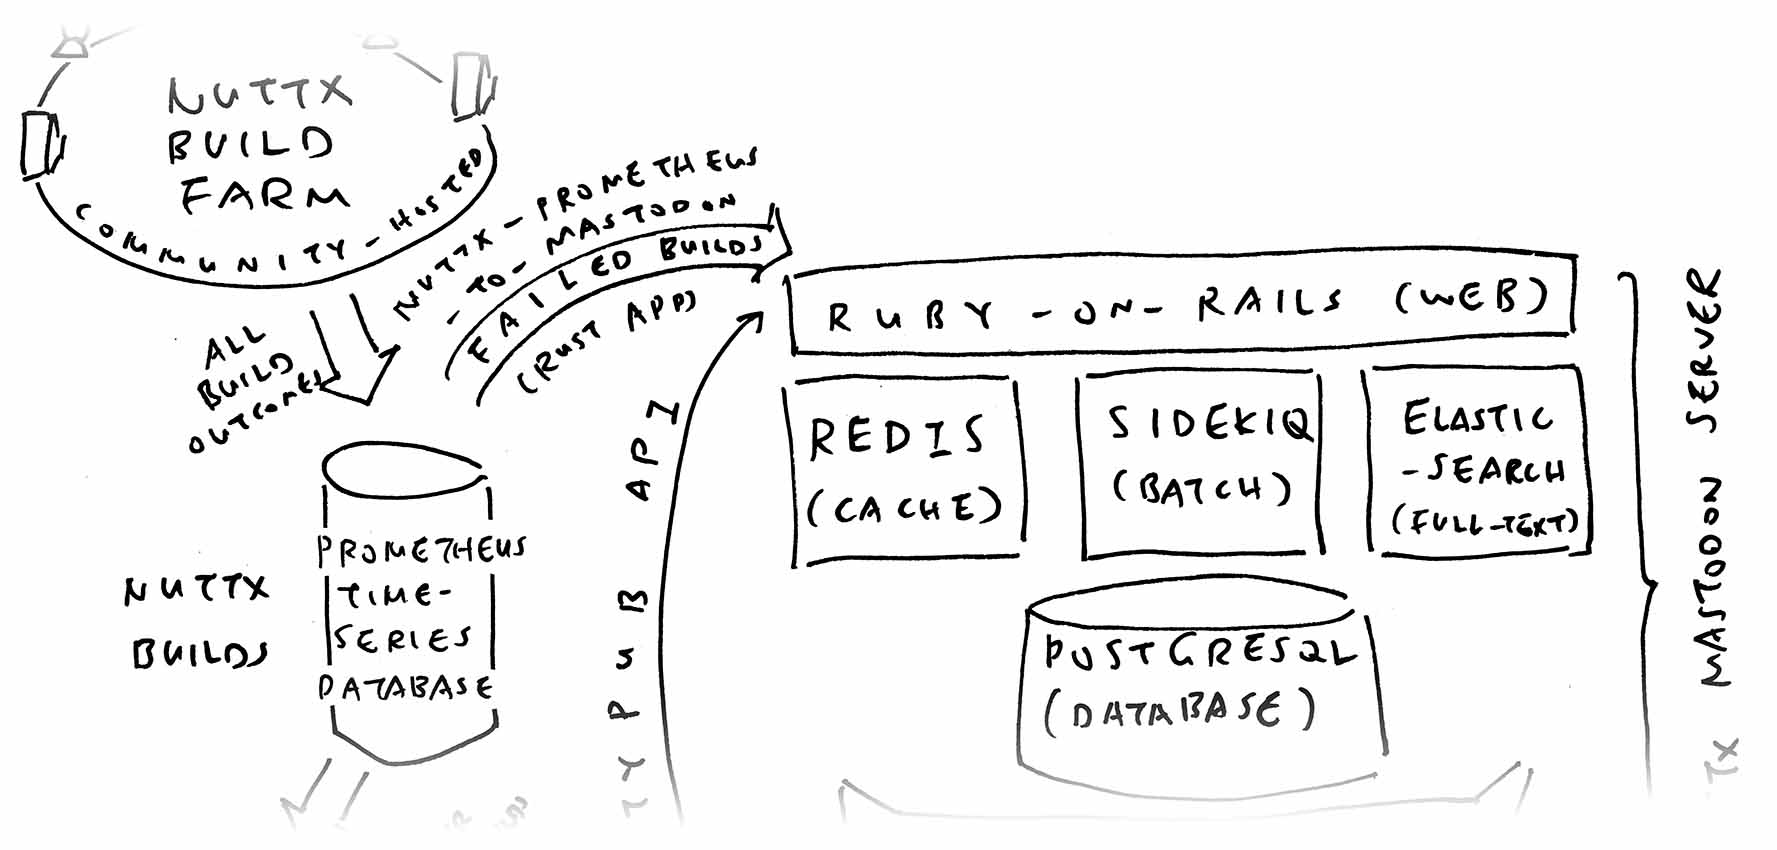
Post via Mastodon API: By creating a Status Update: main.rs
// Post to Mastodon
let token = std::env::var("MASTODON_TOKEN")
.expect("MASTODON_TOKEN env variable is required");
let client = reqwest::Client::new();
let mastodon = "https://nuttx-feed.org/api/v1/statuses";
let res = client
.post(mastodon)
.header("Authorization", format!("Bearer {token}"))
.form(¶ms)
.send()
.await?;
if !res.status().is_success() { continue; }
// Omitted: Remember the Mastodon Posts for All Builds
}Skip Duplicates: We remember everything in a JSON File, so we won’t notify the same thing twice: main.rs
// This JSON File remembers the Mastodon Posts for All Builds:
// {
//   "rv-virt:citest" : {
//     status_id: "12345",
//     users: ["nuttxpr", "NuttX", "lupyuen"]
//   }
//   "rv-virt:citest64" : ...
// }
const ALL_BUILDS_FILENAME: &str =
  "/tmp/nuttx-prometheus-to-mastodon.json"; ...
let mut all_builds = serde_json::from_reader(reader).unwrap();
...
// If the User already exists for the Board and Config:
// Skip the Mastodon Post
if let Some(users) = all_builds[&target]["users"].as_array() {
  if users.contains(&json!(user)) { continue; }
}And we’re done! The Appendix explains how we thread the Mastodon Posts neatly by NuttX Target. (Board + Config)

Will we accept Regular Users on our Mastodon Server?
Probably not? We have Zero Budget for User Moderation. Instead we’ll ask NuttX Devs to register for an account on any Fediverse Server. The Push Notifications for Failed Builds will work fine with any server.
But any Fediverse User can reply to our Mastodon Posts?
Yeah this might be helpful! NuttX Devs can discuss a specific Failed Build. Or hyperlink to the NuttX Issue that was created for the Failed Build. Which might prevent Conflicting PRs. (And another)
How will we know when a Failed Build recovers?
This gets tricky. Should we pester folks with an Extra Push Notification whenever a Failed Build recovers?
For Complex Notifications: We might integrate Prometheus Alertmanager with Mastodon.
Suppose I’m interested only in rv-virt:python. Can I subscribe to the Specific Alert via Mastodon / Fediverse / ActivityPub?
Good question! We’re still trying to figure out.
Anything else we should monitor with Mastodon?
Sync-Build-Ingest is a Critical NuttX Job that needs to run non-stop, without fail. We should post a Mastodon Notification if something fails to run.
Watching the Watchmen: How to be sure that our Rust App runs forever, always pushing Mastodon Alerts?
Cost of GitHub Runners shall be continuously monitored. We should push a Mastodon Alert if it exceeds our budget. (Before ASF comes after us)
Over-Running GitHub Jobs shall also be monitored, so our (beloved and respected) NuttX Devs won’t wait forever for our CI Jobs to complete. Mastodon sounds mightly helpful for watching over Everything NuttX! 👍
How is Mastodon working out so far?
I’m trying to do the least possible work to get meaningful NuttX CI Alerts (since I’m doing this in my spare time). Mastodon works great for me right now!
I’m not sure if anyone else will use it, so I’ll stick with this setup for now. (I might disconnect from the Fediverse if I hear any complaints)

Next Article: We talk about Git Bisect and how we auto-magically discover a Breaking Commit in NuttX.
After That: What would NuttX Life be like without GitHub? We try out (self-hosted open-source) Forgejo Git Forge with NuttX.
After After That? Why Sync-Build-Ingest is super important for NuttX CI. And how we monitor it with our Magic Disco Light.
Also: Since we can Rewind NuttX Builds and automatically Git Bisect… Can we create a Bot that will fish the Failed Builds from NuttX Dashboard, identify the Breaking PR, and escalate to the right folks via Mastodon?
But First…
Many Thanks to the awesome NuttX Admins and NuttX Devs! And My Sponsors, for sticking with me all these years.
Got a question, comment or suggestion? Create an Issue or submit a Pull Request here…
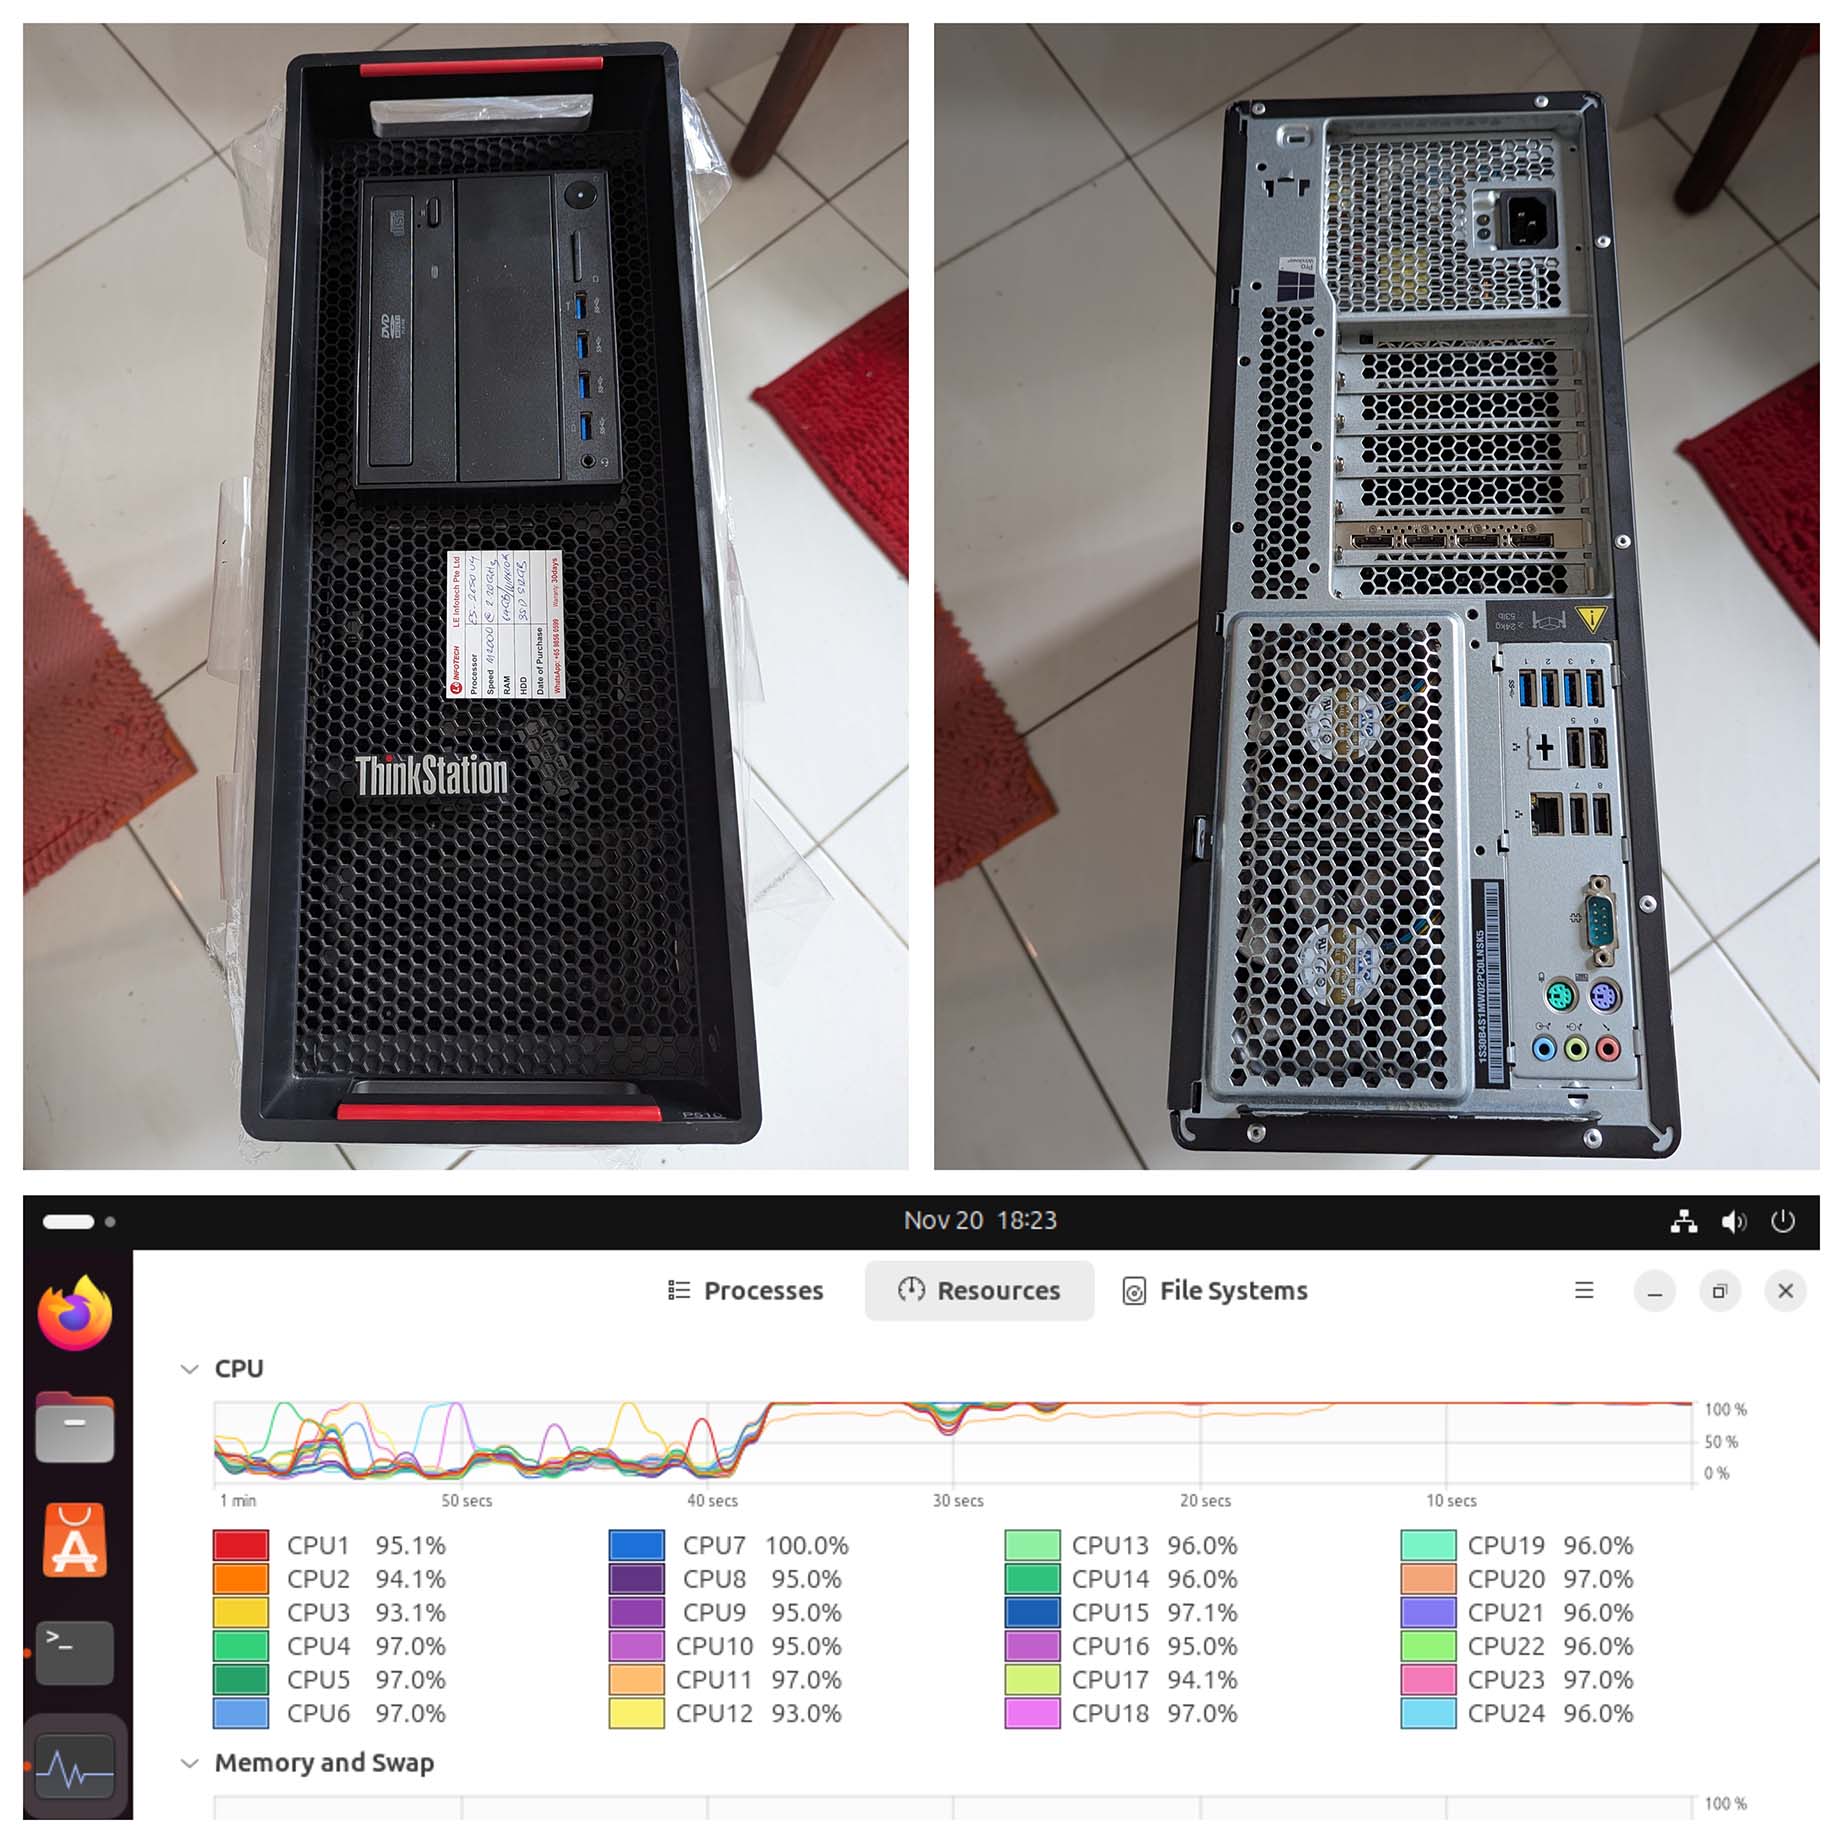
NuttX Build Farm (pic above) runs non-stop all day, all night. Continuously compiling over 1,000 NuttX Targets.
Outcomes of NuttX Builds are recorded inside our Prometheus Time-Series Database…

To fetch the Failed NuttX Builds from Prometheus: We browse to Prometheus at http://localhost:9090 and enter this Prometheus Query…
## Find all Build Scores < 0.5
## But skip these users...
build_score{
  user != "rewind",     ## Used for Build Rewind only
  user != "nuttxlinux", ## Retired (Blocked by GitHub)
  user != "nuttxmacos"  ## Retired (Blocked by GitHub)
} < 0.5
Why 0.5?
Build Score is 1.0 for Successful Builds, 0.5 for Warnings, 0.0 for Errors. Thus we search for Build Scores < 0.5.
| Score | Status | Example |
|---|---|---|
0.0 | Error | undefined reference to atomic_fetch_add_2 |
0.5 | Warning | nuttx has a LOAD segment with RWX permission |
0.8 | Unknown | STM32_USE_LEGACY_PINMAP will be deprecated |
1.0 | Success | (No Errors and Warnings) |
What’s returned by Prometheus?
Plenty of fields, describing Every Failed Build in detail (pic above)…
| Field | Value |
|---|---|
| timestamp | Timestamp of Build (2024-12-06T06:14:54) |
| timestamp_log | Timestamp of Log File |
| version | Always 3 |
| user | Which Build PC (nuttxmacos) |
| arch | Architecture (risc-v) |
| group | Target Group (risc-v-01) |
| board | Board (ox64) |
| config | Config (nsh) |
| target | Board:Config (ox64:nsh) |
| subarch | Sub-Architecture (bl808) |
| url | Full URL of Build Log |
| url_display | Short URL of Build Log |
| nuttx_hash | Commit Hash of NuttX Repo (7f84a64109f94787d92c2f44465e43fde6f3d28f) |
| apps_hash | Commit Hash of NuttX Apps (d6edbd0cec72cb44ceb9d0f5b932cbd7a2b96288) |
| msg | Error or Warning Message |
We can do the same with curl and HTTP POST…
$ curl -X POST \
  -F 'query=
    build_score{
      user != "rewind",
      user != "nuttxlinux",
      user != "nuttxmacos"
    } < 0.5
  ' \
  http://localhost:9090/api/v1/query

{"status" : "success", "data" : {"resultType" : "vector", "result" : [{"metric"{
  "__name__"  : "build_score",
  "timestamp" : "2024-12-06T06:14:54",
  "user"      : "nuttxpr",
  "nuttx_hash": "04815338334e63cd82c38ee12244e54829766e88",
  "apps_hash" : "b08c29617bbf1f2c6227f74e23ffdd7706997e0c",
  "arch"      : "risc-v",
  "subarch"   : "qemu-rv",
  "board"     : "rv-virt",
  "config"    : "citest",
  "msg"       : "virtio/virtio-mmio.c: In function
    'virtio_mmio_config_virtqueue': \n virtio/virtio-mmio.c:346:14:
    error: cast from pointer to integer of different size ...
In the next section: We’ll replicate this with Rust.
How did we get the above Prometheus Query?
We copied and pasted from our NuttX Dashboard in Grafana…
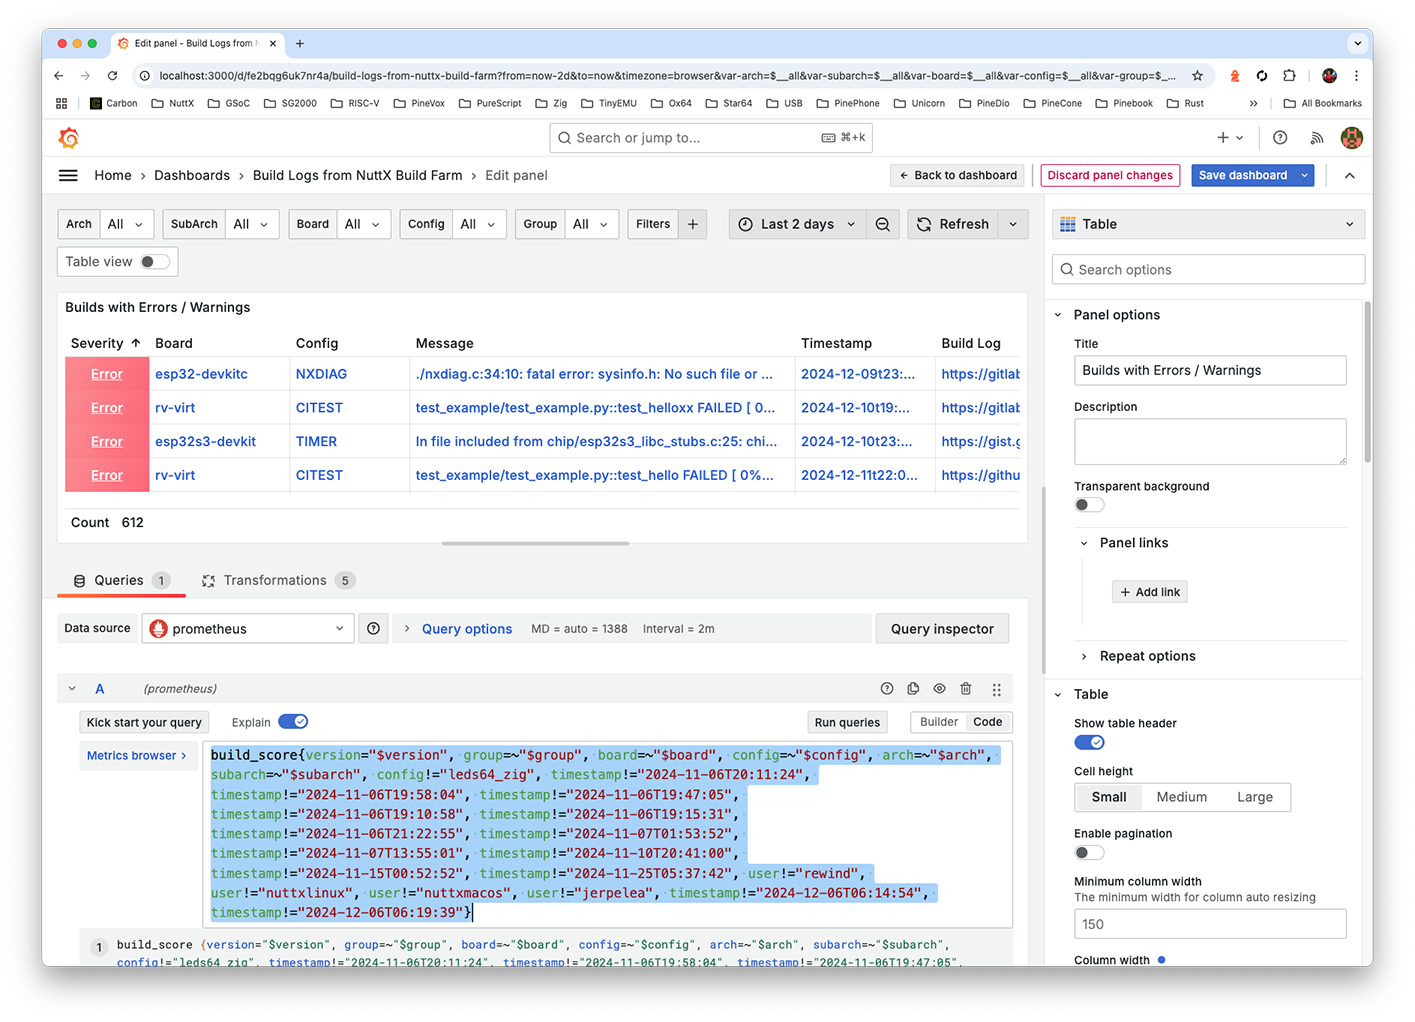
In the previous section: We fetched the Failed NuttX Builds from Prometheus. Now we post them to Mastodon: run.sh
## Set the Access Token for Mastodon
## https://docs.joinmastodon.org/client/authorized/#token
## export MASTODON_TOKEN=...
. ../mastodon-token.sh

## Do this forever...
for (( ; ; )); do

  ## Post the Failed Jobs from Prometheus to Mastodon
  cargo run

  ## Wait a while
  date ; sleep 900

  ## Omitted: Copy the Failed Builds to
  ## https://lupyuen.org/nuttx-prometheus-to-mastodon.json
done
Inside our Rust App, we fetch the Failed Builds from Prometheus: main.rs
// Fetch the Failed Builds from Prometheus
let query = r##"
build_score{
user!="rewind",
user!="nuttxlinux",
user!="nuttxmacos"
} < 0.5
"##;
let params = [("query", query)];
let client = reqwest::Client::new();
let prometheus = "http://localhost:9090/api/v1/query";
let res = client
.post(prometheus)
.form(¶ms)
.send()
.await?;
let body = res.text().await?;
let data: Value = serde_json::from_str(&body).unwrap();
let builds = &data["data"]["result"];For Every Failed Build: We compose the Mastodon Post: main.rs
// For Each Failed Build...
for build in builds.as_array().unwrap() {
  ...
  // Compose the Mastodon Post as...
  // rv-virt : CITEST - Build Failed (NuttX)
  // NuttX Dashboard: ...
  // Build History: ...
  // [Error Message]
  let mut status = format!(
    r##"
{board} : {config_upper} - Build Failed ({user})
NuttX Dashboard: https://nuttx-dashboard.org
Build History: https://nuttx-dashboard.org/d/fe2q876wubc3kc/nuttx-build-history?var-board={board}&var-config={config}

{msg}
    "##);
  status.truncate(512);  // Mastodon allows only 500 chars
  let mut params = Vec::new();
  params.push(("status", status));
And we post to Mastodon: main.rs
// Post to Mastodon
let token = std::env::var("MASTODON_TOKEN")
.expect("MASTODON_TOKEN env variable is required");
let client = reqwest::Client::new();
let mastodon = "https://nuttx-feed.org/api/v1/statuses";
let res = client
.post(mastodon)
.header("Authorization", format!("Bearer {token}"))
.form(¶ms)
.send()
.await?;
if !res.status().is_success() { continue; }
// Omitted: Remember the Mastodon Posts for All Builds
}Won’t we see repeated Mastodon Posts?
That’s why we Remember the Mastodon Posts for All Builds, in a JSON File: main.rs
// Remembers the Mastodon Posts for All Builds:
// {
//   "rv-virt:citest" : {
//     status_id: "12345",
//     users: ["nuttxpr", "NuttX", "lupyuen"]
//   }
//   "rv-virt:citest64" : ...
// }
const ALL_BUILDS_FILENAME: &str =
  "/tmp/nuttx-prometheus-to-mastodon.json";
...
// Load the Mastodon Posts for All Builds
let mut all_builds = json!({});
if let Ok(file) = File::open(ALL_BUILDS_FILENAME) {
  let reader = BufReader::new(file);
  all_builds = serde_json::from_reader(reader).unwrap();
}
If the User already exists for the Board and Config: We Skip the Mastodon Post: main.rs
// If the Mastodon Post already exists for Board and Config:
// Reply to the Mastodon Post
if let Some(status_id) = all_builds[&target]["status_id"].as_str() {
  params.push(("in_reply_to_id", status_id.to_string()));

  // If the User already exists for the Board and Config:
  // Skip the Mastodon Post
  if let Some(users) = all_builds[&target]["users"].as_array() {
    if users.contains(&json!(user)) { continue; }
  }
}
And if the Mastodon Post already exists for the Board and Config: We Reply to the Mastodon Post. (To keep the Failed Builds threaded neatly, pic below)
This is how we Remember the Mastodon Post ID (Status ID): main.rs
// Remember the Mastodon Post ID (Status ID)
let body = res.text().await?;
let status: Value = serde_json::from_str(&body).unwrap();
let status_id = status["id"].as_str().unwrap();
all_builds[&target]["status_id"] = status_id.into();

// Append the User to All Builds
if let Some(users) = all_builds[&target]["users"].as_array() {
  if !users.contains(&json!(user)) {
    let mut users = users.clone();
    users.push(json!(user));
    all_builds[&target]["users"] = json!(users);
  }
} else {
  all_builds[&target]["users"] = json!([user]);
}

// Save the Mastodon Posts for All Builds
let json = to_string_pretty(&all_builds).unwrap();
let mut file = File::create(ALL_BUILDS_FILENAME).unwrap();
file.write_all(json.as_bytes()).unwrap();
Which gets saved into a JSON File of Failed Builds, published here every 15 mins: lupyuen.org/nuttx-prometheus-to-mastodon.json

Here are the steps to install Mastodon Server with Docker Compose. We tested with Rancher Desktop on macOS, the same steps will probably work on Docker Desktop for Linux / macOS / Windows.
(docker-compose.yml is explained here)
Download the Mastodon Source Code and init the Environment Config
git clone \
  https://github.com/mastodon/mastodon \
  --branch v4.3.2
cd mastodon
echo >.env.production
Replace docker-compose.yml with our slightly-tweaked version
rm docker-compose.yml
wget https://raw.githubusercontent.com/lupyuen/mastodon/refs/heads/main/docker-compose.ymlPurge the Docker Volumes, if they already exist (see below)
docker volume rm postgres-data
docker volume rm redis-data
docker volume rm es-data
docker volume rm lt-data
Edit docker-compose.yml. Set “web > command” to “sleep infinity”
web:
  command: sleep infinity
(Why? Because we’ll start the Web Container to Configure Mastodon)
Start the Docker Containers for Mastodon: Database, Web, Redis (Memory Cache), Streaming (WebSocket), Sidekiq (Batch Jobs), Elasticsearch (Search Engine)
## TODO: Is `sudo` needed?
sudo docker compose up

## If It Quits To Command-Line:
## Run a second time to get it up
sudo docker compose up

## Ignore the Redis, Streaming, Elasticsearch errors
## redis-1: Memory overcommit must be enabled
## streaming-1: connect ECONNREFUSED 127.0.0.1:6379
## es-1: max virtual memory areas vm.max_map_count is too low

## Press Ctrl-C to quit the logInit the Postgres Database: We create the Mastodon User
## From https://docs.joinmastodon.org/admin/install/#creating-a-user
sudo docker exec \
  -it \
  mastodon-db-1 \
  /bin/bash
exec su-exec \
  postgres \
  psql
CREATE USER mastodon CREATEDB;
\qGenerate the Mastodon Config: We connect to Web Container and prep the Mastodon Config
## From https://docs.joinmastodon.org/admin/install/#generating-a-configuration
sudo docker exec \
  -it \
  mastodon-web-1 \
  /bin/bash
RAILS_ENV=production \
  bin/rails \
  mastodon:setup
exitMastodon has Many Questions, we answer them
(Change nuttx-feed.org to Your Domain Name)
Domain name: nuttx-feed.org
Enable single user mode?      No
Using Docker to run Mastodon? Yes

PostgreSQL host:     db
PostgreSQL port:     5432
PostgreSQL database: mastodon_production
PostgreSQL user:     mastodon
Password of user:    [ blank ]

Redis host:     redis
Redis port:     6379
Redis password: [ blank ]

Store uploaded files on the cloud? No
Send e-mails from localhost?       Yes
E-mail address: Mastodon <[email protected]>
Send a test e-mail? No

Check for important updates? Yes
Save configuration?          Yes
Save it to .env.production outside Docker:
# Generated with mastodon:setup on 2024-12-08 23:40:38 UTC
[ TODO: Please Save Mastodon Config! ]

Prepare the database now?           Yes
Create an admin user straight away? Yes
Username: [ Your Admin Username ]
E-mail:   [ Your Email Address ]
Login with the password:
[ TODO: Please Save Admin Password! ](No Email Server? Read on for our workaround)
Copy the Mastodon Config from above to .env.production
# Generated with mastodon:setup on 2024-12-08 23:40:38 UTC
LOCAL_DOMAIN=nuttx-feed.org
SINGLE_USER_MODE=false
SECRET_KEY_BASE=...
OTP_SECRET=...
ACTIVE_RECORD_ENCRYPTION_DETERMINISTIC_KEY=...
ACTIVE_RECORD_ENCRYPTION_KEY_DERIVATION_SALT=...
ACTIVE_RECORD_ENCRYPTION_PRIMARY_KEY=...
VAPID_PRIVATE_KEY=...
VAPID_PUBLIC_KEY=...
DB_HOST=db
DB_PORT=5432
DB_NAME=mastodon_production
DB_USER=mastodon
DB_PASS=
REDIS_HOST=redis
REDIS_PORT=6379
REDIS_PASSWORD=
SMTP_SERVER=localhost
SMTP_PORT=25
SMTP_AUTH_METHOD=none
SMTP_OPENSSL_VERIFY_MODE=none
SMTP_ENABLE_STARTTLS=auto
SMTP_FROM_ADDRESS=Mastodon <[email protected]>Edit docker-compose.yml. Set “web > command” to this…
web:
  command: bundle exec puma -C config/puma.rb
(Why? Because we’re done Configuring Mastodon!)
Restart the Docker Containers for Mastodon (pic below)
## TODO: Is `sudo` needed?
sudo docker compose down
sudo docker compose up
And Mastodon is Up!
redis-1:     Ready to accept connections tcp
db-1:        database system is ready to accept connections
streaming-1: request completed
web-1: GET /health(Sidekiq will have errors, we’ll explain why)

Why the tweaks to docker-compose.yml?
Somehow Rancher Desktop doesn’t like to Mount the Local Filesystem, failing with a permission error…
## Local Filesystem will fail on macOS Rancher Desktop
services:
  db:
    volumes:
      - ./postgres14:/var/lib/postgresql/data
Thus we Mount the Docker Volumes instead: docker-compose.yml
## Docker Volumes will mount OK on macOS Rancher Desktop
services:
  db:
    volumes:
      - postgres-data:/var/lib/postgresql/data

  redis:
    volumes:
      - redis-data:/data

  sidekiq:
    volumes:
      - lt-data:/mastodon/public/system

## Declare the Docker Volumes
volumes:
  postgres-data:
  redis-data:
  es-data:
  lt-data:
Note that Mastodon will appear at HTTP Port 3001, because Port 3000 is already taken by Grafana
web:
  ports:
    - '127.0.0.1:3001:3000'
We’re ready to Test Mastodon!
Talk to our Web Hosting Provider (or Tunnel Provider).
Channel all Incoming Requests for https://nuttx-feed.org
To http://YOUR_DOCKER_MACHINE:3001
(HTTPS Port 443 connects to HTTP Port 3001 via Reverse Proxy)
(For CloudFlare Tunnel: Set Security > Settings > High)
(Change nuttx-feed.org to Your Domain Name)
Browse to https://nuttx-feed.org. Mastodon is Up!
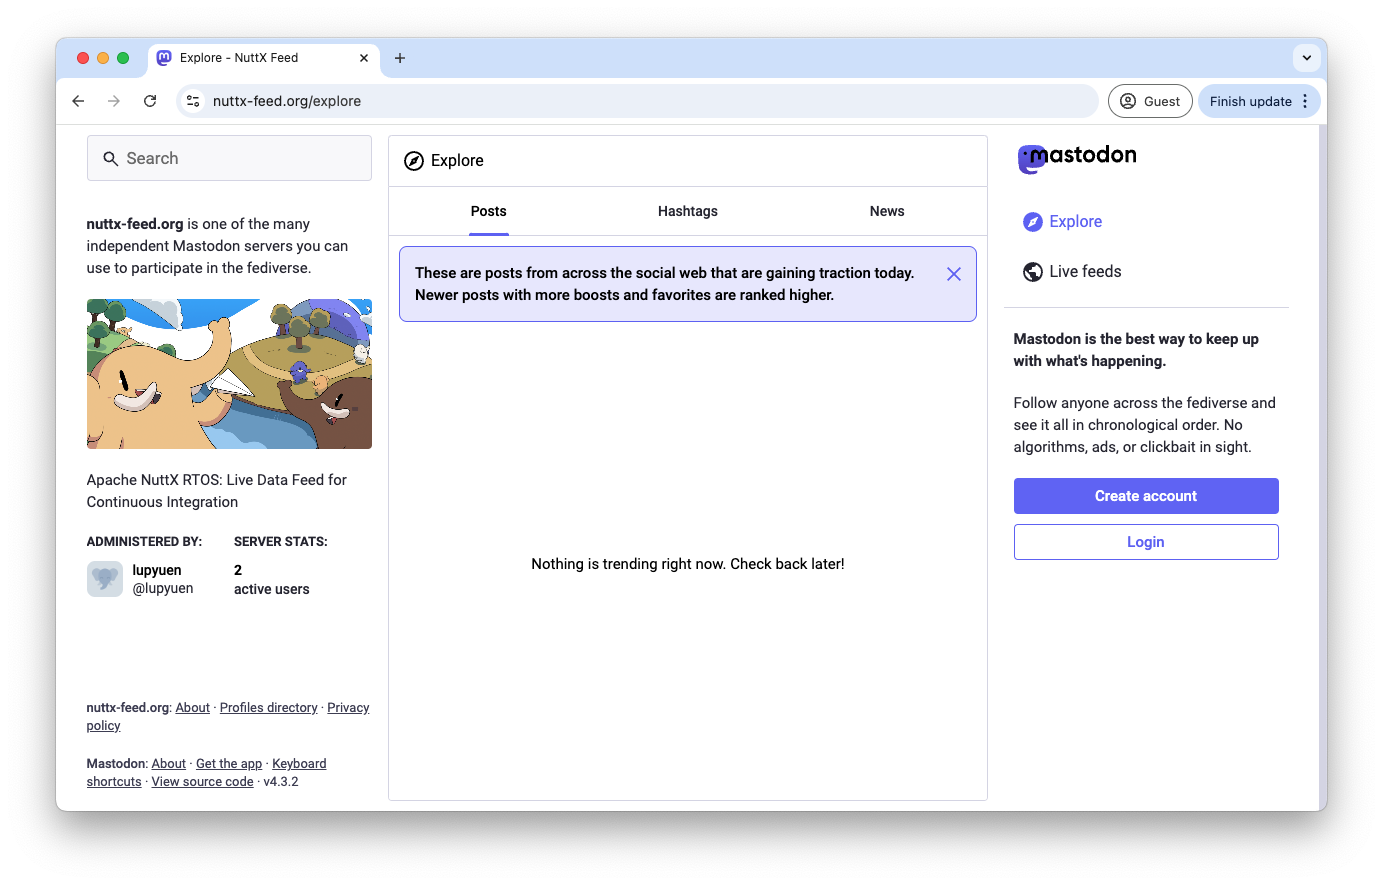
Log in with the Admin User and Password
(From previous section)
Browse to Administration > Settings and fill in…
Normally we’ll approve New Accounts at Moderation > Accounts > Approve
But we don’t have an Outgoing Mail Server to validate the email address!
Let’s work around this…

Remember that we’ll pretend to be a Regular User (nuttx_build) and post Mastodon Updates? This is how we create the Mastodon User…
Browse to https://YOUR_DOMAIN_NAME.org. Click “Create Account” and fill in the info (pic above)
Normally we’ll approve New Accounts at Moderation > Accounts > Approve
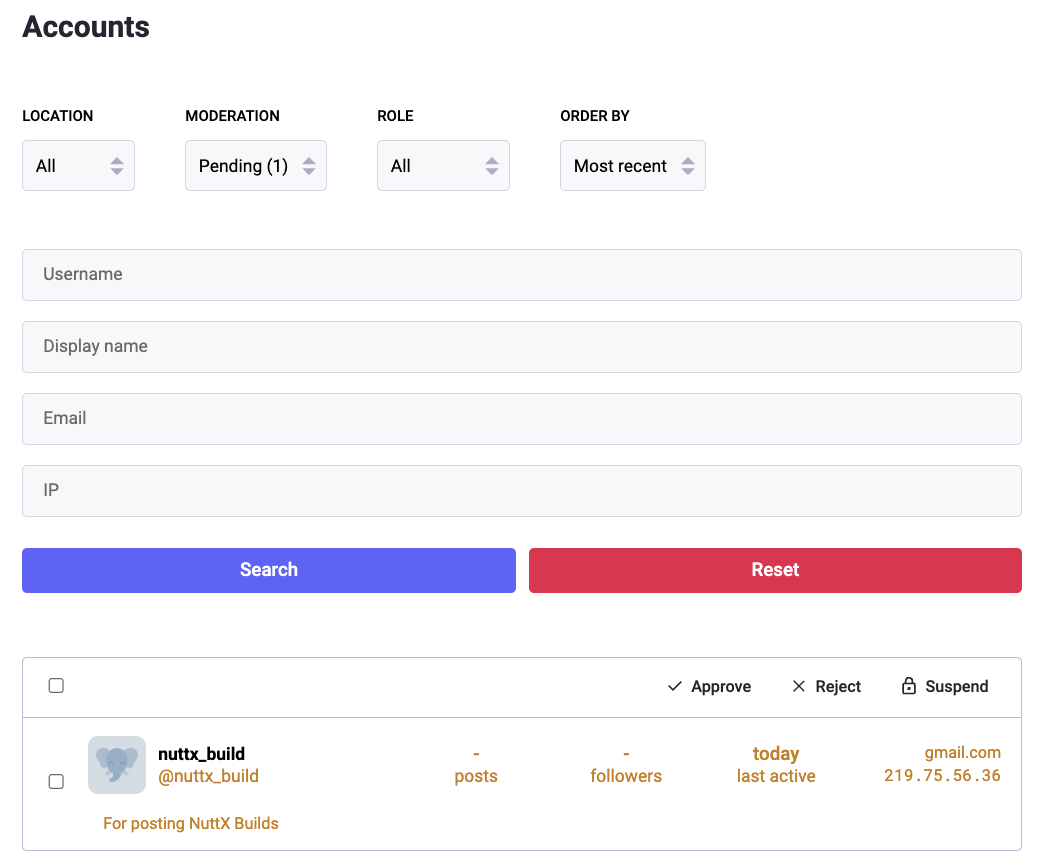
But we don’t have an Outgoing Mail Server to validate the Email Address!
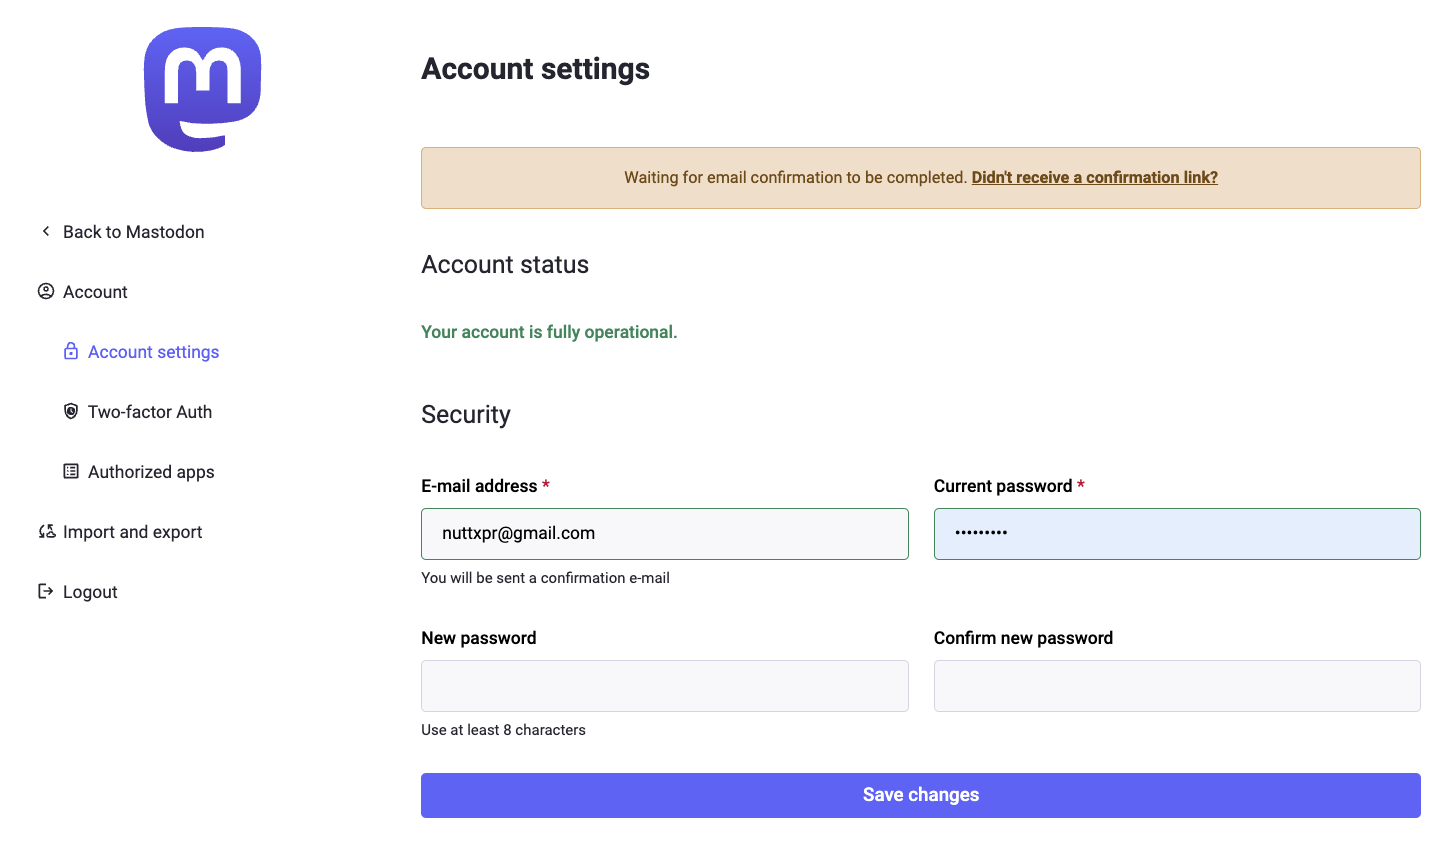
Instead we do this…
## Approve and Confirm the Email Address
## From https://docs.joinmastodon.org/admin/tootctl/#accounts-approve
sudo docker exec \
  -it \
  mastodon-web-1 \
  /bin/bash
bin/tootctl accounts \
  approve nuttx_build
bin/tootctl accounts \
  modify nuttx_build \
  --confirm
exit
(Change nuttx_build to the new username)
FYI for a new Owner Account, do this…
## From https://docs.joinmastodon.org/admin/setup/#admin-cli
sudo docker exec \
  -it \
  mastodon-web-1 \
  /bin/bash
bin/tootctl accounts \
  create YOUR_OWNER_USERNAME \
  --email YOUR_OWNER_EMAIL \
  --confirmed \
  --role Owner
bin/tootctl accounts \
  approve YOUR_OWNER_NAME
exit
That’s why it’s OK to ignore the Sidekiq Errors for sending email…
sidekiq-1 ...
  Connection refused
connect(2) for localhost port 25Let’s create a Mastodon App and an Access Token for posting to our Mastodon…
We create a Mastodon App for NuttX Dashboard…
## Create Our App: https://docs.joinmastodon.org/client/token/#app
curl -X POST \
  -F 'client_name=NuttX Dashboard' \
  -F 'redirect_uris=urn:ietf:wg:oauth:2.0:oob' \
  -F 'scopes=read write push' \
  -F 'website=https://nuttx-dashboard.org' \
  https://YOUR_DOMAIN_NAME.org/api/v1/apps
We’ll see the Client ID and Client Secret. Please save them and keep them secret! (Change nuttx-dashboard to your App Name)
{"id":"3",
"name":"NuttX Dashboard",
"website":"https://nuttx-dashboard.org",
"scopes":["read","write","push"],
"redirect_uris":["urn:ietf:wg:oauth:2.0:oob"],
"vapid_key":"...",
"redirect_uri":"urn:ietf:wg:oauth:2.0:oob",
"client_id":"...",
"client_secret":"...",
"client_secret_expires_at":0}
Open a Web Browser. Browse to https://YOUR_DOMAIN_NAME.org
Log in as Your New User (nuttx_build)
Paste this URL into the Same Web Browser
https://YOUR_DOMAIN_NAME.org/oauth/authorize
  ?client_id=YOUR_CLIENT_ID
  &scope=read+write+push
  &redirect_uri=urn:ietf:wg:oauth:2.0:oob
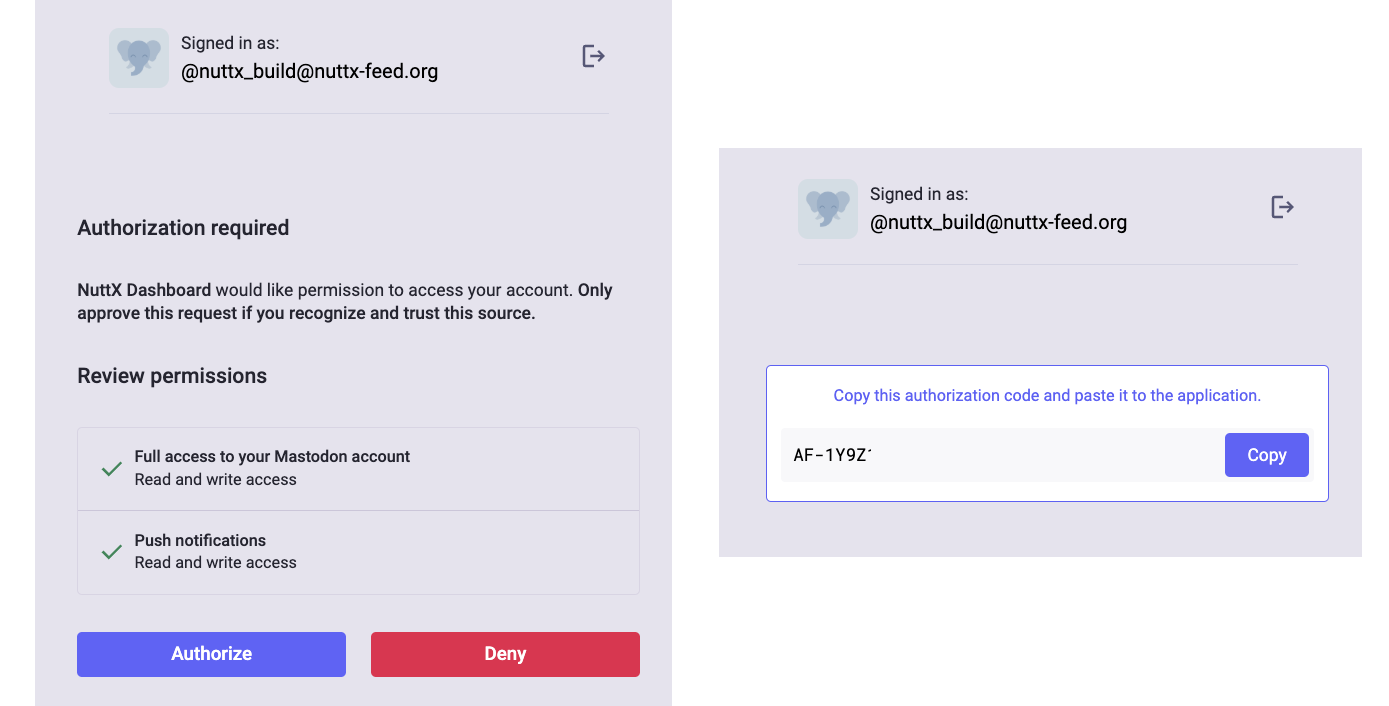
&response_type=codeClick Authorize. (Pic below)
Copy the Authorization Code. (Pic below. It will expire soon!)
We transform the Authorization Code into an Access Token
## From https://docs.joinmastodon.org/client/authorized/#token
export CLIENT_ID=...     ## From Above
export CLIENT_SECRET=... ## From Above
export AUTH_CODE=...     ## From Above
curl -X POST \
  -F "client_id=$CLIENT_ID" \
  -F "client_secret=$CLIENT_SECRET" \
  -F "redirect_uri=urn:ietf:wg:oauth:2.0:oob" \
  -F "grant_type=authorization_code" \
  -F "code=$AUTH_CODE" \
  -F "scope=read write push" \
  https://YOUR_DOMAIN_NAME.org/oauth/token
We’ll see the Access Token. Please save it and keep secret!
{"access_token":"...",
"token_type":"Bearer",
"scope":"read write push",
"created_at":1733966892}
To test our Access Token…
export ACCESS_TOKEN=...  ## From Above
curl \
  -H "Authorization: Bearer $ACCESS_TOKEN" \
  https://YOUR_DOMAIN_NAME.org/api/v1/accounts/verify_credentials
We’ll see…
{"username": "nuttx_build",
"acct": "nuttx_build",
"display_name": "NuttX Build",
"locked": false,
"bot": false,
"discoverable": null,
"indexable": false,
...
Yep looks hunky dory!
Our Regular Mastondon User is up! Let’s post something as the user…
## Create Status: https://docs.joinmastodon.org/methods/statuses/#create
export ACCESS_TOKEN=...  ## From Above
curl -X POST \
  -H "Authorization: Bearer $ACCESS_TOKEN" \
  -F "status=Posting a status from curl" \
  https://YOUR_DOMAIN_NAME.org/api/v1/statuses
And our Mastodon Post appears!

Let’s make sure that Mastodon API works on our server…
## Install `jq` for Browsing JSON
$ brew install jq      ## For macOS
$ sudo apt install jq  ## For Ubuntu

## Fetch the Public Timeline for nuttx-feed.org
## https://docs.joinmastodon.org/client/public/#timelines
$ curl https://nuttx-feed.org/api/v1/timelines/public \
  | jq

{ ... "teensy-4.x : PIKRON-BB - Build Failed" ... }

## Fetch the User nuttx_build at nuttx-feed.org
$ curl \
  -H 'Accept: application/activity+json' \
  https://nuttx-feed.org/@nuttx_build \
  | jq

{ "name": "nuttx_build",
"url" : "https://nuttx-feed.org/@nuttx_build" ... }WebFinger is particularly important, it locates Users within the Fediverse. It should always work at the Root of our Mastodon Server!
## WebFinger: Fetch the User nuttx_build at nuttx-feed.org
$ curl \
  https://nuttx-feed.org/.well-known/webfinger\?resource\=acct:[email protected] \
  | jq

{
  "subject": "acct:[email protected]",
  "aliases": [
    "https://nuttx-feed.org/@nuttx_build",
    "https://nuttx-feed.org/users/nuttx_build"
  ],
  "links": [
    {
      "rel": "http://webfinger.net/rel/profile-page",
      "type": "text/html",
      "href": "https://nuttx-feed.org/@nuttx_build"
    },
    {
      "rel": "self",
      "type": "application/activity+json",
      "href": "https://nuttx-feed.org/users/nuttx_build"
    },
    {
      "rel": "http://ostatus.org/schema/1.0/subscribe",
      "template": "https://nuttx-feed.org/authorize_interaction?uri={uri}"
    }
  ]
}Here are the steps to Backup our Mastodon Server: PostgreSQL Database, Redis Database and User-Uploaded Files…
## From https://docs.joinmastodon.org/admin/backups/
## Backup Postgres Database (and check for sensible data)
sudo docker exec \
  -it \
  mastodon-db-1 \
  /bin/bash -c \
  "exec su-exec postgres pg_dumpall" \
  >mastodon.sql
head -50 mastodon.sql

## Backup Redis (and check for sensible data)
sudo docker cp \
  mastodon-redis-1:/data/dump.rdb \
  .
strings dump.rdb \
  | tail -50

## Backup User-Uploaded Files
tar cvf \
  mastodon-public-system.tar \
  mastodon/public/system
Is it safe to host Mastodon in Docker?
Docker Engine on Linux is not quite as secure compared with a Full VM or QEMU. So be very careful!
(macOS Rancher Desktop runs Docker with Lima VM and QEMU Arm64)
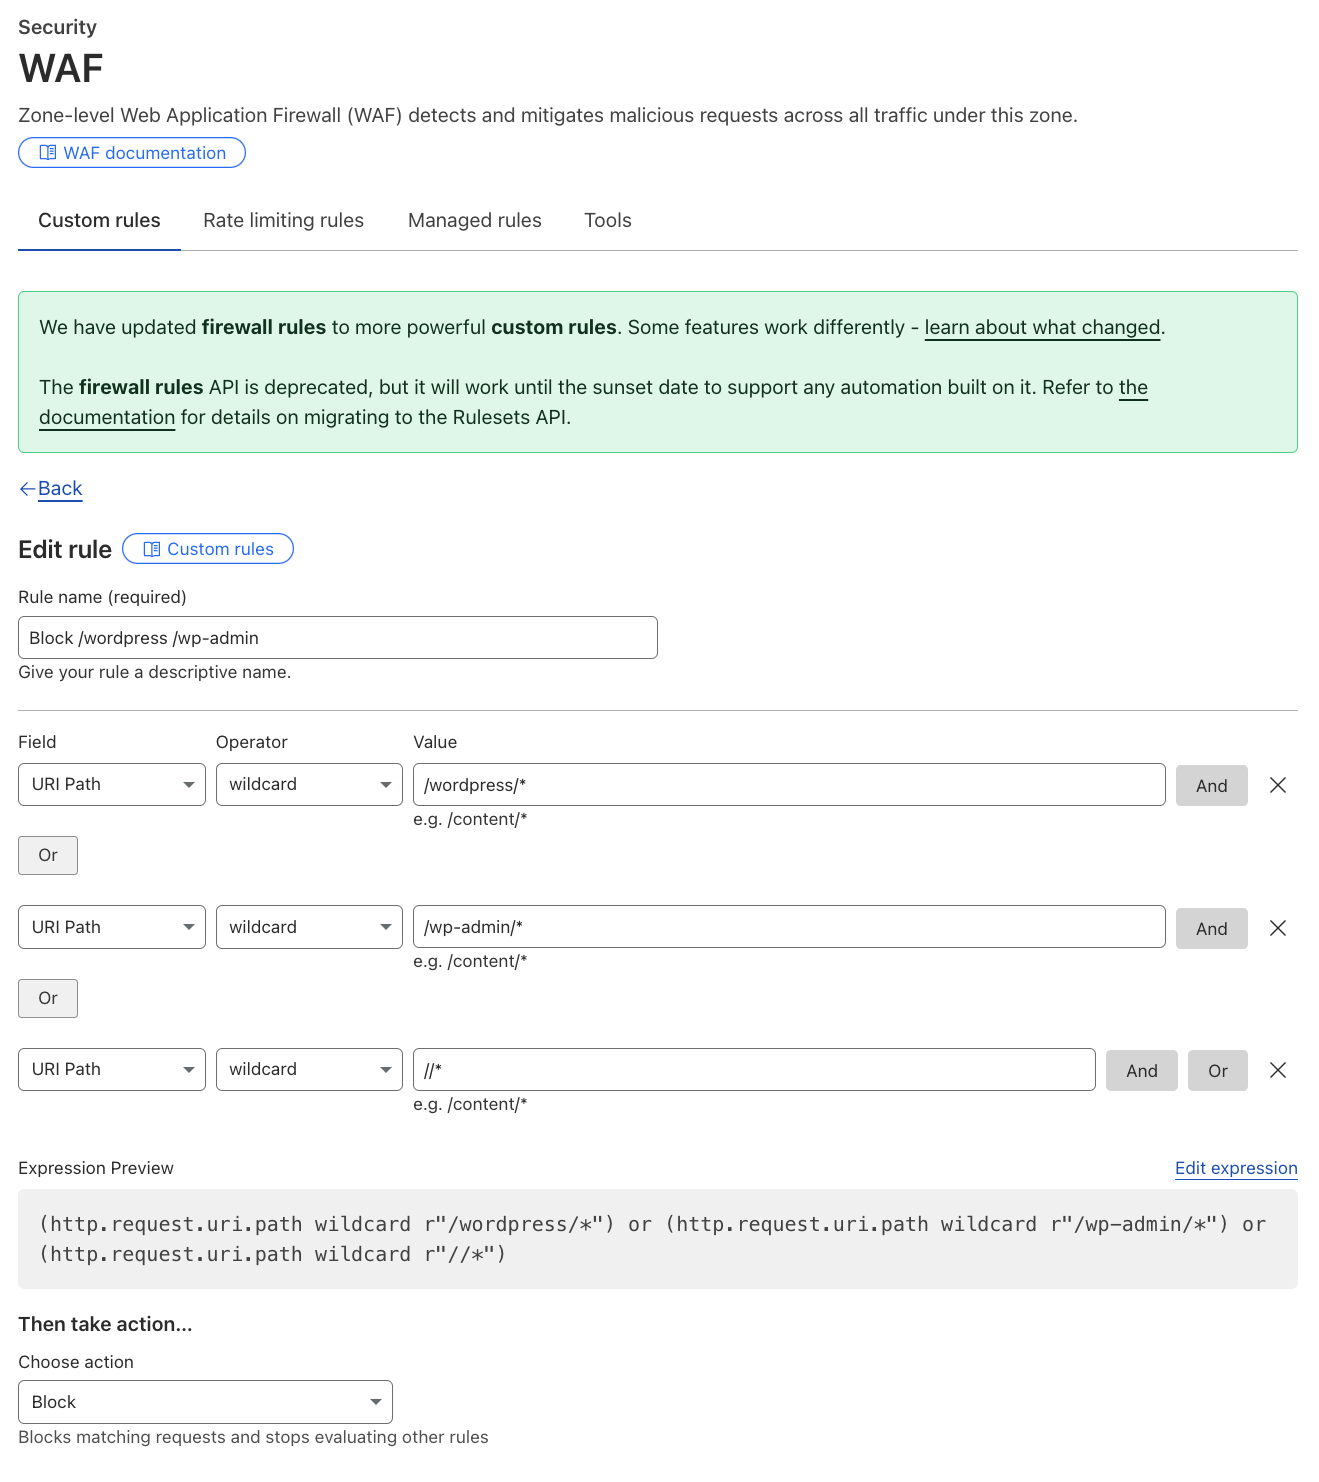
Remember to watch our Mastodon Server for Dubious Web Requests! Like these pesky WordPress Malware Bots (sigh)

These Firewall Rules might help…
Block all URI Paths matching /wordpress/*
Or matching /wp-admin/*
Or matching //*
Enabling Elasticsearch for macOS Rancher Desktop is a little tricky. That’s why we saved it for last.
In Mastodon Web: Head over to Administration > Dashboard. It should say…
“Could not connect to Elasticsearch. Please check that it is running, or disable full-text search”
To Enable Elasticsearch: Edit .env.production and add these lines…
ES_ENABLED=true
ES_HOST=es
ES_PORT=9200
Edit docker-compose.yml.
Uncomment the Section for “es”
Map the Docker Volume es-data for Elasticsearch
Web Container should depend on “es”
  es:
    volumes:
      - es-data:/usr/share/elasticsearch/data
  web:
    depends_on:
      - db
      - redis
      - es
Restart the Docker Containers
sudo docker compose down
sudo docker compose up
We’ll see…
“es-1: bootstrap check failure: max virtual memory areas vm.max_map_count 65530 is too low, increase to at least 262144”
Here comes the tricky part: max_map_count is configured here!
~/Library/Application\ Support/rancher-desktop/lima/_config/override.yamlFollow the Instructions and set…
sysctl -w vm.max_map_count=262144Restart Docker Desktop
Verify that max_map_count has increased
## Print the Max Virtual Memory Areas
$ sudo docker exec \
  -it \
  mastodon-es-1 \
  /bin/bash -c \
  "sysctl vm.max_map_count"

vm.max_map_count = 262144
Head back to Mastodon Web. Click Administration > Dashboard. We should see…
“Elasticsearch index mappings are outdated”
Finally we Reindex Elasticsearch
sudo docker exec \
  -it \
  mastodon-web-1 \
  /bin/bash
bin/tootctl search \
  deploy --only=instances \
  accounts tags statuses public_statuses
exit
At Administration > Dashboard: Mastodon complains no more!

What’s this Docker Compose? Why use it for Mastodon?
We could install manually Multiple Docker Containers for Mastodon: Ruby-on-Rails + PostgreSQL + Redis + Sidekiq + Streaming + Elasticsearch…
But there’s an easier way: Docker Compose will create all the Docker Containers with a Single Command: docker compose up
In this section we study the Docker Containers for Mastodon. And explain the Minor Tweaks we made to Mastodon’s Official Docker Compose Config. (Pic above)

PostgreSQL is our Database Server for Mastodon: docker-compose.yml
services:
  db:
    restart: always
    image: postgres:14-alpine
    shm_size: 256mb

    ## Map the Docker Volume "postgres-data"
    ## because macOS Rancher Desktop won't work correctly with a Local Filesystem
    volumes:
      -  postgres-data:/var/lib/postgresql/data

    ## Allow auto-login by all connections from localhost
    environment:
      - 'POSTGRES_HOST_AUTH_METHOD=trust'

    ## Database Server is not exposed outside Docker
    networks:
      - internal_network
    healthcheck:
      test: ['CMD', 'pg_isready', '-U', 'postgres']
Note the last line for POSTGRES_HOST_AUTH_METHOD. It says that our Database Server will allow auto-login by all connections from localhost. Even without PostgreSQL Password!
This is probably OK for us, since our Database Server runs in its own Docker Container.
We map the Docker Volume postgres-data, because macOS Rancher Desktop won’t work correctly with a Local Filesystem like ./postgres14.
Powered by Ruby-on-Rails, Puma is our Web Server: docker-compose.yml
  web:
    ## You can uncomment the following line if you want to not use the prebuilt image, for example if you have local code changes
    ## build: .
    image: ghcr.io/mastodon/mastodon:v4.3.2
    restart: always

    ## Read the Mastondon Config from Docker Host
    env_file: .env.production

    ## Start the Puma Web Server
    command: bundle exec puma -C config/puma.rb
    ## When Configuring Mastodon: Change to...
    ## command: sleep infinity

    ## HTTP Port 3000 should always return OK
    healthcheck:
      # prettier-ignore
      test: ['CMD-SHELL',"curl -s --noproxy localhost localhost:3000/health | grep -q 'OK' || exit 1"]

    ## Mastodon will appear outside Docker at HTTP Port 3001
    ## because Port 3000 is already taken by Grafana
    ports:
      - '127.0.0.1:3001:3000'
    networks:
      - external_network
      - internal_network
    depends_on:
      - db
      - redis
      - es
    volumes:
      - ./public/system:/mastodon/public/system
Note that Mastodon will appear at HTTP Port 3001, because Port 3000 is already taken by Grafana.

Web Server fetching data directly from Database Server will be awfully slow. That’s why we use Redis as an In-Memory Caching Database: docker-compose.yml
  redis:
    restart: always
    image: redis:7-alpine

    ## Map the Docker Volume "redis-data"
    ## because macOS Rancher Desktop won't work correctly with a Local Filesystem
    volumes:
      - redis-data:/data

    ## Redis Server is not exposed outside Docker
    networks:
      - internal_network
    healthcheck:
test: ['CMD', 'redis-cli', 'ping']Remember the Emails that Mastodon will send upon User Registration? Mastodon calls Sidekiq to run Background Jobs, so they won’t hold up the Web Server: docker-compose.yml
  sidekiq:
    build: .
    image: ghcr.io/mastodon/mastodon:v4.3.2
    restart: always

    ## Read the Mastondon Config from Docker Host
    env_file: .env.production

    ## Start the Sidekiq Batch Job Server
    command: bundle exec sidekiq
    depends_on:
      - db
      - redis
    volumes:
      - ./public/system:/mastodon/public/system

    ## Sidekiq Server is exposed outside Docker
    ## for Outgoing Connections, to deliver emails
    networks:
      - external_network
      - internal_network
    healthcheck:
test: ['CMD-SHELL', "ps aux | grep '[s]idekiq\ 6' || false"](Streaming Server is Optional)
Mastodon (and Fediverse) uses ActivityPub for exchanging lots of info about Users and Posts. Our Web Server supports the HTTP Rest API, but there’s a more efficient way: WebSocket API.
WebSocket is totally optional, Mastodon works fine without it, probably a little less efficient: docker-compose.yml
  streaming:
    ## You can uncomment the following lines if you want to not use the prebuilt image, for example if you have local code changes
    ## build:
    ##   dockerfile: ./streaming/Dockerfile
    ##   context: .
    image: ghcr.io/mastodon/mastodon-streaming:v4.3.2
    restart: always

    ## Read the Mastondon Config from Docker Host
    env_file: .env.production

    ## Start the Streaming Server (Node.js!)
    command: node ./streaming/index.js
    depends_on:
      - db
      - redis

    ## WebSocket will listen on HTTP Port 4000
    ## for Incoming Connections (totally optional!)
    ports:
      - '127.0.0.1:4000:4000'
    networks:
      - external_network
      - internal_network
    healthcheck:
      # prettier-ignore
test: ['CMD-SHELL', "curl -s --noproxy localhost localhost:4000/api/v1/streaming/health | grep -q 'OK' || exit 1"](Elasticsearch is optional)
Elasticsearch is for Full-Text Search. Also totally optional, unless we require Full-Text Search for Users and Posts: docker-compose.yml
  es:
    restart: always
    image: docker.elastic.co/elasticsearch/elasticsearch:7.17.4
    environment:
      - "ES_JAVA_OPTS=-Xms512m -Xmx512m -Des.enforce.bootstrap.checks=true"
      - "xpack.license.self_generated.type=basic"
      - "xpack.security.enabled=false"
      - "xpack.watcher.enabled=false"
      - "xpack.graph.enabled=false"
      - "xpack.ml.enabled=false"
      - "bootstrap.memory_lock=true"
      - "cluster.name=es-mastodon"
      - "discovery.type=single-node"
      - "thread_pool.write.queue_size=1000"

    ## Elasticsearch is exposed externally at HTTP Port 9200. (Why?)
    ports:
      - '127.0.0.1:9200:9200'
    networks:
       - external_network
       - internal_network
    healthcheck:
       test: ["CMD-SHELL", "curl --silent --fail localhost:9200/_cluster/health || exit 1"]

    ## Map the Docker Volume "es-data"
    ## because macOS Rancher Desktop won't work correctly with a Local Filesystem
    volumes:
       - es-data:/usr/share/elasticsearch/data
    ulimits:
      memlock:
        soft: -1
        hard: -1
      nofile:
        soft: 65536
hard: 65536Finally we declare the Volumes and Networks used by our Docker Containers: docker-compose.yml
volumes:
  postgres-data:
  redis-data:
  es-data:
  lt-data:

networks:
  external_network:
  internal_network:
internal: truePhew that looks mighty complicated!
There’s a simpler way: Mastodon provides a Docker Compose Config for Mastodon Development.
It’s good for Local Experimentation. But Not Safe for Internet Hosting!
## Based on https://github.com/mastodon/mastodon#docker
git clone https://github.com/mastodon/mastodon --branch v4.3.2
cd mastodon
sudo docker compose -f .devcontainer/compose.yaml up -d
sudo docker compose -f .devcontainer/compose.yaml exec app bin/setup
sudo docker compose -f .devcontainer/compose.yaml exec app bin/dev

## Browse to Mastodon Web at http://localhost:3000
## TODO: What's the Default Admin ID and Password?

## Create our own Mastodon Owner Account:
## From https://docs.joinmastodon.org/admin/setup/#admin-cli
## And https://docs.joinmastodon.org/admin/tootctl/#accounts-approve
sudo docker exec \
  -it \
  devcontainer-app-1 \
  /bin/bash
bin/tootctl accounts create \
  YOUR_OWNER_USERNAME \
  --email YOUR_OWNER_EMAIL \
  --confirmed \
  --role Owner
bin/tootctl accounts \
  approve YOUR_OWNER_USERNAME
exit

## Reindex Elasticsearch
sudo docker exec \
  -it \
  devcontainer-app-1 \
  /bin/bash
bin/tootctl search \
  deploy --only=tags
exit
Optional: Configure Mastodon Web to listen at HTTP Port 3001 (since 3000 is used by Grafana). We edit .devcontainer/compose.yaml
services:
  app:
    ports:
      - '127.0.0.1:3001:3000'
Optional: Configure the Mastodon Domain. We edit .env.development
LOCAL_DOMAIN=nuttx-feed.org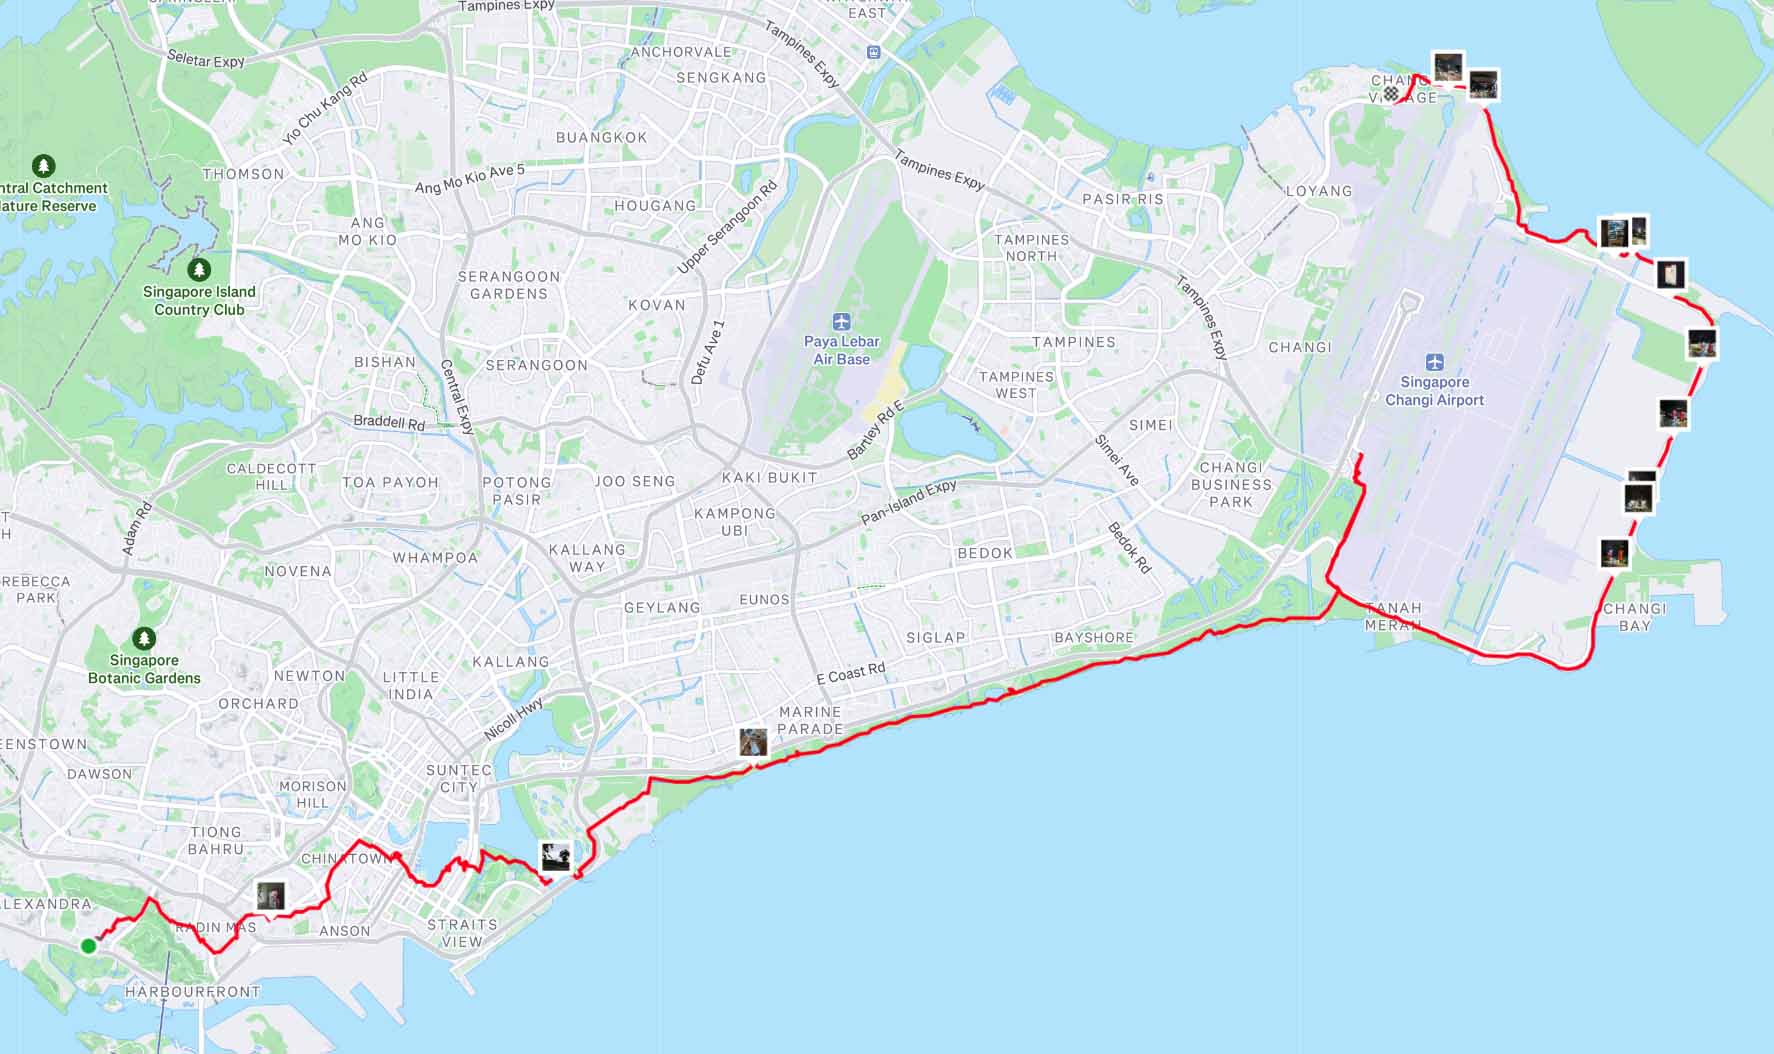
50 km Overnight Hike: City to Changi Airport to Changi Village … Made possible by Mastodon! 👍